|
PREVIOUS MISSION THIEF
2 Mission 15: Sabotage at Soulforge [This
report has recently been verified with TFix/NewDark 1.27. Although the original text for OldDark has been preserved, any situations affected by
these patches are discussed in green. Keep in mind that there is a difference
between playing the game in NewDark with or without
TFix. TFix updates the
core mission files, as well as applies .dml files
that tweak the environment in numerous ways. These changes aren’t supposed to
have a significant impact on gameplay, but when ghosting, slight changes
could occur. If wanting as close to the “vanilla” experience as possible,
install just NewDark, without any further patches.
I have ghosted the game 1) in OldDark, 2) in plain NewDark, and 3) in NewDark with
TFix.] While not the best mission in the game, ‘Sabotage at
Soulforge’ stands out to me as a good end to a
decent campaign. Thief 2 has 5-6 great missions, while the rest are par for
the course or worse. 3-4 of them are absolutely terrible. This mission
separates itself as being different, and different in a good way, something
the designers didn’t dare try as much as they should have. I really enjoy
exploring through Soulforge Cathedral, the ultimate
creation of this mechanical faction. Overall
score: 8.3/10 Viktoria
had already made her way into the cathedral, and I was left alone to stop Karras. My main objective was to redirect his servants
back to Soulforge Cathedral. I needed to find information
on how to use the guiding beacon in order to accomplish this. My tasks would
get more specific then. I wasn’t to let Karras in
on my plan, an objective I still don’t know how to fail. Lastly, I had to
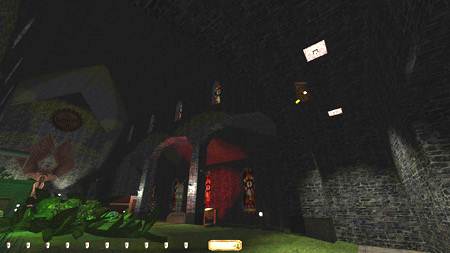
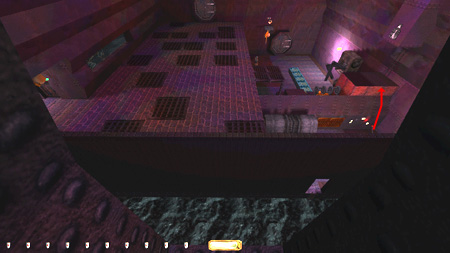
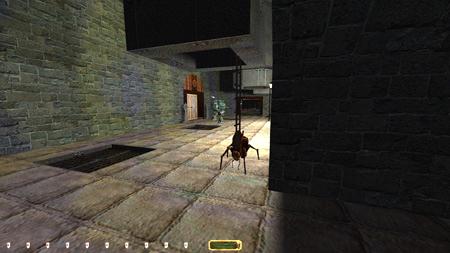
leave the cathedral in one piece. Unfortunately, my Ghost run was busted the
very second I started (left image below). I definitely think the watcher is
intended to spot you, as a way to make Karras’
announcement seem deliberate, but that doesn’t prevent the bust. I tried
buying an invisibility potion, but there was no way to get to it in time. It
seemed like the camera started in yellow, but it always made the second alert
noise and turned to follow me; clear signs of detection. Like with ‘Trail of
Blood’, I do think the original archived community assumed the exception, but
I don’t. I was still intent on Ghosting (or even Supreming)
the remainder of the mission though. Some players might disagree, but I have
a much easier time accepting these kinds of busts than the ones where I feel
there might be a way to avoid it. [UPDATE
7/24/21: Galaer found a way to avoid this bust! If
you buy an invisibility potion during the loadout screen, you can quickly use
it as the mission starts and get away with not even first alert. You have to
set the potion to a hotkey in the controls first, in order to pull it up
quick enough. Keep spamming the potion and use keys as you start the mission
and you should be fine. Buying and using the potion are still busts to
Supreme, but this is a massive improvement on previous runs.] The mission didn’t have any loot or
pickpockets, so I added the extra challenge of trying to steal all the gear,
including all the production resources spread around the compound. My goal
was also to manufacture the three secret weapons, thereby visiting all the
machine bays. I would skip the infamous quote scroll, as it involved killing
several combat bots. Parts relating to the stealing
of gear will be marked in blue, as it is unnecessary for plain Ghost and
disallowed (and thus skipped) for Supreme. Machine
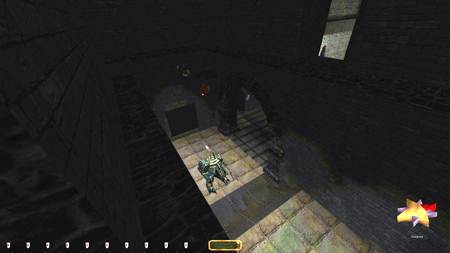
Bays I could move quite freely around the
machine bays. Some areas would occasionally get crowded, but the patrollers
had routes long enough to easily wait them out. A watcher and a patrolling
bot forced me up a ledge in the east (right image above). I had to pass this
area in order to get to the storage rooms and retrieve the required items for
the guiding beacon. Got new objectives in the plans room that specified
guiding beacon production and deactivation of 7 out of 8 signal towers.
Revealed the secret study by mantling up the end of the open safe door.
Didn’t have to use a vine arrow that way. It wasn’t retrievable without
taking damage anyway. Opened the northern apse and left the study open. I
would return to close them both later. Initially I thought I had to circle the
entire area counterclockwise to return to bay C. The aforementioned ledge
around the watcher seemed too high up to warrant a harmless drop. But I found
an efficient way to drop onto the staircase railing safely. Hitting the wall
just before landing kept me unharmed. This sped
things up considerably. I could now move straight back to the starting area
and begin assembling the beacon. The entire assembly process was carried out
with no trouble. Had to be careful in bay A as the bots here were on high
alert due to the scattered mech bodies. Bay B/C had
a dangerously roaming spider bot. I only moved when it had its back turned,
just to stay on the safe side. Took the secret tunnel to bay D. Was careful
to listen for alerts when producing the beacon pieces here. The blind bots
alerted to the thumps of the objects exiting the machines. The 3 water arrows in the pool here couldn’t
be obtained without a comment from the stationed iron beast. Skip these if
you wish to stick to Supreme rules.
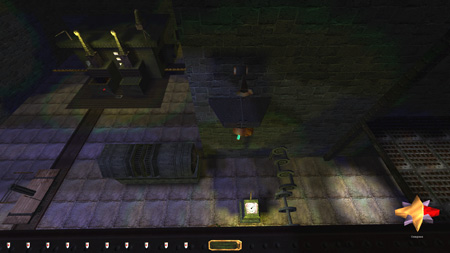
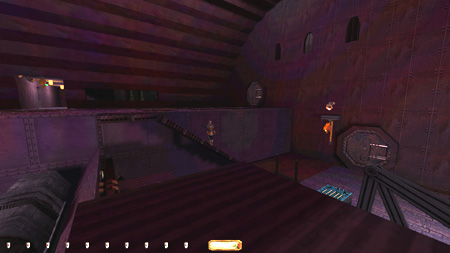
Entered bay E through the overhead walkway. Hopped onto the north camera
overhang and furthermore onto the generator (left image below). Reached the
production machine this way. Left through the secret panel. Reset
the plans room immediately after installing the finished guiding beacon. I
like to get things done right away. Signal
Towers The frogbeast egg among the foliage
outside the west entrance to the barracks couldn’t be stolen without multiple
first alerts. I had to douse the nearest torch also. Accepting those Supreme
violations, I could rush into the grate alcove and lean out from the shade
(right image above). If you don’t care about using the arrow, be my guest. I
don’t use eggs, I just wanted to see if it could be done. I
had no real problems until the underground exploratory inventing workshop. A
watcher guarded the conventional entry in intimidating fashion. I could turn
off the lights to pass it, but that was against Supreme rules, plus I found
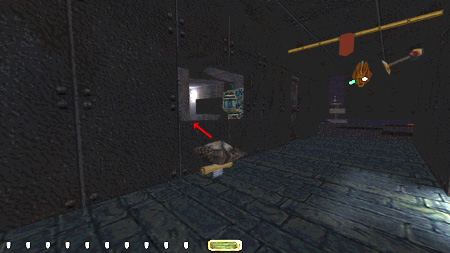
another way around. I could drop into the water from the upper hall to the
north (left image below). The lone mechanist stationed on a ramp below didn’t
alert. I could mantle up the metal wall to the chute ladder without any
comments, despite my light gem going red (right image below). This area was
also out of view of any of the cameras. The mantles were tough and had to be
done close to the west wall. Check the red arrow in the left image. The first
mantle was up the metal slope. I had to let go of the jump key before
completing the move, to avoid the typical “clunk”. To get further up without
making noise I had to crouch-run, then mantle again. I heard no remarks,
although it was tough to tell over the generator. I could only tell whether he said something, not what he said. If I heard him talk, I
reloaded and tried again. I set the ladder option to ‘touch’ and climbed the
signal tower. To slide back down to the lever side I leaned out and shot a
vine arrow into the carpet. The vine ended up hanging down onto the slope. I
inched over and Garrett caught hold with a small jerk. From here I could turn
around and back up slowly to descend. As I reached the end I slid down and
grabbed the rope in the process. Nice to get out of that one clean! The room with the patrolling iron beast in the same workshop
couldn’t be reached without turning off the lights. The door was protected by
the aforementioned camera and the window couldn’t be mantled. I didn’t find
useful stackables either and wasn’t in the mood to
search. If you want the goodies in there, go ahead and kill the lights. Then
it was easy enough. To avoid a chirp (first alert) from the watcher, however,
thing got more complicated. The doorway was too bright to be utilized, but
the adjacent window was dark. Jumping into it was possible, but not without
the watcher alerting. There was only a tiny flicker in the light gem, but
that was enough to receive the first alert. The only way to avoid it was
creating a stack of six scrolls and one explosive charge (left image below).
Then I could slide onto the sill and out of view.
The tower in the computer room to the far
southeast wasn’t a problem. It was only a matter of dodging all the iron beasts
and flipping the gate levers. The tower just to the west of this was harder
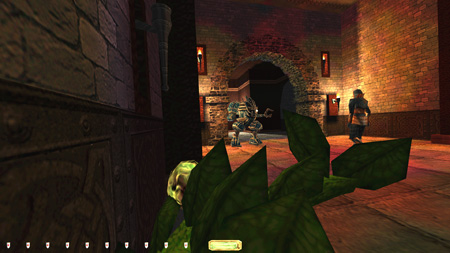
still. A stuck spider bot outside the chapel (more on him later) made access
to the metal rafters difficult. It blocked the way to the intended chute. I
had to use an alternate way via the tunnels in the abovementioned computer
room. Once there, a watcher covered a lit-up portion above the second water
tank. Choosing the right moment, I could strafe-run past the two lamps and
come to a halt as it swung back to face me (right image above). Luckily, this
spot was dark enough to avoid alerts of any kind. There wasn’t much time to
spare and maximum speed was of essence. The iron beast stationed by the
elevator didn’t detect anything going on atop the rafters, and I could safely
make my way to the signal tower. I used a vine arrow into the ceiling grate
when returning. Plunged into the tank and climbed over the edge while
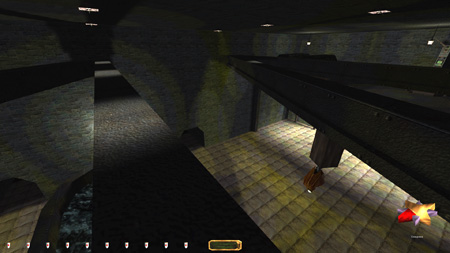
monitoring the camera. The hall outside the chapel was the access
point to the remaining two towers. Unfortunately, the previously mentioned
spider bot was still stuck (left image below). In fact, I have never played
this mission and not seen something getting stuck there. You cannot rush into
the south opening and avoid hunt mode. You can get by with backtracking and
dousing a torch outside the barrack’s main entrance, but that busts Supreme.
The trick to solving this problem with Supreme intact is finding one of the
three other robots patrolling the same route. To my knowledge, two other
spider bots and an iron beast do exactly that. There might be a mechanist or
two that also venture down there from time to time. Anyway, the robots have
set paths with random pivot points in certain locations, making their routes
semi-predictable. If studying their patrols, you can learn the locations of
the pivot points and quicksave right before they
reach one. If the robot turns and you didn’t want it to, simply reload and it
might not turn the next time. If you follow one or more of these robots all
the way to the chapel, they will eventually end up at the same ladder as the
stuck spider. Once that happens, both will get freed due to a programmed
response that causes both AIs to shift laterally, thus rounding the ladder
altogether. In my case, all three robots found themselves in bay A, forcing a
rather lengthy addition to the playthrough just to
deal with this problem. Once found, I had no trouble following them to the
chapel and freeing the other bot as explained.
The barracks had one troublesome item; a healing potion in a pickable footlocker. It was in a brightly lit area
straight out from another pivoting watcher. The closest place to wait was in
a dark alcove in the northeast (right image above). From here I could make lockpick-runs while the camera swung west. I needed three
such runs to undo the lock and get the potion. The
last towers went by worrilessly. Used the passageway
from the trap-maze tower to bypass the furnace room with all the wandering
mechanists. This saved me quite a bit of work. Utilized the shades carefully
to bypass the cameras and the iron beast to reach the tower across the pit. I
did give the turret production facility a wholehearted shot. I just couldn’t
pass up a room that intimidating without a fight. Sneaking along the most
shaded route I could find, I actually made it quite far. Farther than I
thought at least. The last walkway towards the tower itself ended up being
the end of me. The image below shows the sweet spot before getting nailed by
the turret on my left. As you can see, I even got the tower gate open. If
property damage had been allowed, I could’ve easily downed two of them. One flinging
a scouting orb into the hydraulic press button, and a fire arrow into the
explosive charge on the workbench. But none of that matters much. It was fun
trying anyhow. I’m not sure how to interpret turret alerts, but I counted a
turning noise as a first alert, then a shot as a Ghost bust. For unknown reasons, with T2Fix you can’t even sneak
over to the first doorway without getting spotted. The entire area is much
more brightly lit because there is a lamp just above the first speaker which
was never there in the original release.
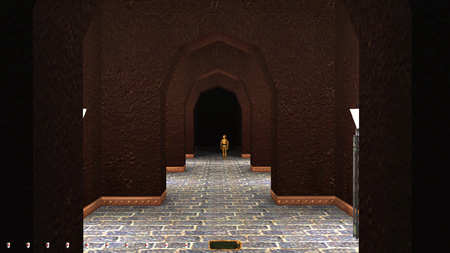
The last skipped area was another machine room close to the
chapel. It was guarded by a golden child staring straight down a long,
brightly lit hall (right image above). There was no way to circumvent him,
not even by waiting for him to fidget. He idled differently compared to his Angelwatch counterpart. With T2Fix, the golden child now does a small patrol
back and forth, which makes you able to sneak past him. Another example of
ridiculous decisions made by modders. The changes
observed in my NewDark playthough
have actually made me abandon all patches and fixes for future playthroughs, unless they are guaranteed to only fix game breaking bugs. There
were no real issues leaving the compound. Several bots had gotten stuck in or
near bay A, but nothing I couldn’t sneak past. Overall, I Supreme Ghosted the
entire mission bar the watcher in the beginning. If you excuse that bust,
then this mission is Supremable; though I’m always
too hard on myself to allow such justifications. With that, Thief 2: The
Metal Age is done and I’m off to pilfer some fan mission. See you next time! Statistics: Time: 2:31:16 Loot: None Pickpockets: None Locks Picked: 6 Secrets: 4 out of 4 Damage Dealt: 0 Damage Taken: 0 Bodies Discovered by Enemies: 1 Consumables: None Ghost: Chemical success! Perfect
Thief: N/A Supreme
Thief: Failed! Perfect
Supreme Thief: N/A (Norwegian Thief: Failed!) Notes: -
Had to buy and
use an invisibility potion in order to avoid detection by the starting
watcher. Supreme busts. Renders the run a chemical success for regular Ghost. -
Skipped
the quote scroll in bay A, as it involved the killing of three iron beasts. -
The
three water arrows in bay D couldn’t be taken without a comment from the
nearby stationed iron beast. It heard the splash when entering the pool. -
Getting
the frogbeast egg outside the west barracks
entrance necessitated the use of a water arrow. I also received several first
alerts in the process. -
The
flux spheroid and the spring wiring in the exploratory inventing workshop
couldn’t be obtained without shutting off the lights. After that, no further
busts were necessary. -
Couldn’t
retrieve any of the items on the turret production facility workbenches.
There was no way to get within reach safely. -
Skipped
all the items in the machine room beyond the golden child close to the
chapel. He covered the only passable area. -
The body
discovered is one of the destroyed iron beasts in bay A. These are already
present upon starting the mission and naturally no bust. |
|
|