|
Thief 2 - WHAT LIES BELOW To
get a changeup from all the classic fan mission lately, I decided to give this
re-release from the 2006 Water Contest a go. Awaiting Yandros’ release of the
epic Death’s Cold Embrace (hopefully in 2015), I knew the quality of his
work. So when this NewDark version hit the table, I just couldn’t resist. And
I’m glad I didn’t. What Lies Below shows you exactly what lies below; an
eerie, atmospheric, ambience-rich sewage system, superbly engrossing, making
you forget about life for the duration. Clever secrets, some ingeniously
crafted gameplay elements, and scares out of the top draw solidifies this as
one of my favorite missions of the year. I
had been contacted by the resurged hammerite order to help them retake the
Old Quarter cathedral, long since overrun by hordes of undead. Due to my
ability to spot keeper glyphs, I’d been asked to make my way from sewage
sector 12, through a reservoir system, to sector 15. There I was to remove a
seal that would grant the hammerites access to the cathedral crypts.
Thereafter, I had to find my way out through sector 9. No loot requirement and
nothing else to steal or destroy, as of yet. Sector 12 The
looped audio of the hammerite-undead clash in the streets was cool, but
quickly got repetitive and a bit frustrating; I had trouble hearing the
haunt’s alerts over the noise. I got used to it after a while, but it made me
have to reload more times than I expected. The haunt on the west bank was my
greatest worry. The fog made me unable to see him past 20 feet or so, even
though he could see me like normal. He also heard me lockpicking the storage room
door from across the canal. I had to time his patrol for me to get in there
unheard. Tricky to detect alerts through the windows in any of the rooms
also. Leaving the doors open was the best bet, in order to listen for
potential first alerts. I loved the background tune for the readables.
Calming and creepy at the same time. Those small touches that makes missions
stand out. Some
well-hidden coins on a sill outside the power room. The toughest piece of loot
by far was the mask in the ceiling nearby (left image below). I had to resort
to a hint or two in the forums to find it my first time around. Once you know
about it however, it’s a piece of cake. It was entangled in a spider web, so
I had to use a broadhead to get it down. Supreme doesn’t disallow arrow use
for those things.
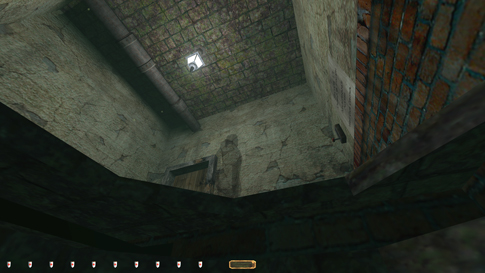
Passing
the haunt to the north got a little tricky. There was a spot in the northwest
corner though where I was safe from both patrollers (right image above). From
there I simply followed the haunt and quickly pressed the glyph leading into
the offices. I
flipped the gate lever but skipped taking the gate room key under the desk.
Instead I made my way back the way I came and traversed to the gate by again
dodging the haunts. It just seemed less messy, as you have to return the key
for Supreme and it couldn’t be replaced back under the desk. Taking it
wouldn’t have been a bust, but if I could avoid moving it, then that was
desirable. Sector 13 Utilized
the secret keeper cache to dodge the initial haunt here. He had a difficult
patrol path, especially due to making random 360 flips now and then. I guess
the narrow walkway sometimes forced him outside his assigned route. I hid in
the southeast corner and let the haunt pass. For some reason he didn’t first
alert when patrolling west, but coming back he always gasped. I could just
pick the lock to the office when he was off towards the west however. Slipped
inside before he saw me. Loved the scare that came after also. Raised the
sluice in the gate control room and return the crossover station key. The
sluice control box couldn’t be operated again, so no need to close it. The
northern part of sector 13 wasn’t that difficult. Two enemies, of what seemed
to be the mage/priest apparition type, though I can’t be sure. One patrolling
in the west, the other stationary in the east. My goal was to get back to the
south through the east sluice, which involved opening both maintenance access
gates. These were operated by levers in the west and east maintenance control
rooms. Getting into the west control room and plunging down the maintenance
hatch was the largest problem. The apparition had that room as part of his
patrol and every other time he stayed there for a considerable period of time
(left image below). During that time I took the loot pieces in the water and
waited for him on the bank to the north of the door. Diving into the water
through the hatches didn’t make any noise, so I didn’t have to worry about
alerts there.
A
total of four single coins were scattered along the bottom between the two
maintenance gates. They were devilishly difficult to find, even when I knew
their locations (right image above). Their frob distance were set so low I had
to be directly on top for the coins to light up. I also couldn’t pick the
lock on the east maintenance door, as the stationary apparition outside gave
a first alert. Instead I emerged past the underwater gate and headed through
the recently opened sluice. Now
I could open the gate that joined the entire crossover station, being careful
not to alert the haunt from earlier. I also found a glyph outside the
drainage control room that opened a ceiling grate inside. I then backtracked
through the maintenance pipes in order to close both hatches; remember, that
is required for Supreme Ghost. Finally I utilized the glyph of concealment in
the first keeper cache (left image below) to enter the drainage control room.
Sector 14 Two
problems in this area. First, I had to time the drop from sector 13 so that
the patrolling haunt below was stationed by the balcony in the east. He had a
route that took him back and forth between said balcony and the west
reservoir. There were two impassable gates along his route that he magically
walked straight through. Timing the drop was just a matter of waiting a few
extra seconds in between each reload until I got it. No big fuss in the end.
However, there was no way to reclose the drain grate which strictly speaking
is required for Supreme. The control box still worked, so functionally
speaking it was closable, but there was no way to get back up there while
still ending the mission. I counted this as a bust to the Supreme rules,
although it did seem a bit silly. The
second, but bigger problem was brother Reginald. He was roaming behind the
office door in the southeast. There was a glyph outside that opened the door
after a few seconds. This calmed him down from a frantic beating at the door
to a regular stationary apparition (left image below). Problem was, now I
couldn’t enter without getting caught. Instead I utilized another hidden
keeper hallway accessible from the office control room below to enter
Reginald’s office from the back (right image above). From here I could
reclose the door and grab the valve key without getting spotted. There was a
glyph on the wall that would kill him but that would’ve been a clear bust to
me. I simply descended the ladder again and drained the sector 14 reservoir
using the newly acquired key. Luckily, it disappeared upon use. All the while
I had to watch the patrolling haunt for alerts. He detected any door opening
or closing while he was close to the reservoir fence. Closed
the double gates by re-flipping the levers in either gate control room.
Flipping one automatically flipped the other. Ran out as the gates were
closing. This of course made it impossible to return, even when the undead
were gone later.
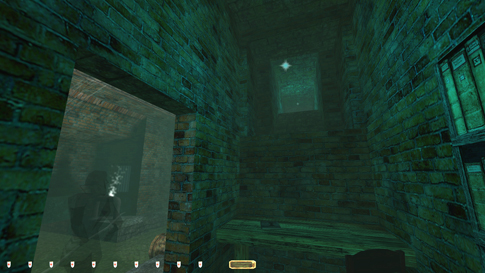
Sector 15 This
was the most heavily patrolling section in the mission. Three priests covered
the sewer banks. Two patrolled a longer, circular route, while the third had
a small back and forth patrol by the entrance to sector 14. All I needed to
do to evade them was getting into the machine room (right image above). The
door had a fairly difficult lock and was in view of all three priests. I
waited as in the picture above and followed as an apparition came by. The
timing had to be so that the priest with the short patrol was stationed out
of sight as I got to the door. I usually got a few seconds worth of lockpicking
in before having to return to the above spot. It took about 2 or 3 rounds of
this before the door was open and I was safe. I
could now access the skyway (left image below) and stay out of view of all
enemies. Since I couldn’t turn off the ceiling lights for Supreme there were
areas where I could be seen from below, but watching the patrollers carefully
I avoided their gazes without too much trouble. One patroller got stuck in
the water and it actually turned out to my benefit. Normally I’d reload but the
last hardsave was too far back to bother.
Cathedral The
hammers always wont he fight and there were always 8 of them in the cathedral
crypt afterwards. A few players have noted various outcomes of the fight, but
I never experienced this. I ran the fight 5 or 6 times and then called it a
good day. My biggest concern was the hammer haunt closest to the ladder
leading down (right image above). He always gave a howl as I dropped onto the
rungs. By accident, however, I managed to get down without any alerts.
Repeated the maneuver twice, so it’s definitely a legal move. I was
crouch-walking off the edge onto the right part of the ladder each time I got
it. I know Supreme was already busted, but I like to eliminate all the busts
I can. Snuck
through the room easily enough. Had to drop the Necronymus straight into the
water not to get caught. If it hit the side of the tub, the haunts all heard.
Used the potion on the corpses afterwards for the bonus objective. Returned
all the keys and shut off the skyway before ending the mission. Nice to get
away without a single first alert. Too bad about the grate in sector 13 that
couldn’t be closed. Statistics: Time: 1:01:11 Loot: 1085 out of 1085 Pickpockets: None Secrets: 3 out of 3 Locks Picked: 5 Damage Dealt: 0 Damage Taken: 0 Consumables: 1 Broadhead Arrow (to get mask in
ceiling) Ghost: Success! Perfect Thief: Success! Supreme Thief: Failed! Perfect Supreme Thief: Failed! Notes: -
Couldn’t close the sector 13 drainage grate. I had to
open it to leave and there was no way to end the mission if I went back to
close it. Strictly speaking a Supreme bust. |
|
|