|
The Black Parade - Mission 7: The Long Shadow Falls This
is an absolutely astonishing mission. We rob a gorgeous, Victorian-style manor,
guided by a plethora of objectives and a captivating story. I never thought
I’d even see the fall of DeWall’s empire, let alone
take part in its completion. One word of caution though: This mission is
hard! Tiled floors, plenty of cameras, numerous patrollers, copious electric
lights, you name it. Yet, it still offers a plethora of ways to complete your
tasks. Well done, Feuillade Industries! It
was time to take out the big guns and bring down DeWall
himself. I had to frame him by leaving the body of a hammerite
priest in his turture chamber. I also had to steal
his ledger and 2,400 worth of valuables. Furthermore, I need to take back St.
Graimal’s chalice and Aldrius’
Demise, by swapping the latter with a replica. The remaining objectives were
already required by the ghosting rules. Getting Inside I
did not take the sewers leading to DeWall’s
basement. Doing so forced two unnecessary lockpicks,
both of which could be relocked, but that meant picking the key off one of the
basement guards and leaving it on his patrol route. Way too messy for
Supreme, especially when avoidable. I could also have used the other sewer
exit and entered via the front yard, but I felt that left me a bit too
exposed. Plus, I wanted to bring in brother Berthold right away, so I needed
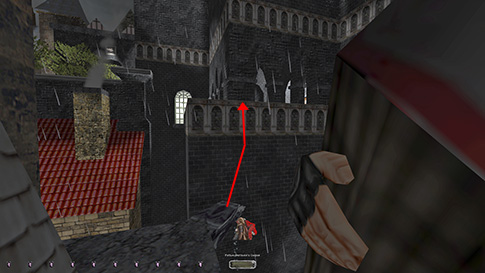
an entrance that was close to the basement. Thus, I used the ledge on the
north side of the tower close to the starting streets. I could quite easily
jump across to the northeast balcony from here (left image below).
Before
heading inside, I climbed the scaffolding and cleaned the attic. This
prevented another lockpick on the second floor
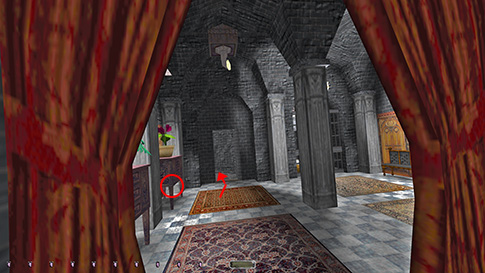
closet door. I then brought the corpse with me and left it in the basement
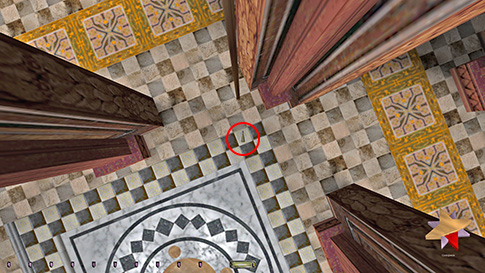
torture chamber. This level was not difficult. I emerged from the basement
above the family crypt to the west. There was a camera here, so I took the
secret passage and headed to the second floor (right image above). Foyer & Aldrius’
Demise Looted
the guest rooms in the southwest without problems. I used the lightning
strike to get the two vases atop the foyer stairs. This was a one-time event
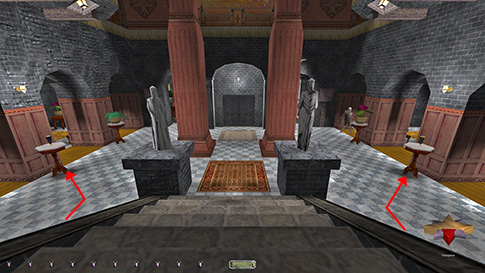
that took out the power for a few precious seconds. About halfway down the
bottom flight of stairs I could stay fairly hidden, and this was the best
place from which to approach the two next vases on the downstairs foyer
tables (left image below). The only patroller that headed up the stairs was a
nobleman, but he had a fairly lengthy route. Dropping to either side of the
stairs kept me completely hidden, and this was out of view of either camera.
When the coast was clear, I could crouch-run over and grab each vase with a
lean, then quickly head back to the shade.
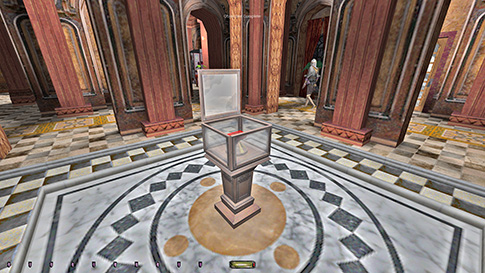
In
order to get Aldrius’ demise, I had to turn off the
alarm. The periscopes I could leave on, in order to avoid an additional bust.
The alarm was linked to the glass case, which had to be opened to both get
the gemstone and replace it with the replica. I took the security key off the
guard captain and approached the security office. The outside guard luckily
had the runs and kept frequenting the restroom. While he was away, I could
sneak around the corner with the camera and hide in the office doorway (right
image above). The next time he ran in there, I followed and hid in the
shadows behind the door. After he left, I grabbed the loot and snuck out when
he entered for a third time. Had
to time this guard again, as well as the guard captain when turning off the
alarm. It was off for 5 minutes, but luckily turned back on automatically;
thus, I didn’t have to revisit the security office. The best way to avoid the
cameras was to descend from a rope arrow into the second floor ceiling,
southwest corner. The rope wasn’t long enough to reach the floor, so I
dropped a healing potion before reaching the bottom to cushion the landing
(left image below). I had one in my starting inventory. If timing the
patrolling guard, I could replace the gemstone within a couple of seconds
(right image below), then scoot into the south gallery. Got the loot here
plus the guard’s purse, before climbing the rope back up. Really fun to do
all this completely unseen, despite the initial Supreme bust. I had
previously made sure not to
trigger the conversation in the family museum, as this would’ve sent an extra
patroller into the room above the gallery.
The North Hall Diamond Cleaned
the family museum and sitting room by the pool easily. The camera outside the
security office couldn’t spot me at the far north end of this corridor, so I
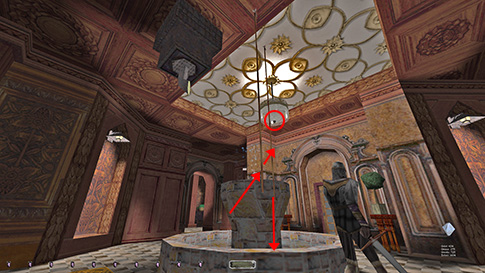
could head down the stairs to the first floor hall. Here came the most
difficult piece of loot in the mission; a diamond in a chandelier above the
fountain (left image below). For regular Ghost, it was easy, as I could just
turn off the camera. For Supreme, not so much. I was adamant I was going to
obtain all the loot for that mode, despite the already busted run. This one,
however, was a real challenge. The
camera pivoted southwest to southeast, and it was positioned a little bit
above halfway up the height of the room, not very close to the ceiling. This
meant it didn’t have any real blind spots above or below its trajectory.
There was also a patrolling guard on this floor, who thankfully left the room
both west and east during each loop. This gave me 5-10 precious seconds to
work with each time. Realizing that the entire ceiling was rope attachable,
including the white marble-looking topmost portion, helped focus my attention
on using ropes. It was possible to climb a rope and seek hardcover above the
wooden lip just south of the camera, but this was out of reach of the
diamond, and didn’t leave any good way of getting back. Since the camera
pivoted southeast, aiming to take the diamond perpendicular to that angle (in
other words southwest) gave me the best chance. In order to save time when
climbing the rope, which is a notoriously slow process, I was hoping that jumping
from one rope to the next might boost the process. Experimenting with rope
placements, I found the spot farthest away from the camera where the diamond
would highlight if I was on the rope at the same height as the lowest part of
the chandelier. See the farthest rope in the screenshot below? It’s attached
in the middle of the white portion between the flower decoration and the gold
lines to the left of it. The other rope I attached into the lower wood,
pretty much in a direct line behind the first, so that I could jump from one
to the next without having to change angle. After a lot of trial and error, I
learned at what time in the camera’s pivot cycle to go for the first jump,
then just wait a fraction of a second and jump again. Sometimes when reaching
the second rope, I would shoot up a few feet closer to the ceiling. This was
not good and required a reload. About 25% of the time this would happen. I
also learned what angle to have so that when I reached the second rope, the
diamond would pretty much be in direct view and highlight immediately. I
managed to get the loot plenty of times, but when turning around to jump back
to the rug, I always got caught. Hume’s body turned whenever I spun on the
rope and this took my body further into the room, directly in view of the
camera. I probably tried this move 60-70 times and always with the same
result. Then it dawned on me: What if instead of turning around on the rope,
I just hit crouch and come off the rope immediately after taking the diamond,
and then turn around to jump once on the ground? My instincts told me this
would be too slow and I would get caught, but it seemed not spinning around
on the rope left me with enough extra time before the camera’s view now
reached me, that I could scoot over the fountain’s edge and back to safety!
YES!!!!! Sweet, delightful gemstone!! I then repeated the jumps to retrieve
my arrows, though I had to wait another patrol cycle to do so. I must admit,
it has been a long time since it felt this good to get a single piece of
loot. But oh how fun it was!
Cleaning Up Following
this, I cleaned most of the northern part of the first floor. The ballroom
and game room were tense, but didn’t pose any real issues. Headed up the
staircase and went for DeWall’s. After getting his
key, I focused on raiding his study. Its door was pickable,
but since DeWall’s key relocked it, I had to do so
for Supreme. Returned it right away, as this was the only use I had for it,
besides opening his safe of course. All the other doors it unlocked could be
circumvented. Exited this floor via the greenhouse. The
most difficult part of the first floor came in the southwest. A purple vase
in a room next to the main entrance, plus two candlesticks in the chapel had
to be reached. I could’ve taken these coming from the basement earlier by
dodging the camera, but that would’ve required picking the lock on the foyer
gate and then returning to relock it later with DeWall’s
key, which was a lot of extra backtracking for Supreme. Instead I managed to
cross the main entrance staircase by timing the guards. It probably would’ve
been easier (but not easy) to cross the main foyer directly. Regardless,
there was a convenient dark wall in the chapel where I could hide and wait
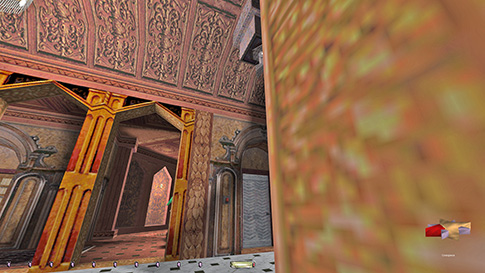
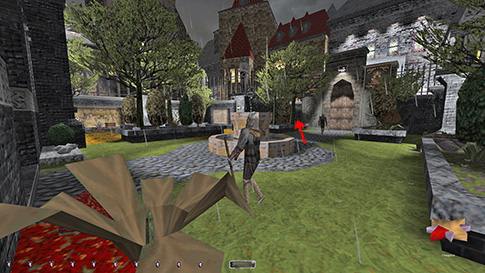
for the patroller to pass. Out the door I had to make it across the tile and
drop into the dark flower beds below (right image above). Then I circled the
yard counterclockwise along the edge and left via the hole in the fence. What
a masterpiece of a mission! Statistics: Time:
1:32:25 Loot:
3624 out of 3624 Pickpockets:
8 out of 9 Locks
Picked: 5 Damage
Dealt: 0 Damage Taken: 0 Consumables:
None Ghost:
Success! Perfect
Thief: Success! Supreme
Thief: Failed! Perfect
Supreme Thief: Failed! Notes: -
Had to turn off
the alarm in order to obtain Aldrius’ Demise.
Supreme bust. |
|
|