|
Ruins of Originia - Mission 3: Fire and Ice Definitely
the weakest mission in the campaign so far, but probably not as bad as I’ve
heard some players describe it. It’s repetitive and confusing yes, but I still
find it enjoyable. It’s not often you have a mandatory objective to kill
every enemy in the mission, but that’s the case on expert difficulty. For me
who is a consistent ghoster, it offers a nice
changeup. I’d say give it a chance, but I understand those who choose to skip
it. I
basically had to kill all 33 burricks and then head
for the exit to the east. That was it. My motivation really wasn’t there to
try to avoid alerts from the burricks, when they
were all going to die anyway. It’s one of those rules I disagree with,
especially when no other enemies exist in the mission. However, I was gonna give it a shot. None of them could be blackjacked
or gassed. Most of them died from an unalerted
overhead swing. The lava burricks also perished (or
solidified) from a direct water arrow shot. Ice Caves The
opening cave was a foregone conclusion. A bust no matter how you look at it.
The normal burricks to the west were the hardest.
They heard every little sound, plus they took more than the usual damage to
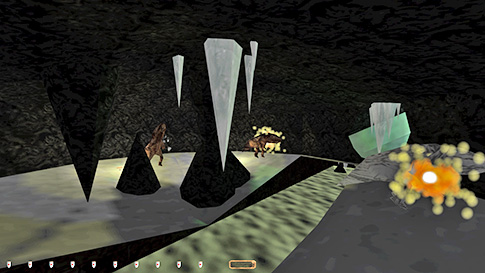
kill. I found mines to be the best. I could toss four of them across the
river, two at each of their feet. Then one more mine over to the frost burrick. With a bit of luck, none of them started a hunt
maneuver before they got killed, plus all of them died less than one second
apart (left image below). That seemed the most concealed and undetected way
to get out of the first room to me. Of course, if you haven’t brought along
the mines from either of the first missions, you’re out of luck. In that
case, pull out your sword and get to work. From
here, I first headed down towards the large ice cave. On my way I took out
another frost burrick using a mine. That was the only
way I found to one-shot it. It was the only small frost burrick
that didn’t die with a single overhead swing. Down below were three huge
frost burricks. They had different amount of hit
points. One of them needed two overhead swings. I couldn’t use mines here, as
the other burricks would hear it. Then there was a
tall, but shortened frost burrick. It looked like
an oversized frog. It only needed a single swing. The final one in this cave
needed four overheard swings. I had to chase him around after the first two,
which felt very unstealthy. Oh well.
The
rest of the ice caves was just about finding the remaining 14 frost burricks and killing them without alerting anybody else.
Four burricks patrolled in two pairs, which was the
toughest to deal with. One of the pairs I had to inch closer to and use the
engine’s distance shut-off to trigger only one to patrol. That way they got
separated and could be dealt with. The other pair I blocked the backmost burrick on a narrow ledge above the big ice cave below. I
think Galaer reported using a similar method. If
reloading, the burrick ended up patrolling into the
wall until I saved/reloaded again, so I could use that to create distance. Prison I
had to pick at least two locks to get through the prison. On the western
side, the northern cell was the only one that didn’t trigger an alert from
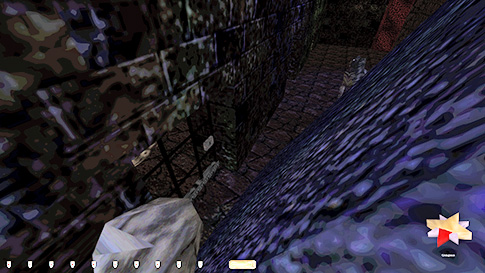
the nearby shadow burrick. I had to climb the east
side of the coal piles in order to approach the burrick
from behind (right image above). Coming from the flooded caves to the south
was pointless; shadow burricks can see you in the
dark. Luckily, one overhead swing was enough to down it. Lava Caves The
lava burricks was easier to deal with for two
reasons. One, they died from a single water arrow. Two, they turned to stone,
but didn’t register as a dead body to any of the other burricks.
The problems were they illuminated a certain radius around them and were thus
difficult to hide from in narrow caves, plus they easily heard the splash of
the water arrow if close by. The first three burricks
I encountered by themselves, so they were easy to take out. The last three in
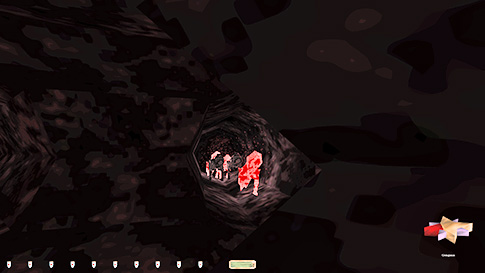
the upper caves patrolled together. In order to split them up, I first killed
two burricks in the same tunnel right next to each
other. It was close to a four-way junction in the northeast. This made the
three patrolling ones have a difficult time getting past the stone carcasses.
One usually got through quite fast, leaving the other two behind (left image
below). After it got away, it was easily dealt with. To split up the other
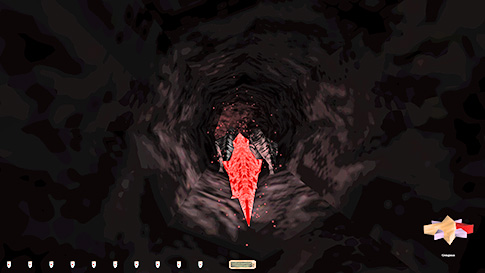
two, I made a longer loop around and approached them from behind. With some
distance, there was a good chance the engine shut off their patrol, and when
they resumed again as I got closer, one had usually already gotten past. The
other one was left behind and both could be doused (right image below).
The
lower caves with the lava pools was much easier. All the remaining four burricks patrolled separately and had different routes it
seemed. I killed two of them in the lava, which destroyed the stone cadaver
after a few seconds. This made some noise, but I didn’t notice any burricks alerting. Galaer had a
similar experience in his report. From here, the door to the end was close. Statistics: Time: 52:45 Loot: 17006 out of 17006 Pickpockets: None Secrets: None Locks Picked: 2 Back Stabs: 19 Knock Outs: 0 Damage Dealt: 943 Damage Taken: 0 Innocents Killed: 0 Others Killed: 31 Consumables: 6 Mines, 10 Water Arrows Ghost: Failed! Perfect Thief: Failed! Supreme Thief: Failed! Perfect Supreme Thief: Failed! Notes: -
Alerted two of
the burricks in the opening cave once the mines
that killed the first one detonated. They were all killed as part of the
objective, but alerting them in the process is still a Ghost bust. -
Alerted two of
the large frost burricks in the deepest ice cave.
They needed more than one overhead swing to kill, so the first one alerted
them. More Ghost busts. -
Blocked one of
the burricks patrolling in a pair in order to kill
them while separated. Engine exploit and Supreme bust. |
|
|