|
ROWENA’S CURSE A classic, high quality,
plot driven mission from one of the best authors this community has ever
seen. The keyhunt aspect and forced damage might turn
some players off, but the story, character development and rock solid design
should make this a must play for most. Over 20 years past its original
release, Rowena’s Curse has aged better than other missions from this era,
though it does suffer from elements of backtracking and frustrating gameplay
elements. Yes, it does showcase the typical mansion-with-a-dark-secret-below
scenario, but then again, it was one of the first missions to implement it. I was tasked with
investigating the disappearance of Lord Carlysle’s
daughter Isabella. I had to find information from Barker, the catetaker, as well as Isabella’s own diary. If she was
alive, I had to bring her out through the front gates. I also had to pick up
8,000 in loot, which was over 88% of the total amount. Quite high, even for
expert difficulty. I knew this mission was unghostable from the get-go. But I also knew the busts
were tied to required kill objectives, so I was determined to try to
eliminate as many other busts as possible. Busts forced by design are a lot
easier to accept than those forced by gameplay, as there sometimes are
creative ways around them. Therein lies at least half the fun of ghosting. Entering the
Grounds The crate breaking at the
start wasn’t a bust. It was actually just a sound cue of wood breaking. I was
met with instant Supreme busts in the basement, however. First I took two
comments when picking the lock on the door. If all three guards were within
close proximity, they usually triggered off each other and second alerted, so
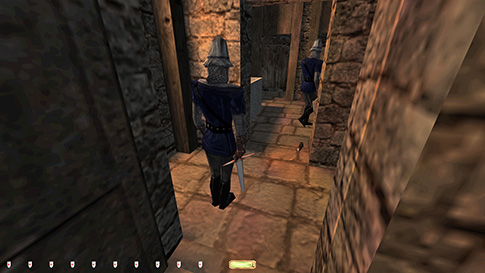
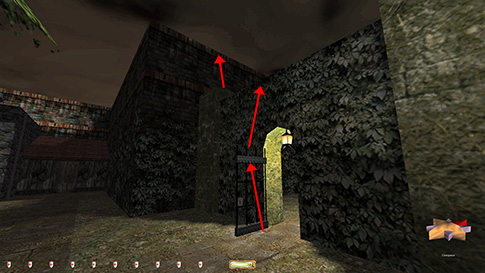
I avoided this. Then I had to nudge the stationary guard a foot or so towards
the left in order to pass by (left image below). This was allowed as a last
resort for regular Ghost. The storage room had a piece of loot that I had to
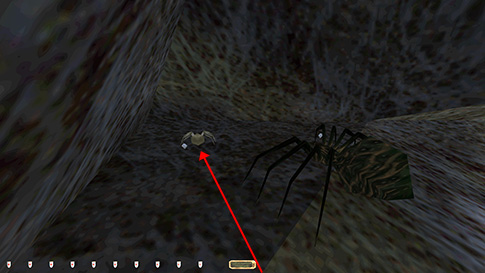
skip for Supreme. I could circle the room clockwise with no alerts, but the
closest spider heard the lockpicks on the
footlocker.
Impossible to pass through
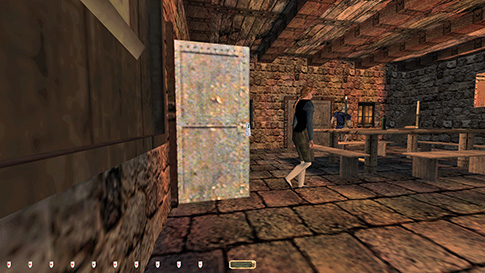
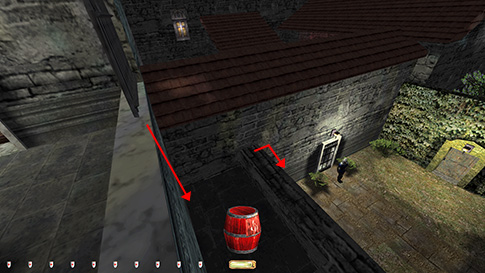
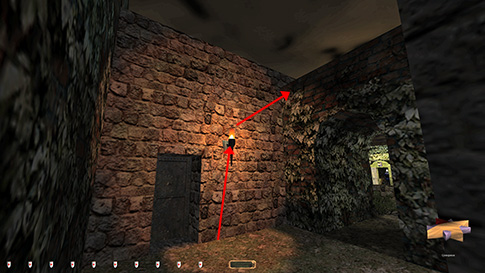
the front yard, so I was forced via the mess hall to get to the mansion. The
guard in there heard the doors, so I waited in the corner and used the maid
to block open the door (right image above). Had to have her close it too on
the way out. Getting the loot in the
kitchen for Supreme was the first real
challenge. Four pieces of loot, all at the northern end of the room. There
were three entrances, but only the southern one was viable for Supreme. The
guard in here had two facing angles; north and east. He pivoted quite
frequently, but could stay a few cycles in either direction. The maid visited
the kitchen along her route, so I could use that to enter the room unheard,
though it was more difficult than in the mess hall. In fact, I couldn’t touch
the door at all, but had to follow close by the maid and sneak in quickly
behind her back. There was also the cook, facing west over by the stove. As
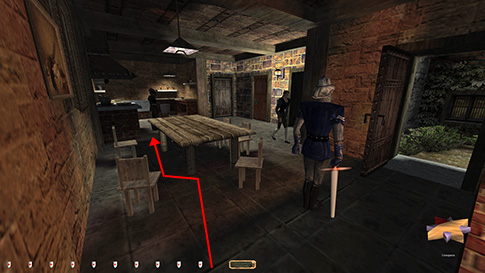
the maid left, I needed the guard to face east. He had to stay that direction
until I reached the patch of shade at the other end of the table (images
below). Easier said than done. My biggest issue was getting between the
corner of the table and the nearest chair. There was room, but not without
pushing at an angle against it. I could stand up and run to get through
faster, but then the cook gave a comment. This was tedious to figure out, but
after a lot of reloading, it was done. I could now move a bit further north
before hitting the lights, and from here I could grab the loot items in
cycles, all while the guard faced east. Getting back across the table took a
similar method, albeit with a bit more save scumming.
Had to skip the loot in Lisette’s room for Supreme. I couldn’t get to the
opposite corner without turning off the lights. For regular Ghost it was no
problem. Took the secret wardrobe exit in the cook’s room to the basement,
then used this to get to the inner courtyard for now. Main Mansion Lots of patrollers in the
main halls, plus glass doors. Carefully looted the sitting room and dining
hall. Then went to Wilson’s room to get the white room key. Upstairs was easy
to ghost in comparison. Cleaned the white, yellow and blue rooms, before
heading to the chapel. Took the red room key and left. Couldn’t get the
candlesticks in the chapel yet, but I had an idea for later. Also took the purses
from the front foyer guards at this time. Had to skip the purse in the
reading nook just east of the front entrance for Supreme. The closest guard
commented and there was no other way in there. I was surprised I could
open the red room door without Lucrethia
commenting. I could grab everything in there by maneuvering around her
pivots. I needed her garden key to proceed, but I couldn’t use the secret
chute for Supreme. A stationary guard heard the stone panel slide open (left
image below). There were two other ways into the north gardens. One was
through some pickable grates behind the basement
furnace. I don’t like to pick locks unnecessarily, so I instead used the
western door in the basement close to the wine cellar.
Garden The northwest barracks
couldn’t be entered for Supreme, so I had to skip the loot in there. That
made it 365 so far. The stationary guard heard the door, and quite frankly it
would’ve been weird if he hadn’t. To get to the accident location, I had to
climb the outer walls of the property. I used the door and the hedge just
northeast of the barracks (right image above). I doubt that move is possible
without NewMantle. I circumnavigated the
ground all the way to east of the chapel. I dropped here to get the three
pieces of loot by the pivoting guard outside the chapel doors. He didn’t hear
the secret under the staircase open, which surprised me a bit. Climbed the
hedge in the same fashion as before to get back onto the walls. Dropped into
the accident area from the northern wall next; that way I didn’t have to pick
open the door. All I did underground for
now was to get two pieces of loot and head to Rowena’s room. The Holy Sword
ordeal would have to wait till later. The falling rocks was not a trap, but
merely a cave-in and a script to force me in one direction. The Well Room After Rowena’s room I
cleaned the library. No issues there. Got the well room key, which required
me to find a way to blow open the barricade to that door in the dungeon. The
only way I knew to do that was by using the explosive barrel in the armory by
the northwest barracks. I fetched it from the basement entrance like the
before. The best way I found to get into the dungeon without nudging was via
the door in the southeast yard. I found that I could drop from the first
floor east balcony without taking damage or getting spotted. I had to inch
myself over the edge ever so slowly to avoid a comment from the stationary
guard. There were patrollers in this yard also, but their route was across to
the south. I had to be very quiet when placing the barrel, and if the guards
heard it, they usually second level alerted. From the inside hallway, I
could now get one of the candlesticks from the chapel by leaning from the
doorway. I had to block the door as the archer came out of the chapel; frobbing it made noise, just like the kitchen door.
Instead of closing it, I left it almost shut, enough for the archer to have
to open it and then shut it. Fully closing it would have triggered a comment
from the inside sentry.
Down in the dungeon the
problems arose. A stationary and a patrolling guard, and three torches. I
could get the loot items with no busts easily enough. I could not, however,
place the barrel by the bricked door without a second level alert from the
patroller. I tried many many times with no success.
I was thus forced to use a moss arrow. Additionally, I had to nudge the
stationary guard in behind the corner at the bottom of the ramp. Otherwise,
the explosion would kill him and that would fail the no-kill objective. In
order to do that, I had to douse both torches in this room. If I doused only
one, they both first alerted, but the patroller would see it put out and
comment again, setting off the stationary guard to hunt mode. If both were
out, he couldn’t see the torch doused and didn’t give the latter remark.
Silly, but that’s how it works. I used a flare to blow up the barrel, as a
fire arrow made even more noise. Both guards naturally second level alerted,
which was the first inevitable Ghost bust. Several of the guards in the front
yard also heard it and alerted. The barrel had to be pushed far into the
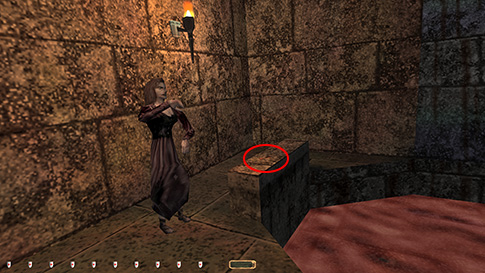
alcove, otherwise the fireballs relit the closest torch. In the sacristy, I couldn’t
get the ring from the chest for Supreme. Surprisingly, the stationary guard
in the chapel heard it, even with the door closed. Similarly, I couldn’t take
the candlestick from this side of the altar for Supreme. Closing the door
afterwards yielded another comment. That was 615 skipped so far for that
mode. I was well over halfway there. I realized I couldn’t leave the sacristy
without getting fully spotted, but the way back was blocked by a gate that
closed once inside the well room. I reloaded and blocked the gate with the
scroll from the yellow room (left image below). This was silent and easy to
return. To get back into the mansion, I used the door to the small courtyard
west of the chapel. I did take another first alert from the pivoting guard.
Elemental Rooms I ended up not taking any
of the elemental keys. It was unnecessary and would incur more busts for
Supreme. The only one that had loot along the way was the water section below
the blue room. It had six gems in two different caves. Skipping all six would
push me below the loot requirement, so I had to figure out something. A
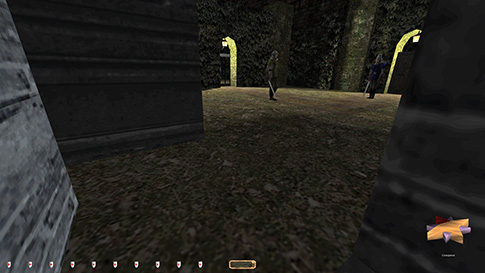
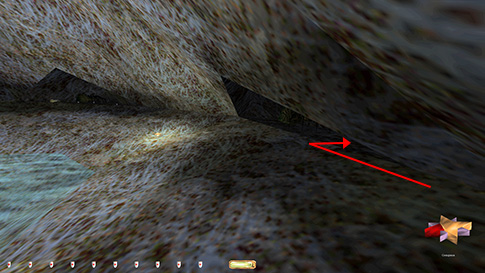
stationary green spider at the southern end of the cave guarded the entrance
to the flooded section. I could get quite close with no alerts (right image
above). However, I did not find a way past without a first alert chirp. It
was awkward, as the rock sloped in and down, so although I could lean through
without getting spotted, in order to get Garrett’s body through, I had to
move too far east. I thus took one alert going in and another one going out. The other three gems at
the northern end of the first cave was a real challenge to get for regular
Ghost. I could pass the first two spiders quite easily, as they were facing
the wall. However, rounding the second one got me in view of the yellow and
green spiders at the far eastern end, where the gems were located. I found a
method where I rushed around its back and came to a quick halt in the shade
with only first alerts. I still couldn’t reach any of the gems though.
Instead I found I could use the scouting orb from the mess hall to nudge the
small spider away. It was quite difficult to find the right spot to place it,
but one nudge pushed it a few feet up the slope. This was enough for me to
reach the first gem. I had to nudge it a second time like this to get the
rest. This time it scooted much farther, all the way over to the innermost
gem (left image below).
Headed all the way back to
the tombs via Rowena’s room. I frobbed the skull on
the wall and got to the puzzle room. It wasn’t too hard to figure out. Used
the rock to keep the pressure plate down. Two levers had to be flipped to
enter the Holy Sword cave. I hadn’t taken any of the elemental keys because
the sword could quite easily be taken through the gate. I just leaned forward
instantly when running into it, then jumped and grabbed it (right image
above). Used the scroll again to block the sliding boulders in order to close
up the passageway when leaving. Ghost Slaying In order to proceed, I had
to take Rowena’s locker key and read the diary there. This triggered a new
objective to kill Cedric’s ghost, but in order for this ghost to spawn, I
first had to slay Duncan’s apparition in the cemetery. Since this wasn’t
explicitly stated in the objective, it counted as another Ghost bust. In
order not to detect him before the kill, I blackjacked him and brought him in
behind one of the crypts. Strange that he could be knocked out, but oh well.
In order to enter the cemetery, I mantled a torch south of the mess hall and
used the walls to get there (left image below). I had to go slow to avoid
getting spotted by guards.
In order to kill Cedric
outside Gate to Hell, I had to use one overheard swing. It was excused as per
the objective, but I couldn’t alert him in the process. For Supreme I also
had to avoid using a moss arrow or dousing any torches. I positioned myself
just behind the corner of the sloping cave (right image above). Here I could
draw my sword without any comments. I loaded my overhead before he came to
the end of his route closest to me. When he turned, I waited a second or so,
then ran out and did an angled jump, letting go of the attack button in the
air. If timed correctly, the sword would hit him before I hit the ground,
thus avoiding the alert. I found a predictable method in the end. This
counted as 30 damage dealt and 1 back stab. Gate to Hell Got caught by the first
demon on the right. He didn’t pivot like all the other stationary ones, and
as soon as I rounded the corner, it gave a howl. I was able to descend the
other levels without any first alerts, by taking it slow and timing the
patrols. One room on the bottom level had the main gates to Rowena’s lair,
guarded by two more demons. Couldn’t get in that way without busts. There
were also four cages with zombies and loot. I could lean in and get three of
them for Supreme, but the southwestern one was different. It wouldn’t
highlight unless I opened the cage, which the zombie first alerted to (left
image below). Had to skip that one for Supreme.
There was a closed chute
at the northern end of this room, atop a ladder. Luckily, I could lean
through it and reach the lever from the outside. That avoided further busts
going through the room below. Dropped onto the torch behind Rowena to
approach her unseen. I could kill her in one overhead blow, but this didn’t
complete the objective. Instead, additional versions of her appeared fully
alert. Some of them acted like apparitions, while others as zombies. All of
them had to get killed before the objective checked off. Additionally, when
the next to last version got slayed, Isabella woke up and she alerted to hunt
mode from the noisy fights. I stayed behind one of the big pillars for the
majority of the fights, so she never actually saw me. Regardless, all of this
was a massive bust to all Ghost modes. The locked up demons also alerted to
this, but they died along with Rowena, as did all the other demons outside.
The objective said to take Isabella out of the mansion, which implied
knocking her out, so at least that was excused. There were quite a bit of
loot laying around, including in a semi-hidden tomb underground. It required
a red key from a strange room with two stationary female zombies guarding a
red pool (right image above). Unfortunately, this was one of the few keys
that could be returned, but that was impossible for Supreme, as the closest
zombie then entered hunt mode. Technically I should’ve skipped all this loot,
but it was 750 worth of valuables, which pulled me way below the loot
requirement. Instead I just hung on to the key, which was another bust. Bringing Isabella out
wasn’t a problem, just tedious. Climbed the torch by the mess hall again in
order to get over the wall. Not sure how I would’ve dealt with that in OldDark. It would’ve been another huge bust. This made
the front gate key by Lenny’s corpse pointless, so I skipped it entirely. Statistics: Time: 3:38:31 Loot: 9074 out of 9074 (Supreme: 8159) Pickpockets: 10 out of 13 Locks Picked: 25 Damage Dealt: 0 Damage Taken: 0 Back Stabs: 4, Knock Outs: 2 Damage Dealt: 217, Damage Taken: 0, Healing Taken:
0 Innocents Killed: None, and others Killed: 11 Bodies Discovered by Enemies: 1 Secrets: 8 out of 8 Consumables: 2 Water Arrows, 1 Flare & 1 Moss
Arrow Ghost: Failed! Perfect Thief: Failed! Supreme Thief: Failed! Perfect Supreme Thief: Failed! Notes: -
Got two first alerts when picking the lock on the
basement turbine room door. Supreme busts. -
Nudged the guard outside the turbine room out of the way
in order to pass. Supreme bust. Allowed for Ghost as a last resort. -
Skipped the purse worth 100 in the basement storage room
for Supreme. Couldn’t avoid a first alert from the spider when picking the
lock. -
Skipped the nugget worth 50 in Lisette’s
room for Supreme. The outside guard saw me unless I turned off the lights. -
Skipped a purse worth 100 in a reading nook east of the
front entrance for Supreme. The hallways was too lit and the guard gave a
comment. -
Skipped the northwest barracks for Supreme, which
included a purse and three coin stacks for a total of 115. The stationary
guard heard the door open. -
Got a first alert when closing the gate to the southeast
yard when heading to the dungeon. Supreme bust. -
Had to douse two torches and use one moss arrow in the
dungeon, which also spawned two first alerts. Supreme busts. -
Nudged the dungeon guard out of the way so that he
wouldn’t get killed from the blast. Supreme bust, but allowed for Ghost. -
Alerted both dungeon guards and many front yard guards to
hunt mode when blowing up the explosive barrel. Ghost bust. -
Had to skip one of the candlesticks worth 50 in the chapel
for Supreme. The stationary guard alerted to the door closing. -
Also had to skip the ring worth 100 in the sacristy for
Supreme. The same guard as before heard the lockpicks. -
Took a first alert when returning to the mansion from the
dungeon. The stationary guard in the chapel courtyard heard the door close. -
I couldn’t take any of the six gems in the water caves
for Supreme. The spiders gave at least a first alert for all of them. I ended
up taking the three in the flooded cave, as I wouldn’t have reached the loot
goal otherwise. This yielded two first alerts. Supreme busts. -
Had to kill Duncan’s ghost in order to proceed with the
story. Not directed in the objectives and thus a Ghost bust. 40 damage dealt
and 2 back stabs. -
Got a first alert from the first demon beyond Gate to
Hell. Supreme bust. -
Had to skip the golden bone worth 100 in the southwest
cage outside Rowena’s ritual chamber for Supreme. I couldn’t reach it from
outside and the zombie heard the gate open. -
Alerted all the demons in Rowena’s ritual chamber when
fighting her. I was also spotted by all of her versions before winning the
fights. Big Ghost busts. -
Isabella heard me killing the final version of Rowena.
Ghost bust. -
I couldn’t return the red key to the room below Rowena’s
chamber for Supreme. The closest stationary zombie alerted. I had to take
this key to reach the loot goal, so I hung onto it. Small bust. -
Of the damage dealt, 40 was for Duncan’s ghost and 30 for
Cedric. 1 damage was for knocking out Isabella, and the remainder was for the
7 versions of Rowena. That should be 9 kills in total, so I’m not sure where
the 2 extra in the stats are from. The 1 body discovered is probably one of
the demons who spotted something. |