|
PREVIOUS MISSION THIEF GOLD NEXT MISSION Mission 8: The Mage
Towers [This
walkthrough has recently been updated for TFix,
running NewDark 1.25. Although the original text
for OldDark has been preserved, situations affected
by these patches have been inserted in green. All screenshots have been
updated, and many new ones have been added. Keep in mind that there is a
difference between playing the game in NewDark with
or without TFix. TFix
updates the core mission files, as well as applies .dml
files that tweak the environment in numerous ways. These changes aren’t
supposed to have a significant impact on gameplay, but when ghosting, slight
changes could occur. If wanting as close to the “vanilla” experience as
possible, install just NewDark, without any further
patches. I have ghosted the game 1) in OldDark, 2)
in plain NewDark, and 3) in NewDark
with TFix. This walkthrough will discuss
differences between all varieties.] Ironically, I enjoy both of the talisman missions exclusive to Thief Gold better than either of the ones released in the Dark Project. This one, being the first of only two missions to feature mages, is solid, and I’d venture to say fairly underrated. It’s a sizeable step up from The Haunted Cathedral, offering plenty of unique and often times tense locations. The vanilla release was scattered with bugs, most of which have been fixed through patches. I wish a couple of locations, especially the elemental towers, had been designed a bit less monotonously. I’m happy to report this one can be Perfect Supreme Ghosted, which is always a plus. Overall score: 8.4/10 Ok, so I need to gather four talismans that
collectively open the cathedral doors. First up is the earth talisman, found
within the compounds of the Hand Brotherhood. They are a sect of learning
mages residing in a set of large towers. I need to find information on the
whereabouts of the talisman first, then find a way to retrieve it. Most
likely it is well-protected within the four locked elemental towers. I also
need a pair of jeweled reading glasses from the Central Library, and the
Medallion of St. Burringden from Regalio, Captain of the Guards. I’ll have to find 1,800
worth of loot and escape through the sewers. Avoid hand to hand combat at all
costs, as the mages run unfair battles with magic as their source of energy.
Since `sneak´ is my middle name, I guess I’ll get started. A couple of important issues before getting
underway. Unfortunately, the game engine again could cause trouble, removing
the guarantee of a joyful first run. First, the Both the air tower bug and the sewer
archer patrol have been corrected in TFix. Hence,
there is no longer a need to consider those errors when planning your route. It is actually possible to enter the top
floor of the fire tower from the outside, without ever having entered the
other towers. It involves transmigration of the door (an engine exploit) and
is therefore illegal in both Supreme and Ghost (only legal as a last resort
in the latter). Using Lytha’s penetration method,
one can easily get halfway through the metal door. Lean to the left while
holding this position and you can reach the inside lever. Quickly move away
and the door will open after a second. This might be interesting for players
looking to improve their best time for the mission, or players with custom
Ghosting rules. It is also a way past the infamous bug in the
My arsenal includes a rope arrow; the loadout
screen incorrectly stated none. Also one healing potion for Supreme stacking.
The first tower to enter is the one dedicated to the element of water, found
in the southeast. The door to the right takes me to a garden area. Two mages
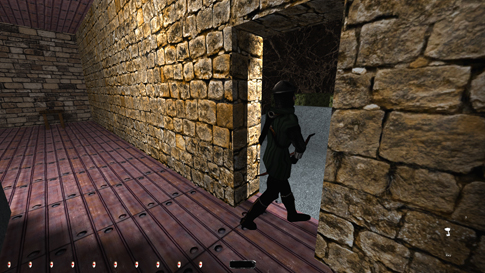
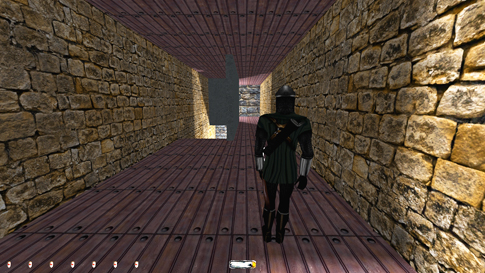
roam around the grassy hedges, wearing two keys [1 & 2]. The air tower is locked, so I head through
the door on the southern wall. Lots of thumping footsteps around, so I hide
in the shadows to the left for a while. An archer comes by entering the
gardens I came from (left image above); he’s carrying
another silver key [3]. I
bring the purse (100) on the table
and head out the door on the opposite wall (ignore the stairs). After
descending the steps, a swordsman carrying another key [4]
comes out the same door. I wait for him to pass me by. To Perfect
Supreme this mission, I need to bring a silver key [5], and the earth mage roaming around these gardens carries
a copy. The water mage has a gold key [6]. Moving southwest I
soon stumble upon another conversation concerning two guards outside the tower
entrance. They both move off, but one will soon return and station himself
permanently, so I quickly enter the tower. The lock here is fortunately
broken, granting free access to the place. No hindrance in grabbing the Earth Key from the flooded room on
the top floor (right image above). I head back downstairs after pickup. The
guard has now returned but he’s not angled straight at the door. I sneak west
behind his back and approach the border to the earth tower garden. An archer
is stationed right outside a wooden door. He angles east, northeast and
north, either of the two latter being sufficient to sneak inside concealed.
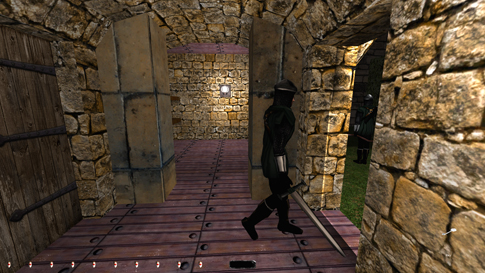
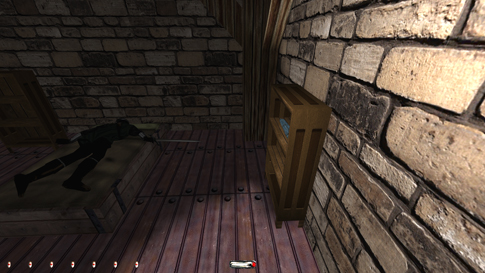
I’ve now entered a small storage room with 8 stacks of silver coins (196) on various shelves. Another
swordsman will eventually walk through here (left image below); a perfect opportunity for me to snatch his key [7].
The west side of this shack is symmetrical to the
east, with an archer guarding the door. He faces west, northwest and north,
and same as last I can sneak past along the south wall. Soon two more mages come by with two more keys [8 &
9]. I find the entrance to the earth tower in the southwest corner,
and the earth key rightfully unlocks it (the locking mechanism is on the wall
beside the door). An earth mage
walks the lowest level, but the room is dark and the floor quiet. A healing potion
and 2 moss arrows lie on a table
to the west. Up the stairs to the next floor. There are two earth
mages to watch out for, but where to expect them is hard to say. I have seen
one or both on the upper walkway, and even both mages on the ground floor. I
guess the latter would be preferred. To reach the upper walkway, I mantle
onto the doorway roof (right image above). The shadows are numerous and the
floor mostly rock. 2 moss arrows reside
in the light to the west. I guess it’s intended to reach the upper
exit via the floating elevators, but they are too exposed to risk. A nicely
flung rope arrow into the dirt ceiling is a perfect way to ascend to the next
level. I grab the rope leaving. The 3rd level is next. Another mage could
enter the room here, so I quickly head for the shadows in the hallway. North by the t-junction takes me
to an area with 2 more moss arrows. The south route
leads me to a sloping incline to the 4th floor. Almost directly west is
another staircase going up. The fourth level also
contains an earth mage and a larger room with boxes, a rope arrow and 2 moss arrows. The fifth has two mages patrolling in a
counterclockwise pattern. I head northwest and enter the right opening around
the corners. Following this hallway I reach the set of stairs to the next
level. 4 moss
arrows lie on the various tables leading
up to the stairs. The last patrolled floor is also the hardest. It has
two earth mages, one carrying a healing potion [10], walking randomly around a set of thick
supporting pillars. There are very few dark spots and the exit is somewhat to
the south. After a few minutes, the coast seems clear and I head out of
hiding. I couldn’t hear any comments, so I guess I’m ok. The highest floor
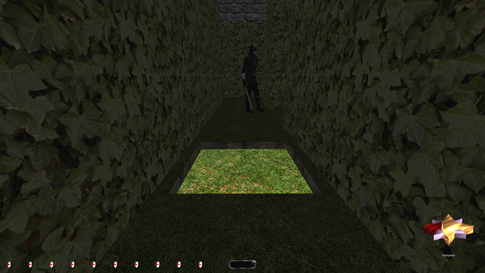
has no AIs to worry about, only caves and goodies. Altogether,
there are 5 rope arrows and 8 moss arrows. The Air Key lies in a chest in the final
pit (left image below). I then backtrack all 7 floors arriving yet again in
the garden. This time I exit through the door to the north, grabbing the purse (296) on the table, and enter
the garden to the fire tower. I wait in the shadows
for a fire mage with another key [11].
Then exit east back to the starting courtyard. Further east from here
is the air tower.
The first floor is brighter than in the earth
tower, but otherwise just as easy. A gas arrow available for pickup on a
nearby table. The second floor is where the fun starts. The bug I
talked about earlier will now (if present) reveal itself. This grotto has a
lower marbled ground level and an upper walkway. Two air mages patrol both
levels. On the south side there is a vertical chute with an automatic
floating elevator. However, sometimes the elevator just isn’t there. All the
walls are solid ice/rock, so without the lift there is no way of ascending
the tower; you have to restart the mission. The reason for this bug is
unknown, but if this tower is visited at the earliest possible time (like
now), it should have a lesser chance of occurring. Luckily, the lift is there
this time! The mages also patrol inches apart, making the whole job a lot
simpler. The ground is very noisy so I have to move slowly. Using the
staircase, I approach the lift and ascend to the second floor. A single mage
patrols this level (right image above), consisting of two circular hallways,
one inside the other. A speed potion is situated on a table to the east. The
following caves are all filled with floating elevators, making them easy to
pass. The final floor contains a floating chest with the Fire Key. Two telescopes operate the elevation power, and frobbing them lowers the chest for about ten seconds. I
have to pick the lock to retrieve the key (left image below). Voila! I once
again backtrack to the bottom.
I tread westward to the fire tower. The bottom
floor is yet again similar in appearance, with an
unimportant papyrus resting on the
table and a single harmless mage walking about.
Wow, the second floor looks bad though! Metal walkways and burning
lava, plus blocks of pulsating heat tiles. I can sneak up the stairs without
any commotion. I can even inch along the upper
walkway and reach for the fire arrow.
I sit still and watch the mage patrol for a minute. He walks the right
walkway, heads down the stairs an roams around in the lava. I could jump onto
the walkway directly south, then hop and mantle onto the opposite side (right
image above). I get onto the metal path quietly and run for the long jump.
Nah...the mage goes on full alert, gotta try to be
more quiet. There! I don’t need to run for long to make the jump, I merely
have to tap the run key and hop to reach the other side. Nice! Have to be
patient with the heat tiles, they slow my movement considerably, but patience
is what Ghosting is all about. Reach the next floor in the dark. A mage
enters and turns around right in front of my nose. I tiptoe after him halfway
through the metal hallway, watching out for more searing floorboards. He
passes me on his way back and I enter the next room. A
small nook in the northeast has a chest with a fire arrow. The next set of stairs is in the southeast
corner. I wait for the mage to return and do one last round, I then head up.
The fourth level finally has some normal concrete floor. A mage eventually
enters the first room and roams around for a bit, then heads out. I follow.
Cc along the metal and wait in the next dark patch to the left for him to
return. 2
fire arrows lie on the ground in this
alcove. I continue down the hall and stop in the last dark area before
the stairs; another small incline here has a box
with a healing potion. The
mage yet again comes by, heads up and down the stairs and passes me for the
last time. Next floor.
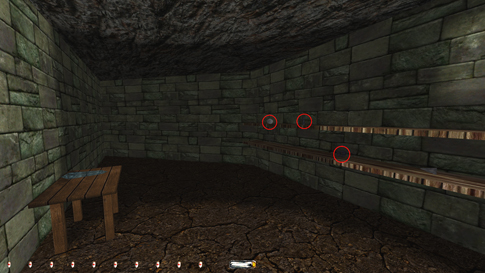
This is by far the hardest area in any of the
towers. Two fire mages are on patrol, and I think they are supposed to guard
the upper walkways. However, I have always encountered one or both lost in
the east end of the lava pit, close to the lowest staircase. He/they then
keep(s) bumping into the side edging, seemingly looking for a way out. One of
them also fell down from the top walkway once, and just ended up patrolling
in a small circle after that. Whatever happens, it doesn’t change the
approached way of ghosting, however hard it may be. I have to move quickly,
as the mage from downstairs will be returning to the stairs any minute, and
that means I’m screwed. Crouching keeps me hidden from whoever exists inside
the lava pool. Moving north towards the next set of stairs is risky business,
as both mages check it regularly. The safest bet looks to be straight up, as
illustrated in the figure above. Mantle up the lava pit railing, turn around,
then do another mantle onto the walkway. Once there, the worst part is
actually over, as the rest involves moving when the mages aren’t looking. I
take the route marked red in the figure. A chest
with another healing potion rests
to the north on the topmost walkway. The top floor has a chest
protected by 4 burning tiles (right image above). Have to pick the lock in
small intervals, but finally the treasure
key is mine. Yes! The exit towards the central tower seen in the lower
left part of the figure is useless, at least for Supreme. The door to the
stairway going to the treasure room is pickable,
but needs to be relocked with the gold key carried by numerous guards around
the premises. This calls for an unnecessary pickup, as the key (which also
works on the library doors) isn’t needed to complete the mission. I therefore
have to go all the way down to the bottom exit and leave the tower the same
way I got in. From here I head back to the garden outside the water tower.
Amongst the various hedges is a secret panel leading to the house basement
(left image below). In I go! The left chest holds a diamond (396), and the right a water arrow. On the shelves I
find two stacks of silver coins (420)
and a silver nugget (470). The
backside of a secret door is further down the hallway. The area beyond is
guarded by two patrollers; an archer and a swordsman. They could be just about
anywhere, but due to frequent intervals of shadows along the halls, they are
easy to pass undetected. I notice the door to the central staircase on my
left and continue around the corner to the middle hall. The two doors here
are locked and require the silver key. The southern storage room contains a water arrow
on the table, and 10 broadhead arrows, a purse (570), a silver
nugget (620) and a stack of silver
coins (632) on the shelves (right image below). Watching for the passing
guards, I clean the north room as well. It has a gold nugget (732) and a purse
(832), each worth 100 gold. I relock both doors after use. The north part
of the dungeon leads to the sewers, which at the moment is closed for access.
I take the western door to the central staircase, and head up to the first
floor entry.
The first floor of the mage keep contains one room
of interest, with three pieces of loot. The library has to be entered from
the floor above, to avoid picking the gold key. I emerge in a heavily
patrolled storage room. A total of 4 people walk through here, 2 servants, 1
swordsman (with a gold key [12]) and an archer. Check the map for their
routes. The male servant walks back and forth between this room and the
pantry further east; the three others also head upstairs. When the coast is
clear, I sprint out and turn right. On the tables
are a papyrus and a scroll with uninteresting
information. I head out the northeast door to the hallway. A swordsman
is walking away in the distance to the north. I follow him and wait by the
corner in the shadows. The male servant walks past me the opposite way and
soon the archer comes by also. The swordsman heads down the south hall and
eventually enters a door to the right. That’s the pantry where the loot is. I
wait for him to leave and sneak in to snatch the 3 bottles of fine wine (982) from the shelf. I abscond before the
servant returns. This floor is done already so I head back to the central
stairs and continue up. Through the first empty room I open the door to
the keep. A mage patrols with his back turned, walks up a small incline, then
returns past me to the northeast. I slip out and look around. Wow, not many
hiding places here! The door to the west unlocks
with the silver key. Through it another archer is stationed, with another silver key [13] on his belt (left
image below). This area is otherwise uninteresting, so I go back and relock
the door. The north doorway has some shadow; I wait there to gather my
thoughts. A purse (1082) rests on
the table in front of me. The eastern door leads to the main foyer, much too
risky to cross. Instead I head back south. The broad east hallway has some
more shadow. This large dining area has two patrolling and one stationary
guard protecting the library entrance. Hugging the left wall I can reach the
shade without getting spotted. I then make a south turn straight across the
room. I pilfer the healing potion [14] and the key
[15] off the patrollers. Also grab the loaf, healing potion
and unexciting papyrus off the
tables. The stationary archer turns east and I move into the corner by
the door. As he turns back, I grab his key [16]. This is the only
unlocked door to the library and thus the sole way in for a supremer.
Inside I just get time to spot two mages on their
way downstairs. Quickly search the room before they come back. 3 water arrows on a shelf in the northeast. I find information on
the earth talisman in a papyrus roll
on one of the tables. Great! So the treasure key I found in the fire tower
must work on a door in the central tower! I’m closing in!! Drop the paper back
for Supreme. Wait what’s this?? A frobbable book in
the western bookshelf opens a secret door in the wall (right image above).
The mages are on their way back so I slip in. One desk with goodies. A golden goblet (1107), a water arrow and
the reading glasses (1307). The
objectives are checking off like crazy now! The wizards descend the staircase
and I follow, remembering to close the secret doorway. They carry a key [17]
and a healing potion [18] that I
pilfer. No pick-ups whatsoever on this floor of the library, so I
continue down to the lower level. Many bookshelves to hide behind, and two
more patrolling mages. They are over on the west side, so I walk east to the
right of the stairs down. On a table in the northwest corner is a valuable vase (1407). A
table directly south holds 2 water
arrows. The mages then head down the stairs and disappear through
a door. I grab the 2 water arrows from the table east of the staircase. I wait for
them to return and sneak down the stairs to enter the right door. The chest
here holds a rope arrow. I’ve
gotten all of interest from the library. I head all
the way upstairs and leave through the unlocked door. There’s one area I haven’t checked on this floor,
and I have a feeling it contains something valuable. I’m talking about the
lookout east of the foyer. The western one held a purse. I sneak across the
room and wait by the east doorway for a swordsman to appear. Once he does I
softly tread through, without drawing the archer’s attention. I was right!
There is a piece of loot on the table behind the archer, but it’s impossible
to reach from here. Ghosters can douse the torch,
but for Supreme I have to think of something else. I would have to grab it
from outside the booth. The guard switches position very frequently from
southwest to northwest. I open the door and crawl through. There’s a very
bright portion halfway through where I get spotted a couple of times, but
finally he is faced north long enough for me to leave safely. Another archer
is stationed outside facing north, not turning. I see the torch from inside
the lookout lights up an area just outside the window. I would have to move
west of that part, past the window and then approach the booth from the north
corner. I can’t move too far north though, due to a lamp beyond the next
pillar. Let’s go for it. I creep-crouch along the route shown in the left
image below. I have to go pretty fast, as the swordsman covering the foyer
returns quite quickly. I make sure not to approach the booth too far south,
in the light of the torch inside. I lean forward, squeeze halfway through the
window, turn left and reach for the purse
(1507). YES!! Nice move! I hurry back exactly the same way (right image
below). Not even a comment, all within Supreme laws, wonderful! I head back to
the central stairway, as this floor is finally done.
The purse can be taken in a different, perhaps easier,
manner. The two archers guarding it have a conversation triggered upon
entrance of the mage keep. After this chat, the outside archer walks
downstairs, turns at the bottom of the ramp and enters the large square
dining hall upstairs. He then returns to his spot outside the lookout and
stays put for the remainder of the mission. Taking advantage of this, one can
grab the loot while the archer is on the move. However, the only entry close
enough to successfully retrieve it in time is the front doors, at least while
still keeping Supreme intact. I would suggest doing this maneuver as soon as
possible, preferably when starting the mission in the main courtyard. Playing with TFix,
this conversation can now also be heard coming from the central staircase, as
it only triggers within close proximity of the archers. Using the time when
the outside archer is patrolling to steal the purse is therefore a lot
easier. However, in NewDark the archer now also
faces the window (east) during and after the conversation (left image below),
instead of north. This makes approaching the purse from the outside somewhat
simpler, even with both archers present.
I arrive at the next door and open up. This seems
to be the main hallway with 3 patrolling guards. Brilliant... Only one guard
here now, so I go for the door to the south. It’s pickable
but takes a looong time to unlock. Most certainly
purposefully done from the mission designers. I get it unlocked as an archer
is headed my way in the north distance, but luckily I’m done just in time. I
slip inside. This must be Captain Regalio’s office,
with the sir himself snoring in bed. There’s an uncut diamond (1707) in the nice looking chest. On the desk sits the Medallion of St. Burringden
(1857). Nobody holds out on me! I also grab the silver nugget (1957). The 2 water arrows from the shelf unit
further east I have to snatch from on top of the desk (right image above).
Moving too close to Mr. E. F. Regalio will wake
him. Leaving the room the main hallway is empty. The door to the right
unlocks with the silver key. Another sleeping dude. The two unlocked chests
contain 6
water arrows and a stack of gold coins (2007). I wait in
the open door for the patrollers to bypass one by one. I make sure to snatch
the purse (2157) [19] off one of
the swordsmen. When the coast seems clear, I lock the door and
enter the first room on the left. Wow! Caught instantaneously! Try again. I
sneak up from the north side, that way I can enter the dark patch in the
doorway unseen. A stationary servant holds a purse (2232) [20], I can snatch that from here. I can even bend
over and grab the stack of gold coins
(2257) from the chest. The goblet on the shelf to the left seems harder.
Normal ghosters can just douse the torch or settle
for a 1st alert, but supremers have a real problem
here. The woman has three facing angles: southeast, straight south and
southwest. Could I sneak over and reach the loot while she’s angled
southwest? I can sneak pretty far over, but as I lean, she comments.
Hmm...that was pretty sad. What to do? If I could get onto the bunk bed and
slide down west of her... I need some crates; remember some down in the
dungeon room underneath the gardens. Two ought to do it. I take the tedious
journey downstairs and bring them up. She has to face southwest for me to
even sneak over to the northeast corner. I have to be real quiet not to alert
her with the crates. Crouch, drop and hop; got onto both crates, but I’m
still not tall enough to walk onto the bed. How about that healing potion?
Yes, that elevates me enough to move quietly onto the bed. Great! I stand in
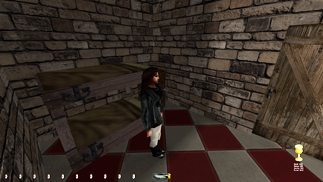
the southwest corner and watch the servant’s positioning (figure 1). As she
turns southeast I creep down. Nah...I can’t get onto the chest without making
noise, and I can’t reach for the goblet either. What if I make a dropping
maneuver straight onto the chest from the bed? Yes! That actually worked! I
have to land on the edge of the chest, otherwise I’ll make a revealing
stepping noise. I reach for the golden
goblet (2282). While on the chest, the lady has to stay turned towards
the southeast until I am back on the floor (figure 2). Then she can turn to
the south without seeing me. However, if she turns southwest, I am screwed.
This means I have to get off the bed, grab the goblet, and get back onto the
bed without her ever turning southwest. Staying as close to the bed as possible,
I grab the two crates and move onto the bed. Phew! This time I didn’t need
the healing potion to get high enough. The potion fell to the ground, but it
is soft enough not to cause any alert. This also means I can slide down from
the bed on top of the healing vial, and not make any noise. Perfect! This
room is clear (figure 3)! I can’t set the crates in the hallway because of
patrols, so I bring them back to the central staircase one by one. In NewDark,
this room can be cleaned and the loot taken without the use of crates, as the
bed can now be mantled. In fact, using crates will alert the woman to hunt
mode if using TFix, busting even regular Ghost.
Next I approach the second door on the east side
of the hall. It also needs the silver key to open. Inside are two chests; the
right holding another purse (2382).
Leave and relock the door. I now need to check the two side rooms at the end
of the hall (the double doors only lead to an empty balcony lookout). There
is a dark spot to the left where the wall angles northwest. Timing the
various patrols, I sneak into the west room. A purse (2482) lies on a desk in here. The room opposite the hall
is empty. Ok, guess I’m done. But going back down the hall, I notice
something lying on top of the wooden beam in the south end. I’ll wait until
people have cleared and check it out. Using a rope arrow, I find a golden nugget (2582) on the rafter
(left image below). Nice! I head back to the central stairs for the last trip
up.
I leave my crates here for the way down. The
entrance to the central tower is pickable and leads
me to a marbled hall. On a pedestal to the immediate
left is a papyrus giving a hint to
the location of the earth talisman. I start sneaking up the winding
stairs. Almost at the top I hear someone patrolling. Waiting in a dark
corner, a fire mage comes by, soon disappearing down the multitude of steps.
I continue all the way to the top, and unlock the final door with my treasure
key (remember, the unlocking mechanism is on the wall to the side of the door). Upon entering, two
mages start a conversation nearby. When they finish, they starting patrolling
in a clockwise pattern, checking the various pedestals. Directly west of the
door I find an artifact (2602)
displayed. Hey wait, both mages come to a halt and check the westernmost
pedestal more thoroughly than the others (right image above). That has got to
be the genuine one! It sure is; the earth
talisman is mine! On the north side I find 2 more artifacts
(2642) and 2 statues (2792).
Finishing my clockwise run around the central dome, I pick up the last piece
of loot east of the exit door, another artifact
(2812). I then leave the way I came. I bring the crates back to their original
positions. Then drop the silver key in the gardens above, along the earth
mage’s patrol route. I then snatch the 2 keys [21 & 22] off the guards
in the dungeon. I follow the archer to the north side of the dungeon
and slip into the torture chamber behind his back. This way I don’t have to
lift his key for Supreme. In the back room is another secret passage leading
to the sewers. This last patrolling archer eventually comes to a halt on the
west side of the sewage river, as mentioned in the introduction. Before that,
I can slip into the water and wade around the south corner. 1 talisman down,
3 to go! Time: 2:11:50 Loot: 2812 out of 2812 Pickpockets: 22 out of 22 Locks Picked: 4 Damage Dealt: 0
Damage Taken: 0 Consumables: None Ghost: Success! Perfect Thief: Success! Supreme Thief: Success! Perfect Supreme Thief: Success! Norwegian Thief: Success! |