|
PREVIOUS MISSION THIEF GOLD Mission 15: Into the Maw of Chaos [This
walkthrough has recently been updated for TFix, running NewDark 1.27.
Although the original text for OldDark has been preserved, situations
affected by these patches have been inserted in green. All screenshots have
been updated, and many new ones have been added. Keep in mind that there is a
difference between playing the game in NewDark with or without TFix. TFix
updates the core mission files, as well as applies .dml files that tweak the
environment in numerous ways. These changes aren’t supposed to have a
significant impact on gameplay, but when ghosting, slight changes could
occur. If wanting as close to the “vanilla” experience as possible, install
just NewDark, without any further patches. I have ghosted the game 1) in
OldDark, 2) in plain NewDark, and 3) in NewDark with TFix. This walkthrough
will discuss differences between all varieties.] ‘Into the Maw of Chaos’ is
a fitting end to a great campaign. It is perhaps not made with a ghoster in
mind, but provides clever challenges nonetheless. Yet again, the designers
manage to implement new ideas and stretch mission making even further. To
bring down the Trickster himself is perhaps over the top for a thief, but it
works in the end. Unfortunately, the objectives cause a bust to plain Ghost. Overall score: 6.2/10 I am following Again, I have not drawn
any maps, as the mission is quite linear, and the existing patrols pretty
obvious. There is no loot, only equipment, so the objectives are the only
thing at interest. I will not point out every pickup along the way, so if
that is your alley, check out the list from the menu. No purchase screen this
time, so I will have to do with the weapons at hand, which for a ghoster is a
moss arrow, a gas arrow, a water arrow and two rope arrows. That single moss
arrow could be cutting it close, but hopefully there are some more laying
around. I start in a cave looking
down a reddish tunnel. An insect-beast is already heading my way, so I
quickly hide in the shadows by the tunnel entrance. A monkeyman soon catches
up with the insect-beast and together they disappear through the portal
behind me. After a couple of minutes another insect-beast, a monkeyman and a
crayman come by. It seems there is an unlimited flow of creatures appearing
from the depths. It could possibly be that portal the Hammers talked about.
It definitely needs to be shut down! I pass the red tunnel and enter the
purple cave to the right. The exit a couple of stories down opens to a fairly
bright area, with an overlooking insect-beast to the southeast. The easiest
way to pass is to traverse the sloping west side of the cave and drop down to
the shadows, right by that gas arrow. I can inch down the next slope as well,
onto the marbled pathway. I follow the stony trench on the left side until I
hear the howls of another insect-beast. I lean around the corner and see the
stationary creature covering the path ahead. The shadows are plenty here, so
I creep over the edge and enter the next purple cave to the left. I pass this
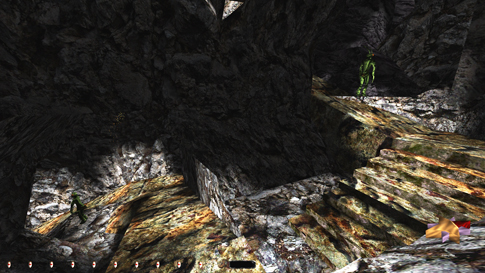
and emerge on the beast’s opposite side. The stony slope to the left is dark
a section down. This area is a little tricky, because of another insect-beast
to the southwest. It is highly preferable that they both are positioned as in
the picture below to the left when I traverse the east side of this cave.
There is a very bright portion beside the marbled path where I will get
caught immediately. I can continue to the next purple cave (south) without
leaving the dark. I clear this cave and once again appear at the other side
of the green critter. I wait for some more patrollers to bypass and head down
this steep pathway when the insect-beast is turned away (opposite as in the
picture). I pass the bends and wait in the northwest corner for another enemy
to go by. The purple entrance here only leads back
to the insect-beast mentioned before. There are some gas arrows in there for
those interested.
The next set of caves
takes me through a lava filled area. All I do here is dodge a few patrollers
and bounce from ledge to ledge into another cave system. I soon arrive at a
larger set of caverns with blue crystals scattered around. Finally at the ice
cave, I can hear frogs nearby. Ugh, I hate those creatures! The ice is hard
to navigate and the crystals hurt upon contact, so it takes a few tries to
reach the shadows by the opposite wall. From here I can spot three frogs
jumping merrily around the stony cave below. To the northwest is an icy ramp
down to another clump of crystals. Shadows extend about halfway down this
ramp. I slide down and position myself at the far end of those shadows, as
shown in the right image above. The three frogs have no set pattern it seems.
They sometimes disappear around the corner to the north, but other than that
they cover the entire cave. Spot number 1 in the image is a tiny dark portion
just by the edge of the glacier. It is hard to find, but with a little luck I
can glide into it without letting the frogs see me. Now comes the hardest
part. I have to cross the bright area to spot 2, when none of the frogs are
looking my way. It can be done, but probably not without frustration. In
addition, there is no guarantee a frog won’t bump into me and raise havoc
once I’m there. So after saving, I immediately continue north around the
bend. Luckily, there are shadows all the way out of view from the upper cave.
Reaching the final shadows northeast down this tunnel also relies on luck and
swift movement. These moves have been repeated, but don’t expect to manage
them on your first or second try. The next slope is very
steep, and the crystals along the way must be avoided. At the bottom I enter
another cave with three fire elementals to the east. One of them patrols for
a few seconds, but stops on a small bridge across the running lava. After a
minute or so one of the others also becomes stationary on the east side of
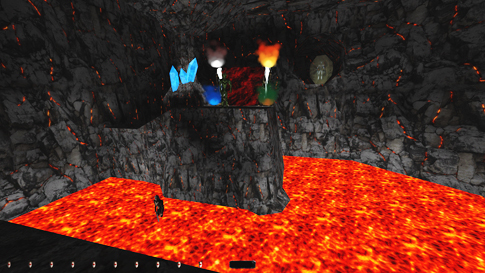
the cave. The third remains patrolling. Emerging from the ice cave I have to
cross a bright area to enter the shadows by the north wall, as depicted by
the light gem in the left picture below. Unfortunately, the flame ball
protecting the bridge catches me right away. What if I try crossing the light
immediately, before the fire elemental becomes stationary? I reload and try
this. Yes, that worked! Not a sound! The arrow shows the next move I must
make. I need to jump the lava stream, landing on the lower end of the bridge.
But I cannot land on solid ground, that will alert everybody. I must time it
to land on the silent soft edge. From there, I can
even grab the fire arrows off the small ledge. The shadows to the
south bring me to the exit. The area with the
fire elementals described above seems a lot more difficult in NewDark than I
remember. Replaying it in the updated engine, the elementals are very jumpy,
reacting to the slightest flicker in the light gem. The worst area though is
leaving down the sloped tunnel to the south. The tunnel’s opening is brightly
lit, and leaving through it almost always set off one of the balls of flame,
especially if one of them has become stationary on the bridge. I managed to
do it by creeping slowly, but I don’t recall it being that tough. Fire
elementals are one of those enemies where alerts are tough to detect, so I
might have just been sloppy in my ability to detect those in the past. Following the turns deeper
into the cave system, I eventually reach a very steep slope. At the end of it
is another large icy cave. I maneuver down it without touching the crystals.
The bottom cave holds what seems to be an ice well. It is impossible to
mantle so I enter the anti-gravity river on the wall instead. The next sets
of tunnels are all water-filled. At one point, there is a small opening on
the left crucial to avoid losing health. I continue and soon spot the
previous well, now underneath me. With a well-timed drop, I plunge in.
Submerging, I arrive in a grassy
grotto with a huge tree. Three monkeymen travel around it, but their patrols
are so big and the shadows so dense that they pose no threat. On the
northwest side I find the opening. Inside are three dangerously looking green
spiders. It is possible to grab the three fruits and
one of the moss arrows on the lowest ledge inside the tree without causing
alerts. The closest fruit is easy when the spiders
are walking away. To reach the ledge I use two rope arrows in the
wooden ceiling, finally landing in the dark spot on the left side of the
ledge. I grab the rope arrows mid-air as they are imperative to finish the
mission. Only one of these moss arrows is necessary to continue. I quickly
screw that idea of climbing the ledges to the top, although that is perhaps
the intended route. Instead I slide down the ledge and jump into the shadows
when the three spiders patrol with their backs turned. The last two fruits I snatch in the same run. Exploiting
the perfect moment relies on patience and swift key-strokes. Something
has been updated in the awareness of the three bottom spiders in NewDark. I
suspect they were never alerting properly in OldDark, and that now they hiss
the way they’re supposed to. I was never able to simply run over to the first
ledge and mantle up without any alerts, like Travis Whitsitt does here. I
instead used two rope arrows in the ceiling and leapt across. In NewDark, I can’t
even do that. I’m not sure what they actually alert to, but one of them
always chirp when I climb towards the top, even though my light gem in black. Now I focus my attention
on those big branches outside. What if I can utilize my rope arrow skills here?
I realize I can ascend the huge branch just southwest of the entrance with a
well-struck arrow (right image above). From the ledge above I lean down and
retrieve the rope. The same technique applies to the next branch to the
north. This one is even steeper at the top, but I still manage to retrieve my
arrow. I can then walk onto the final branch with the exit to the north. [UPDATE August 4th, 2019: Since you can’t get to any of
the moss arrows in the tree from below without alerts in NewDark, the moss
arrow to get is the one on the north side on the top ledge (left image
below). Once having climbed the branches, you can approach it from above. I
never tried this in OldDark and I feel embarrassed saying it, as it is much easier to take than anything farther
down. The red spider on the ledge below does have a weird stationary
behavior, unlike anything I’ve ever seen before, and this may have led me to
believe it got alerted to my presence. It rotates by doing a spinning pivot,
suddenly stops, then resumes again after turning 180 degrees. It still alerts
like normal by giving regular spider chirps, indicating that it is in a
restful state (or unalerted), so this is totally fine to do for Supreme.]
The next tunnel is
protected by a stationary red spider. Two large crystals light up the
entrance quite well. This could be a tough one. I run in and see his reaction.
Full alert. Hmm. What if I jump? Same response. I try mossing the ground at
the landing spot. Yes, that did the trick! With a perfect jump and a quick
crouch, the spider only gives a grunt. I have to stay in the middle of the
path though, as the sides are more lit up. This is why the additional moss
arrow pickup in the spider tree was required. I creep-crouch along the wall
to pass the spider entirely (right image above). The next cavern has many
patrolling spiders, but also plenty of shadows. The spiders tend to get stuck
at the top of the inclines, but this doesn’t prevent me from passing unseen.
I exit through the tunnel to the east. The cave across from the
misty bridge is a strange one. Blue devices cover the walls on either side.
They are spitball-traps that trigger if I enter the light. Mostly, they will
not fire if the light gem stays yellow or darker. I stick to the shadows all
the way through. The next set of tunnels
and caves are quite easy. I dodge a couple of monkeymen, and leap across a
lava gap without any hassle. I eventually reach a larger lava-filled cave,
with a strange device on a plateau in the distance. That must be the portal!
Now what did that papyrus from the Hammers say? “Destroy each of its anchors
with its opposite...” I can spot the four anchors from here, one for each
element. Using the opposite would mean fire for water, air for earth, and so
on. But there is a stationary insect-beast up there, and I don’t think it
would like the sound of a fire arrow. I know this directly follows the
objective, but alerting someone in the process is NOT allowed. Oh great! Now
a monkeyman got up there too, and he doesn’t seem to be moving either. Grrr.
Well, at least I can fling a fire arrow into the water anchor before he gets
there, and get away with “only” alerting the insect-beast. Of course, his
alert state in turn sets off the monkeyman. There seems to be no way around
this. Unless…what if I apply the sit-back-and-see-if-they-fidget-away tactic?
It’s worth a try. If I’m lucky they’ll end up in the lava and kill
themselves. Will keep the laptop on overnight. The picture to the left below
is taken 10 hours later. The monkeyman ended up in the lava all right, but he
has never been better. His companion slid a little back and to the left, almost
right into the anchor. Sorry guys, but the Maw is unghostable. The remaining
three anchors can be disabled with no further alerts.
I sneak away accepting a
bust, and climb the vine in the next cave. As I drop to the ground on the
other side, I hear the trickster’s chanting nearby. He has already started
his ritual, with the Eye on a pedestal in the middle. For each verse he moves
to another pedestal encircling the Eye. As he’s at the westernmost one, I
sneak into the middle and exchange my fake eye. I quickly move to the shadows
on the east side. The objectives change and tell me to wait for Time: 35:47 Loot: None Pickpockets: None Locks Picked: None Damage Dealt: 0 Damage
Taken: 0 Consumables: 2 Moss
Arrows, 1 Water Arrow, 1 Gas Arrow & 1 Fire Arrow Ghost: Failed! Perfect Thief: N/A Supreme Thief: Failed! Perfect Supreme Thief: N/A Norwegian
Thief: Failed! Notes: -
Had to skip the top 3 moss arrows in the huge tree. -
Needed to use one moss arrow to pass the red spider in the tunnel
past the big tree. Also spawned a first alert from the passing. Two Supreme
busts. -
The four arrows used to destroy the portal are allowed, as they
directly follow the objectives. Alerting the insect-beast, and consequently
the monkeyman, is not allowed and busts Ghost. |