|
GODBREAKER - Mission 2: Impious
Pilgrimage This is one of those epic
missions that I will remember vividly for years to come. A very unique location,
lots of characters and story, tons of optional side-quests, and interesting
new enemies. Tomb raiding missions can easily become repetitive, but this is
a fresh take on an old tale. Well done! To start with I had to
locate the tomb of Sir Eldin and obtain his sword
The Godbreaker, in addition to finding 3,000 worth
of valuables. Nilbog This mission was riddled
with new enemies, several of which were quite difficult to assess in terms of
alert levels. In Nilbog was no less than 3 of them;
snakes, bug swarms, and pitcher plants. Snakes were the easiest to deal with,
as they gave fairly normal alerts. The bug swarms made no noise, but instead
altered their paths and followed me, which I took as a bust. The pitcher
plants, however, I didn’t interpret as AI at all. Marbleman
argued something similar in his let’s play of this
mission. They acted more like gas traps that triggered by proximity. They
could be “disabled” with a few broadhead shots.
This didn’t actually trigger the trap, as the gas arrow was left behind to be
taken, but it did “kill” the plant. Though this didn’t count as a kill in the
stat, nor did it count as any damage dealt. Neither was this a case of
property damage; I compared it more to the slashing of foliage, which has
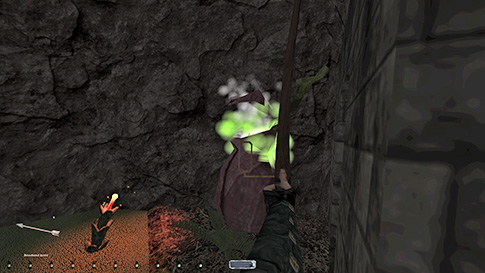
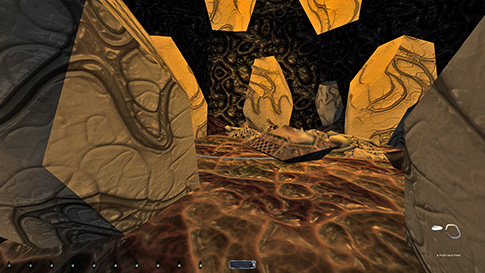
also been deemed ok for Ghost in the past. The pitcher plants didn’t come
into play on more than one occasion in this mission, in the southern part of Nilbog. A plant had to be disabled in order to enter a basement
with a piece of loot (left image below).
Another issue came in the
prison. When approaching the pagan prisoner Grimroot,
a new optional objective spawned to release him. If completed, this would
greatly ease my travels through Glimmer Grove, plus grant me extra objectives
and loot. The problem was I had to relock the cell door for Supreme, and this
triggered a first alert from the nearby crayman. I
could release the crayman first to avoid this, but
that would get him into a fight with the patrolling monkeyman,
and this isn’t allowed as per Ghost rule #5b: “Garrett must also not cause enemy infighting, where AI start
attacking each other”. Even if timing the release so that they would miss
each other, the crayman would start fighting with
the stationary monkeymen outside. The nugget in the
crayman’s cage thus also had to be skipped for
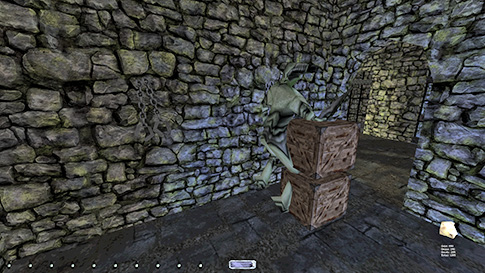
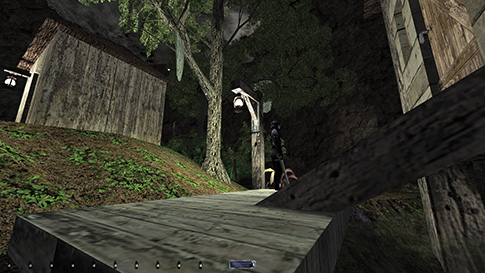
Supreme, but not for regular Ghost. With two crates I could block the crayman before leaving the room (right image above),
preventing him from ever reaching the monkeymen.
The closest frobbable crates were in the swamp
grove by the thieves’ cabin. For Supreme, I now had to
sneak into Glimmer Grove by dodging the archer sentry. This was possible to
do without first alerts by scaling the wall. However, the only required item
in the village, a vial of blessed water, was found in the chapel basement.
Since brother Embry was now hostile, he first alerted to picking the hatch
leading down to said basement (left image below). Thus, I was back to square
one. Since taking a first alert was seemingly unavoidable, I decided to
instead free Grimroot and get access to more
objectives and loot. An alert from a caged crayman
is perhaps more honorable than one from a human priest anyhow. I also wasn’t
able to drop the cell key back like normal. It was droppable and left my
inventory, but it didn’t actually go anywhere. Furthermore, after dropping
it, I kept walking into it and made key dropping noises as I progressed, even
to the point of alerted surrounding enemies. I figured something was wrong
with the item, as it strangely didn’t count as a pickpocket in the stats
either. Since it wasn’t possible to return, I hung onto it instead.
The caves and swamp with
the thieves were uneventful. I could enter the cabin when the thief was
stationed on the balcony; he didn’t hear the door from there. Took the next
set of caves to Glimmer Grove and did all my stuff there. Another enemy that
was tricky to dodge was the gas shooting plants. They pivoted like a camera,
so I could wait them out, but if they stopped and stared, I counted that as a
bust. Temple In Glimmer Grove I
triggered all the objectives except for Cypress the shaman’s. She wanted me
to get rid of all the enemies in the temple; craymen,
undeads, elementals, the whole lot. These types of
objectives are ok to complete if you can do it undetected and without
breaking any other rules. It was impossible to kill any of the craymen inside the temple without alerting several
others. Even when blackjacking them, they scream like a stuck pig, triggering
every other creature in the vicinity at least to hunt mode. The shaman’s
intended way of dealing with them, however, was spawning fire elementals to
kill them for us. Although this was a viable method and would avoid any detection,
it goes against rule #5 mentioned earlier, prohibiting the setup of
infighting in order to complete an objective. This was an easy skip. We would
have to see if the temple was ghostable with all
the enemies still around. The objective to kill the moth hive triggered by
reading Embry’s journal specifically directed us to use an explosive charge
to blow it up. Such an explicitly worded task excuses the bust, as long as we
are not detected in the process or break any other rule. In the temple I first grabbed
the ancient key and dropped from above. I entered on the left to get a piece
of loot, but couldn’t continue here without a first alert from the stationary
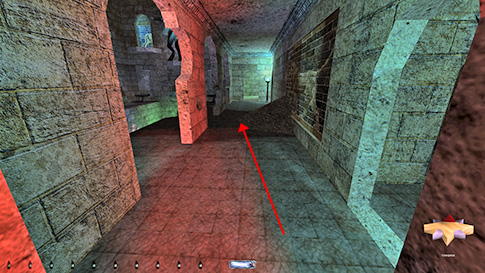
crayman facing north. If entering to the right I
could follow a path along the angled shadowline and
make it to the dark area at the end of the hallway without alerts (right
image above). I had to hit the crayman’s view when
I was farthest away from both torches in order not to get spotted.
Surprisingly, I could drop to the area below and get the thief’s vase without
issues. I chose not to destroy the eggs for the bonus objective. I counted it
as property damage and it didn’t yield extra loot. Headed up via a hole in
the ceiling to get the peculiar key and some more loot, then dropped back
down in another hole to the east.
In the throne room came a
problem. Five enemies spawned when I opened the throne room gate. To get the
loot in there I had to trigger two burning braziers when getting close. Since
my presence caused the braziers to light up, it is actually allowed to douse
these for Supreme, and it might actually be in the best interest for that
mode to do so. Supreme rule #6b says in part: “Removing light sources directly created by the player […] is allowed.”
However, the patrolling enemies heard the water arrows, so I just doused them
before they spawned to avoid this. I had three water arrows in my starting
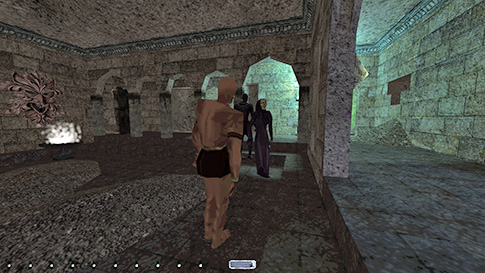
inventory. Now I could get all the loot without any busts. In order to leave,
I had to sneak in between two of the stationary enemies (left image below). I
crouched between them, close to the masked witch as she was facing north. I
had to wait by the archway corner on the upper step until all three
stationary enemies faced away, either east or south, and the patrollers
didn’t see me sneak out (right image above). It took a bit of waiting for
that situation to arise, but it was highly repeatable. The whole temple was
thus Supremed! Godbreaker I exited via the northwest
caves on the upper level of the temple. This accessed the lost expedition
site, Eldin’s tomb, as well as the moth hive. I could
both place the explosives and light the fuse from darkness (left image
below). The only difficult part was exiting the moth hive with Twig before it
blew up without getting seen. I had to time it so I could head out of the
hive pretty much in a straight shot. All the moths and bugbeasts
died at the same time, so no other busts were incurred in the process.
Brought Twig back to
Glimmer Grove to get Hawthorne’s gemstone. Also sold the final book to Embry
and returned the rosary. Next I blessed the last knight ghost and returned
the ancient key. I had picked up all the bugs, so I then returned to the
thief swamp to return the flint & steel as well as the rogue’s key. He
sometimes alerted to the latter, and if so, always to hunt mode. I left as
soon as I had dropped it and waited in the shadows next to the wooden patio
(right image above). If the thief inside the hut had normal footsteps when
resuming his patrol, he was unalerted. This was a
very good spot to maneuver in and out of the cabin from. I was shielded from
all light sources, including the roaming lantern-thief. Next I placed the bug jar
on the stump and got teleported to the final piece of loot. The exit took me
back to the temple, and from here I returned to Eldin’s
tomb to final get the Godbreaker sword. All that
remained was returning to Nilbog to end the
mission. I rechecked the prison to see if the crayman
had loosened from the crates, but he had not. Statistics: Time: 2:15:15 Loot: 5230 out 5230 (Supreme: 5130) Pickpockets: 2 out of 2 Locks Picked: 8 Damage Dealt: 0 Damage Taken: 0 Secrets: 6 out of 6 Consumables: 2 Water Arrows Ghost: Success! Perfect Thief: Success! Supreme Thief: Failed! Perfect Supreme Thief: Failed! Notes: -
Took a first alert from the crayman
in Nilbog prison when relocking Grimroot’s
cell door. It was either this or take a first alert from brother Embry in Glimmer
Grove, plus skip a whole bunch of objectives. I chose the former. Supreme
bust. -
Couldn’t return the cell key for Supreme. Although it
left my inventory, something was wrong with its properties, and it wasn’t
possible to place it anywhere. I didn’t count this as a Supreme bust. -
Had to skip a gold nugget worth 100 in the crayman’s prison cell in Nilbog
for Supreme. Releasing it would cause enemy infighting, disallowed by rule
5b. The option to block it with crates was also not allowed for that mode. |