|
ELEVATOR MISSION T2 Mission 2 - A Doubtful Corridor This
is the mission that’s based on the T1 version from 2000. Although a superior
looking mission, I think it is less interesting. Gone is all the loot and
most of the challenging enemy encounters. Plus, if you have played the
original, none of the gameplay is any different. Keys, buttons, and order of
events are pretty much all the same. There are some interesting changes to
the mission’s ghosting aspect, but overall, this was a bit of a
disappointment. I
had to find two items, the Masamune sword and Pyonchan’s book. I also needed to report my findings to
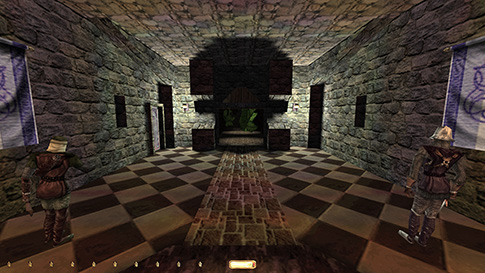
the keepers, which basically meant making my way to the end point of the map. Kitchen Area The
guard at start was odd. Sometimes he alerted from a distance, even to hunt
mode. Other times he didn’t utter a peep. I’m not sure if it was from seeing
me or from all the items in the mission hitting the floor and making noise.
No matter, I backed up and went right when he didn’t alert. Got a first alert
from the kitchen lady when exiting the fireplace door. Nothing to do about
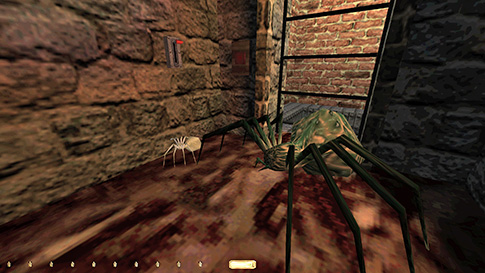
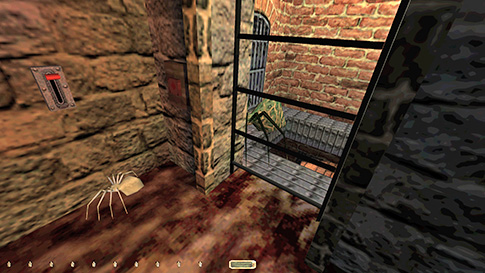
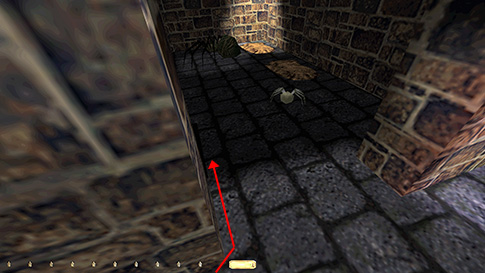
it. At
the bottom of the lift there were two spiders. The green one could be passed
without issues, but the small yellow one would catch me going through the
gate. There is no way to nudge small spiders with your body, neither were there
any items up to this point that could do it. I even tried pushing one of the
barrels from the kitchen all the way down here, but the spider always heard
it bumping along the ground. Then I remembered something from Sabotage at Soulforge, how in the original version, in order to get
rid of a potentially stuck spider bot, I had to wait for a different bot to
patrol the same path and only then would the first bot move. There is a
built-in fail safe in the engine for enemies to move away from each other. This
applies both to patrolling and stationary enemies. Thus, I tried nudging the
green spider over to the yellow one. And voila! When the green spider was
close enough, the yellow one would now move whenever it twisted around. Its
body had to be almost on top of the small spider, and the smaller one would
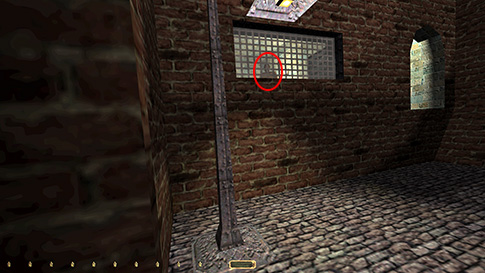
always move in the opposite direction. After some experimentation, I got the
yellow spider flung across to the left wall (left image below). I then nudged
the green spider over to the same wall, and the small spider moved a little
bit more forward. It was now directly underneath the gate control lever, just
a tad closer to the gate itself. Next I worked on getting the green spider
into the elevator shaft. That wasn’t too hard, comparatively speaking. When getting
it into one of the closest corners, I could ride the lift down without
further alerts. I quickly tested if I could go back up, and if I rushed out
of the elevator opening, I only got a first alert from the yellow spider. The
image below to the right shows the final setup. Excellent!
The
next area getting the kitchen key didn’t cause any issues. I’m still not sure
how to detect bats’ first alerts. If fully alerted, it started moving and
hovering around me, but it never attacked or alerted anyone else. I made sure
it stayed put over by the elevator nonetheless. Garbage Pit Area To
reach the refuse pit I had to pass a room with two hammerites
(left image below). Putting out the torches triggered first alerts only, but
it didn’t allow me to get through the room without full alarm. I tried both
sides, fast and slow; nothing worked. I had to resort to knocking them out. I
ran up to the guard and bonked him, then hid back in the previous room. As
the priest switched to hunt mode and got close enough, I knocked him out
also. Huge busts there. In the refuse pit I could get the lockpick
and head back up the ladder without issues. I’m not sure if I was lucky or
what, but I was able to do it multiple times exactly the same way. When
going for the square lockpick I had to dodge a
camera and a stationary swordsman (right image below). I couldn’t avoid a
first alert from the guard, but that was from picking the chest open, which
was inevitable and thus easier to accept. I was able to pick it in 3 rounds
by timing the camera and avoid any clicks from it. Once the guard alerted, he
was in a long first alert state, which is normal when detecting lockpicks, so he didn’t alert any further.
To
get the sword key, I had to pass the long hallway with a guard at the end
that caused the first ghost bust in the T1 version. This time, there was
enough shade to get through with only first alerts. The next room, however,
had more lights up front. So much that I had to douse the two closest torches
in order to reach the pedestal without hunt modes. Just like in the previous
version, stepping on the pedestal would turn on the lights, but leaving would
turn them back off after a couple of seconds. I could wait a moment after
doing so and rush over to the closing door in time to scoot under it (left
image below). Fortunately, the floor was stone down the middle. It took only
3 attempts and I got it with only first alerts. Cathedral Area To
get to the pub, I had to pass the first city section. The main problem was
the singer in the window (right image below). I couldn’t drop to the ground
with the guard without at least a first alert, so I started working on
getting through the upper door without the opera dude seeing me. I could rush
through the door with only a comment, but I wanted to eliminate that also.
Without explaining all my experimentation, I found a semi-predictable way to
do it. Crouching, facing the open doorway, leaning right, I strafed left until
just before getting spotted. The idea was that my body was now clear of the
door frame, though my view was leaned away from the door to avoid the alert.
I then quickly switched to lean forward and turned my view towards the
window. Then I strafed left until my body reached the shadow of the doorway.
This last move was the unpredictable portion, but I managed to do this entire
move alert free four times. It was thus a repeatable, non-exploitative
maneuver.
Had
to ride the elevator up and drop onto the lamppost in order to avoid the
worker in the next room. In the tavern I couldn’t avoid a first alert from
the bartender. There were just too many lights. The fireplace could be
doused, but that didn’t help; the electric lights were the problem. I managed
to get upstairs without further alerts though, with some nifty creep-leaning
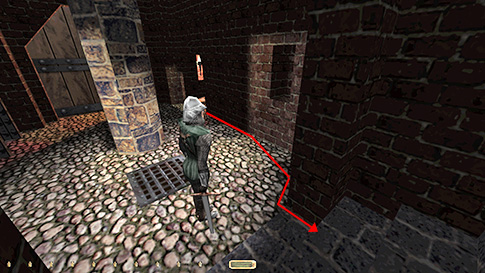
around the pillar. Outside
the cathedral I had to sneak along the closest wall in order to avoid first
alerts (left image below). The civilian behind the window in the far room
caught me if I went along the other side. I had to time the guard’s pivoting.
He had to face the stairs until I got over to the dark area next to him, then
he had to face away from the stairs for the last portion. Trial and error
really. Getting
the bronze gear from here wasn’t difficult at all. A breeze compared to the
Thief 1 version. I was able to return the cathedral key when back at the
tavern. Took another first alert from the bartender going out. Then dropped
down to the street to get the Masamune sword. I
could mantle through the window and avoid picking the lock. Pretty sure that
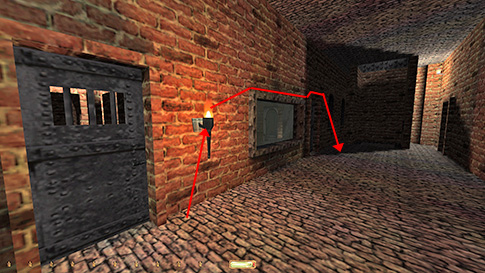
isn’t possible in OldDark. In order to leave this
area, I had to pass through the hallway with the worker behind the window
from before. I could mantle the torch and the window frame in order to avoid
his gaze (right image below). I couldn’t relock the double doors up top, so I
blocked one of them from opening. That seemed the most Supreme-like
alternative.
Church Area Managed
to enter the prison area without a first alert from the spider if going in on
the left side. I was not able to avoid such a chirp reaching the locking
mechanism, however. I tried mantling the open doors to avoid it even, but the
lights were too strong. Got another first alert when unlocking the cell, and
two more from the green spider entering and picking the lock inside. The
inmate next door also heard the lockpicks. I
managed to avoid hunt mode from the yellow spider by rushing in on the left
side and coming to a quick halt in the shade (left image below). In
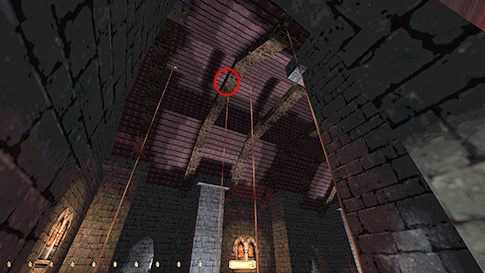
the church I had to grab and use the rope arrows in the first room. I needed
four arrows in order to predictably climb to the rafters without alerts, and
also go back to close up the gate later, while still recovering the ropes
(right image below). The hardest was jumping back and land in a mantle while
grabbing the last rope. I used the arrow circled in red in the image for this
hop. Jumping at this height also arced me above the window with the pivoting
mage. No busts in the church whatsoever.
There
was a book on the church altar that spawned a new optional objective. I have
never heard of anyone being able to finish this. I used Google Translate to
read the Japanese text and I think the message (and possibly also the
objective) is a joke by JIS. I could sense some frustration in his message
too. There was also a weird city section available from this area that served
absolutely no purpose. I wonder why he put so much effort into building
portions of the mission that doesn’t contain anything, although it looks nice
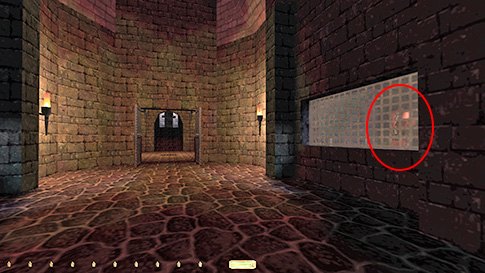
and finished. On
my way back I could now unlock the double doors in the foyer. A super
sensitive haunt prevented me from entering without first dousing the two
torches, however (image below). This meant I had to return to the prison and
get the water arrows in the other cell also. This triggered an extra alert
from the inmate there. I was able to leave after flipping the pillar switch
without getting spotted by the haunts behind the tapestries. Sneaking in the
middle kept me dark enough. Returned
the devilish key before approaching the newly opened doors back in the city.
Running inside spawned a comment from the archer here. The rest was easy.
Statistics: Time: 1:38:20 Loot: None Pickpockets: 4 out of 7 Secrets: None Locks Picked: 14 Back Stabs: 0 Knock Outs: 2 Damage Dealt: 2 Damage Taken: 0 Healing Taken: 0 Innocents Killed: None, and others Killed: 0 Consumables: 4 Water Arrows Ghost: Failed! Perfect Thief: N/A Supreme Thief: Failed! Perfect Supreme Thief: N/A Notes: -
Got a first alert from the lady in the kitchen when
opening the door after descending the fireplace chimney. Early Supreme bust. -
Nudged both
spiders at the bottom of the first elevator enough for me to be able to pass
undetected. Engine exploits. They also gave first alerts in the process.
Supreme busts. -
Didn’t flip the
big lever in the kitchen back for Supreme. Doing it was possible, but it
yielded more first alerts. -
Had
to knock out the two hammerites upstairs from the
refuse pit. One of them gave a first alert and the other alarm mode. Ghost
busts. -
Got a first alert
from a stationary guard when picking the lock on the chest to get the square lockpick. Supreme bust. -
Got a total of
3 first alerts from a mace guard outside the entrance to the sword’s key
area. Supreme busts. -
Doused 2
torches and took 4 first alerts when opening the cave door to the sword’s key
area. Supreme busts. -
Got a first
alert from the cave monster when picking the lock on the sword’s key chest.
Supreme bust. -
Got 2 first
alerts from the tavern bartender when going through this room, 1 each way.
Supreme busts. -
Got 4 first
alerts from the spiders, and 1 from the adjacent inmate in the prison when
entering to pick the lockbox. Supreme busts. -
Doused 2 torches in order to pass a haunt close to the
prison. Supreme busts. -
Got a first
alert from an archer when entering the final building. Supreme bust. -
I did not
return the kitchen and sword’s keys, nor the key of an open space or the key
to hell for Supreme, as that would incur additional busts. |
|
|