|
ELEVATOR MISSION (T1
v2) This is my first mission
by JIS, the infamous Japanese author from the early 2000s. This is probably
his most famous creation, but also one of the hardest missions ever made. No
story, very little loot, and seemingly random occurrences set in arbitrary
locations. All obstacles to prevent you from reaching the end. Most likely the
journey there will be a blood bath, unless you can maneuver around said
obstacles with careful planning and a lot of patience. Good luck with this
one! This mission forces a lot of
combat interactions and thus a lot of busts. I would not throw caution to the
wind, however, and stop caring about minimizing busts. I would even do my
best to limit additional Supreme busts, though I knew heading in that it
would be tedious. I’d have to make some decisions up front as to what kind of
busts would be more severe than others. First, kills I wanted to avoid at all
costs. This meant if I could get enemies to kill each other, that was
preferable. If I was forced to kill, I would want to do that without others
detecting it, even the enemy getting killed. Of course, if blackjacking was
an option, this would always trump other types of damage. Using equipment
would always be preferable for Supreme ahead of dealing damage, even
equipment use that is otherwise disallowed for that mode. For example, I’d
much rather douse a torch than knocking someone out. Basically, the regular
Ghost rules prevail if I have a choice between two different Supreme busts.
Finally, if returning items or closing doors would incur other busts for
Supreme, I would simply skip doing it. If it could be done undetected, fine. Unlike the mission
overall, the objectives were simple; get my sword, the Hand of Glory, and the
GilmoScepter. I also had to make it to the end of
the mission, termed as the ‘GOAL point’. This did not mean making it back to
the starting position, but rather as far as the mission would take me. Kitchen Area The first issue came below
the kitchen, where I could either deal with a green spider or head into a
chute down to a room with two guards. Both required an engine exploit; either
landing on the guard’s head undetected, or nudging the spider into said
chute, out of the way of my alternate path of progress. Since I couldn’t
return up the chute and would have to approach the spider from the front on
my way back anyway, the choice was simple. I scooted the spider to the right
into the chute opening (left image below). It gave a first alert when opening
the door to this room, but now it wouldn’t give another alert when closing it
on my way out. Supreme busted, big surprise.
In the next hallway was a
gate I realized I could lean through to open from outside. This prevented me
having to enter a room further up with a metal staircase and two more guards.
I needed to flip another switch here to open a throne room door. This switch
was also watched by two guards, both of which pivoted randomly. I had to wait
for them both to turn away and stay that direction until I was safe. Same
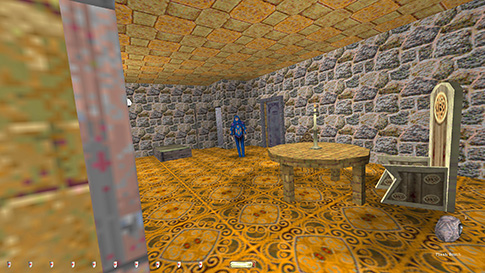
process going out. The throne room was
impossible to do Supreme clean. I took a first alert when entering, reaching
the carpet. I wasn’t able to sneak on either side without at least a comment.
I could then leap to the end of the carpet with only first alerts from both
guards (right image above). The same method worked jumping back from the tile
into the dark. Then got another first alert when leaving. It seems like an
oxymoron how sometimes the obvious forced combat rooms can be done Ghost
clean by simply moving fast. I closed the throne door and the gate to the
switch room afterwards. Leaving through the
kitchen required pulling the big lever by the fireplace. It could be flipped
back, but that would prevent being able to leave. I counted this as a Supreme
bust, though I think it’s silly, since the design forces us to remain trapped
if we reset it. I also didn’t return the kitchen key, since it would require
several more first alerts. Pit Area I reached the pit by
following the patrolling guard. Staying close on his tail meant he opened the
sliding door for me, which prevented a first alert from the stationary hammerite. Suprisingly,
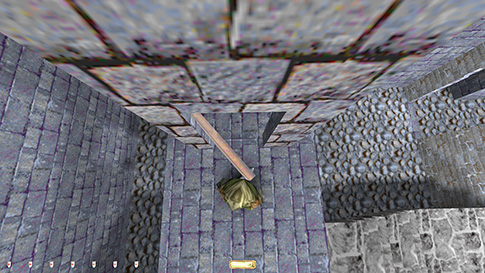
sneaking along the right wall avoided any first alerts. In the pit below
there were supposed to be two spiders and two zombies, though the state of
each of them can vary on each playthrough. The
first time I played, one of the zombies had woken up and killed both spiders.
This is very bad news. The second time, one of the zombies had disappeared
entirely. This time, both zombies were sleeping below the entrance chute and
the spiders attempting to attack them (left image below). This was the best
scenario, as the spiders would attack from various angles, giving me a chance
to descend and get the lockpick without alerts. As
long as they didn’t come charging, I was safe, which they didn’t after a few
attempts. This room was just trial and error.
The next room had a woman
staring out through a window to another room with two guards. I timed the
guards and headed over to the far door. I had to accept a first alert
entering the door, plus I had to rush it not to get hunt mode from the woman.
Beyond this door was an access point back into the first area of the mission.
This made me able to reflip the large lever in the
earlier kitchen for Supreme after all. This did, however, leave the door to
the throne room hallway open, but this couldn’t be
reclosed, and thus it wasn’t a bust to Supreme. Also in this area was a
hallway leading to the second lockpick. I couldn’t
pass the hall without a first alert from a kitchen maid though, plus I took
another one going back. I could pick the lock on the chest containing the lockpick without getting spotted by the nearby guard, but
he did gave a comment from the picking. Dodging the patrolling woman in this
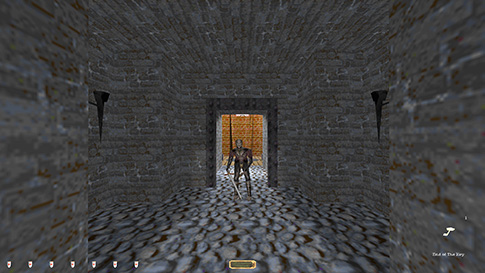
area wasn’t that hard. Sword Key Area The next area had a small
hallway with four doors, one of which had a lady with a purse. I couldn’t get
it without a first alert from picking the door, so I skipped it for Supreme.
In order to reach the sword key, however, I had to deal with a stationary guard
at the end of a long, lit, tiled hallway (right image above). This was an
obvious attempt by JIS to force head-to-head combat. The stealthiest way to
deal with him was to toss a flash bomb from a distance and run up to knock
him out while he was dazed and confused. At least I didn’t get spotted, and
no alerts were uttered, plus it wasn’t a kill and I only inflicted 1 damage.
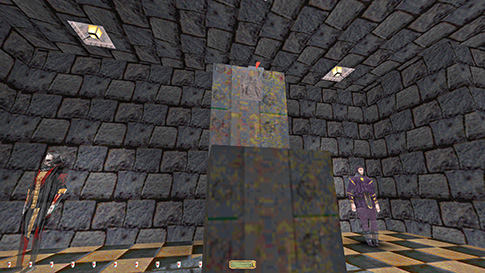
My first Ghost bust, but what can you do. The next room was very
interesting. Two guards protected a pedestal that, when stepped on, opened a
huge swinging door and turned on the lights. Beyond the door was a bugbeast and our required sword key. I could reach said
pedestal with only first alerts from the guards. With the lights fully on, I
couldn’t reach the door without alarm mode. However, when stepping off the
pedestal, the lights turned off after about a second, which also started the
door closing mechanism. If timing this, I could bunny hop over to the door
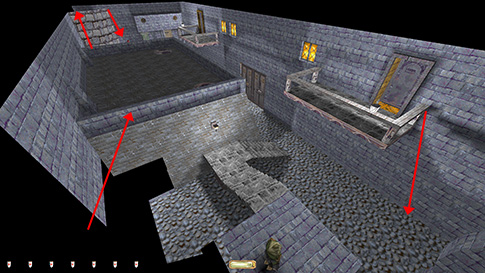
and get there in time, with sometimes only hunt mode from the guards. Galaer reported having to nudge the guards over to the
corners of the room to eliminate these busts, but I found a different way. If
mossing the floor in the middle and timing the lights turning off perfectly,
I was repeatedly able to do an angled running jump from next to the pedestal,
landing on the mossed floor, then jump again over to the right corner of the
doorway (left image below). Fortunately, the door had a grated window, so I
could successfully observe the guards remaining in their spots and hear them
settle down from first alerts (right image below). Nice!
I had to leave the door
open for Supreme when leaving, as pressing the pedestal again would incur
more first alerts. There was a lever on the inside, but it couldn’t be
flipped and then leave in time. In order to leave the entire pit area, I had
to cross the tiled foyer with the woman in the window again. To pass her
window undetected, I had to jump at the right time so that my body was above
the frame. The problem was she always second alerted when hearing me land, so
I had to use another moss arrow by the pillar (left image below). I tried
this jump many times without mossing the floor, but I don’t think it’s
possible without a Ghost bust. Cloud City Getting the sword wasn’t a
problem. The only issue was getting down from the initial ledge without a
first alert from the guest in the tavern across the plaza. He first alerted
if dropping straight down to the railing. I had to call over the lift and use
it to slide down when behind hardcover from the tavern window frame. Kind of
awkward, but repeatable. Said lift caused major issues on reloads though. The
thief that was supposed to be patrolling was already stuck on the railing
with his back turned. This made him easier to deal with for now, though it
happened on my first playthrough also, so I assume
it to be normal. The woman patrolling in the tavern, however, would on some
reloads spawn stuck inside the lift, usually dropping to the ground level.
This was a big pain and I tried to avoid it if possible.
The haunt in the building
with the chapel key unfortunately heard me picking the lock on the door. I
had to start the lift and mantle up it in order to avoid further busts from
this haunt. I couldn’t get onto it otherwise, as it was raised up too high
above the floor. Got more alerts from a woman and the outside thief when
picking the box with the chapel key. The thief’s alert can be avoided if he
isn’t stuck. I didn’t use the other door to exit from this room, as it
couldn’t be closed up. Instead I just descended back down the lift. I could
do this with no further alerts. In order to enter the
tavern to reach the chapel area, I had to hop across from the uppermost level
and land on the small green floating lift (right image above). I managed to
avoid an alert from the guy inside the tavern, but the woman and the thief
again first alerted. If the thief hadn’t been stuck, I imagine both of these
alerts to be avoidable if the thief is patrolling, as you can just ride the
green lift all the way over, but then the guy inside the tavern will
definitely alert, and possibly even the singer. Given my scenario, I think I
found the best way inside. Chapel Area I had to enter a room in
the chapel with a button to proceed. Inside was an acolyte and a floating
woman. Not sure if she was supposed to be laying down or what. They were both
alert and heard the lockpicks. In fact, in order to
avoid the woman going to second level I had to stop the lockpicking
immediately and the continue a few seconds later. Weird behavior. Inside I
had to press the far button, but there was no way to do that without using
equipment. I reluctantly used my final moss arrow (left image below). Using
arrows to hit buttons is allowed for Supreme as long as no one alerts in the
process. I had to follow the
patrolling guard upstairs and then avoid the gaze of the distant thief. He
pivoted frequently, so it was a random matter. Managed to crouch-strafe over
to the first room with no alerts after some attempts. Pressed the button in
here and then headed for the next door. This had to be picked and was in
direct view of the thief. He had to be facing away for the entire picking
session. I had to run over as the swordsman patrolled past the first door.
This spawned a first alert from the thief and the other stationary guard in
the distance. I’m sure the latter alert can be avoided if you’re lucky. I had
to redo this until I got through the door before the thief turned back. It
took probably 20 tries and I got it. Nice.
Underground I couldn’t
avoid full alarm mode from the caged bugbeast (right
image above). The lamp inside the cell and torch on the wall made it too
bright. I didn’t have anything to douse the fire with. I was also out of moss
arrows, though I don’t think that would’ve made a difference. It wasn’t a
matter of noise, but rather time spent in direct light. At least it was
confined and didn’t chase me. If following the patrolling servant, it would
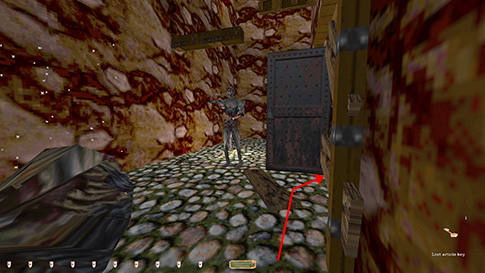
settle down before he returned and thus not transfer the alert. In the final cave I had to
douse both torches. This was intended, as 3 water arrows was in a footlocker
above. This triggered first alerts from all the enemies, but it made it
possible to sneak on the right and get the key and the loot (left image
below). All good for regular Ghost. I made sure to flip the large lever back when
leaving, in order to retrap the bugbeast.
However, it kept alerting the servant after spotting me, so I used a flash
bomb to keep its alert level to hunt mode. Normally, it settled down quicker
and thus avoided triggering any alerts with the servant. I felt this was more
in the spirit of Ghost, since it avoided human alerts.
Back in the chapel I
dropped over the railing immediately to the left while the thief was turned
away. In the tavern the lady had now spawned inside the green lift, which
meant she caught me when I tried to leave. This alerted the stuck thief and
everybody else nearby. I ended up having to use the last water arrow to douse
the torch, then operate the lift so the lady fell down, then jump out over
the thief with no alerts. All of this would definitely not be necessary if no
bugs had occurred. Other guards and critters from elsewhere in the map could
also randomly spawn to the lift upon a reload. Overall this area was a major
pain due to this lift bug and required lots of reloads. To other players I’d
recommend never operating the green lift in the first place, as that could’ve
been what initiated the bugs. Haunt Area After getting the haunt
key I had to use it on some double doors guarded by two hammerite
mages. To my surprise, running in on the left hand side could be done with
only first alerts (right image above). I had to get past the halfway point of
the door to get behind hardcover from the guard by the trees. Major ghost
busts averted here. This next area was really
cool, probably my favorite in the entire mission. To get the seal key without
alerts I had to frob the right door, otherwise the
zombie growled. Same with the room leading to the Hand of Glory; I had to use
the set of doors farthest away from Ramirez to avoid a comment. He only
pivoted two ways, so I could come at him from a straight angle to reach the
button unseen. The trap door couldn’t be reclosed. The prison hallway was
tense, but fun to ghost. The spiders in the cells alerted, although I
couldn’t really hear it from outside the cell. They also heard me picking the
lock in the alcove, and so did the prisoners next door. Timing the woman in
here, as well as the patrolling hammer priest was tough, but doable without
further alerts. Down below I encountered a
stationary blue crayman next to a dead hammerite. First time I played the roles were reversed,
so it probably means these two fight at the start of the mission and either
of them could end up winning. Unfortunately, I needed to use a speed potion
in order to get past without alarm mode. I then nudged it into the cave so I
would be able to pass going back later (left image below).
In the next area two
people heard me pick the lock on the door to the church. I then had to ascend
to the second level on the left side of the nave. I tried multiple times to
run around the column, even with a speed potion, but got caught every time.
The woman was super jumpy and alerted to the comments of the other hammerites. The trick to fool them was hitting the
teleportation button to the upper level from the opposite corner of the room
(right image above). Creep crouching over there didn’t trigger any more
alerts. It was a tough shot, but instantly transported me up top, and without
any alerts. The woman was still in a first alert state from the lockpicks though. The next section had only
one issue, a patrolling fire elemental in a narrow hallway (left image
below). I tried every which way to get past it, but I think its alert
sensitivity was set to max. Even the slightest flicker from the side and it
went to full alarm. From behind I could follow at a slight distance, but as
soon as I got too close it alerted. There was no shadow along the path it was
patrolling. My choice was to get seen and attacked, or to kill it. I chose
the latter, as it could be done while hiding. If using a broadhead
arrow, it counted as 10 damage and 1 kill. With a water arrow it was only 5
damage and no kills, so I chose that.
Back in the church I now
had to leave without busts. No button would get me out of this situation.
Rounding the corner to the right was the only option. Going fast or going
slow both yielded hunt modes. However, I found rushing around the first
corner, then coming to an immediate halt only triggered first alerts, despite
stopping in direct view of the hammerite priest. It
seemed that first corner was crucial to get through quickly, but then if I
continued running, he went to the next state, and this set off the other
enemies too. Stopping prevented this elevation of alert state and I could
slowly creep out with no further remarks. I could also have used another speed
potion to get out safely, but those are always last resort for me. The only way to reach the
end of the mission was to flip a switch now accessible close to the entrance
to the haunt area (right image above). I couldn’t avoid first alerts from the
inner guards when entering this room either. Flipping the switch not only
turned on the lights, but also set off a siren, triggering the 4 closest
enemies to full alarm mode. The woman in the nearby room had mysteriously
vanished, though I’m sure she would’ve alerted also had she been there. The
best way to proceed was to run out and make sure to hit the pressure plate so
the double doors closed behind me. The haunts immediately stopped when
realizing I was out of reach. No damage dealt or taken, but huge busts, obviously. Back at the first set of
double doors, I wasn’t able to rush out the same way I had going in. I had to
either nudge the acolyte forward a tad, or use my last speed potion. Engine
exploits are only allowed as a last resort, so I used the potion. Portal Area To get to the next area I
had to go through a portal guarded by 2 haunts. I went around on the left and
approached it from behind. I could watch the haunts’ positioning from
underneath the structure, but I wasn’t able to avoid a first alert from the
right haunt before going through the portal. It might be possible, but they
were pivoting so rapidly I didn’t try more. The next area was so frustrating.
Three haunts surrounded a podium with a button that teleported me back to the
previous section, no point in using that. The two haunts to the left and
right pivoted and could be in any position when I teleported. This time the
right one faced me, while the other didn’t. After experimenting, I found I
could quickly rush in behind the button structure and avoid anything more
than a gasp. Of course, if you’re lucky and they both have their backs
turned, this can be avoided. Then I had to circle the podium, timing the left
haunt’s pivoting (left image below). This was very annoying, as it required a
lot of reloading and I kept getting the black screen bug in this room
especially. For a time it happened on every other reload. Also, the haunt by
the exit kept disappearing when I reloaded. This happened more often than
not, so I used that to leave this room unseen. Due to its frequency, I didn’t
count it as an engine exploit. It was almost impossible to avoid. If the
haunt is still there, the torch on the wall in the hallway must be doused to
leave.
The pit beyond this area
had two stationary zombies. I could lower myself quietly by dropping the
healing potion into the nearest corner and hopping from the rope onto it. Got
first alerts doing this. Then to get out via the door I had to time the
pulsating lights. When at the lowest, I could rush through and sometimes keep
it to only level 1 alerts (right image above). I closed the door so that the
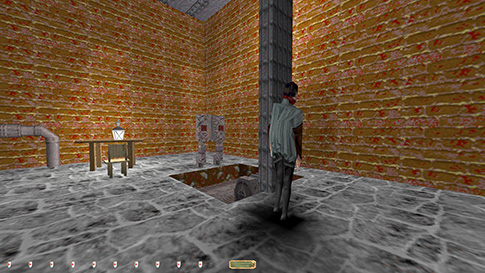
patroller wouldn’t see the zombies. In the next room I had to nudge an
acolyte forward and to the right of the lift in order to ascend without
getting spotted (left image below). I had to time the aforementioned
patroller and nudge in bursts. Up above, the next problem
came in a brightly lit room with a nobleman (right image below). I had to
pass through this room to proceed, so I decided to use another flash bomb and
knock him out. That way he didn’t alert anyone else and didn’t see me. I
didn’t use the switch under the bed, as that only opened up the double doors
to the courtyard, which I could get to from this balcony. Instead I went back
down and reflipped the large switch for Supreme.
I could enter said
courtyard via the balcony in the previous nobleman’s apartment. There was
another nobleman out there and a guard across the way. He always second
alerted when I appeared in the doorway, impossible to avoid. However, I could
use that to my benefit. If I stayed crouched with a yellow light gem, he
stayed in hunt mode and often had his back turned while looking. That’s when
I knocked out the man on the balcony and dropped over the left side to the
street below. He settled down before long, as he had only seen me for a brief
moment. This dealt 3 points of damage, but that is allowed as a last resort
for regular Ghost. This method also prevented said guard from alerting the
other enemies close by. In order to reach the
underground flooded caves I used the method presented by Galaer
in his report, so kudos to him. I mantled onto the half open door to the
tower (left image below), then furthermore onto the central rooftop, onto the
far tower, then dropped next to the hammerite
outside the wellhouse (right image below). This
spawned one first alert from the latter. Perhaps there is a way to avoid
this, I’m not sure.
Water Caves Not much to report from here.
Had to time the pivoting craymen to avoid first
alerts. Needed to use 3 breath potions in total, no way to do it all with
less. When I reached the monkey man, I had to use my last 2 water arrows to
get past him unseen, though he reacted to the first shot (left image below).
I didn’t reset the switch for this area for Supreme, as it would’ve required
using an additional potion. In the last cave stretch
there was a frog at the bottom. It was staring straight at me and I was fully
lit, so there was no way to avoid a third alert. When emerging, two more
frogs gave a first alert, though I was able to avoid a Ghost bust there. They
gave more chirps when picking the lock open. I could lean around the corner
and press the button without getting seen though. When coming back to the
zombie pit, I was unable to climb back up without getting caught by the
closest one. I tried a good number of times, even timing the pulsating
lights. It seems coming from this side, from dark to light, made it
impossible to avoid the bust. I quickly closed the door, returned the lost
article key and climbed the rope. Could jump across the gap without using
equipment, but got more first alerts from the zombies.
Endgame The next rooms had only
friends. Then in the final room were 3 haunts that had to die for the last
set of doors to open. The best way to defeat them was to have them follow me
back to the friendly guards, since they were immortal. I placed my healing
potion and a key on the pressure plate to prevent the gate from lowering,
that way I didn’t have to deal any damage (right image above). I could stand
on a table and watch the guards whack away. Then I made my way to the end
lift and finished the mission. I really like the
uniqueness of this mission, and how each section (each room even) feels like
a small mission on its own. There are a lot of new challenges I’d never have
to deal with before, forcing me to think outside the box. Thank you, JIS! Statistics: Time: 2:35:11 Loot: 1245 out of 1390 (the last 145 is
unobtainable) [Supreme: 1215] Pickpockets: 7 out of 9 Locks Picked: 21 Damage Dealt: 8 Damage Taken: 3 Healing Taken: 0 Innocents Killed: None, and others killed: 0 Bodies discovered by enemies: 1 Consumables: 3 Flash Bombs, 3 Moss Arrows, 6 Water
Arrows, 2 Speed Potions, 3 Breath Potions Ghost: Failed! Perfect Thief: Failed! Supreme Thief: Failed! Perfect Supreme Thief: Failed! Notes: -
Got a first alert from the green spider below the kitchen
when opening the elevator door. Supreme bust. -
Nudged the above spider into the nearby chute in order to
proceed without detection. Supreme bust, but allowed for regular Ghost as a
last resort. -
Got six first alerts when obtaining the kitchen key from
the throne room. Also didn’t return said key. All Supreme busts. -
Got first alerts from a woman outside the refuse pit when
entering and leaving the far door in the next room. Supreme busts. -
Got two more first alerts from a maid crossing a hallways
down to get the square-toothed lockpick. Supreme
busts. -
Got a comment from a stationary hammerite
guard when picking the lock on the chest with the square-toothed lockpick. Supreme bust. -
Skipped a purse worth 30 on a woman close to the sword
key for Supreme. Picking the lock on the door spawned first alerts. -
Used a flash bomb and knocked out a guard by a door
leading to the sword key. Ghost bust. -
Used a moss arrow and triggered five first alerts when
getting the sword key. Supreme busts. -
Left the big door to the sword key open. The only way to
close it was to trigger more first alerts. Supreme bust. -
Had to use moss arrow to avoid hunt mode from the woman
by the refuse pit when passing the foyer. Supreme bust. -
Got a first alert from a haunt by a lift leading to the
chapel key. Supreme bust. -
Got another first alert from the woman by the chapel key
and the outside thief when picking open the box. More Supreme busts. The
thief’s alert is avoidable. -
Got another first alert from the same two individuals
when jumping across to enter the tavern. Again, only the woman’s alert is
necessary if the thief had been patrolling. Supreme busts. -
Got a first alert from the man inside the tavern when
exiting via the back door. Supreme bust. -
Got two first alerts in the downstairs room in the chapel
when picking open the door. Supreme busts. -
Got a first alert from each of the upstairs sentries in
the chapel when heading for the pickable door here.
Supreme busts. -
Was spotted by the caged bugbeast
below the chapel to alarm mode when entering. Ghost bust. -
Used two water arrows to douse the torches in the shrine
with the training place key. Also got 3 first alerts doing this. Supreme
busts. -
Used a flash bomb on the same bugbeast
as above when leaving, but still got a second level alert. Another Ghost
bust. -
Used another water arrow back in the tavern and got first
alerts when jumping out. This can be avoided if no bugs occur. Supreme busts. -
Got first alerts from the hammerites
in the plaza with the haunt key when entering the double doors. Supreme
busts. -
Got first alerts from the caged spiders when approaching
and leaving the prison area. Got more such alerts from them and the next door
prisoners when picking the lockbox in their cell too. Supreme busts. -
Had to use a speed potion to pass a crayman
in the hall below the prison. Also had to nudge the crayman
in order to pass going back. Supreme busts. The potion is not needed (and
possibly also the nudging) if the winner of this fight faces differently. -
Got a first alert from two individuals in the church when
picking the entry door. Supreme busts. -
Had to kill the fire elemental with a water arrow in the hallway
leading to the demon key. It was either that or full alarm mode or attacks.
This counted as 5 damage, but no kills. Ghost bust. -
Got 4 first alerts when heading back through the church
to leave. Supreme busts. -
Got fully caught by 4 enemies when flipping the switch
after using the demon key. Got first alerts entering the room first too.
Inevitable Ghost busts. -
I did not lock up the doors opened by the demon key,
since I was being chased by haunts, but this can be done without taking
damage. Supreme bust. -
Had to use a speed potion to avoid getting caught by hammerites outside haunt key area when going back. Got
first alerts from both of them too. Supreme busts. -
Got a first alert from one of the haunts when entering
the portal, and one more when spawning in the next area. These are avoidable,
but it depends on luck. Supreme busts. -
Got first alerts from the zombies in the pit beyond the
portal when getting the key and entering the door. Supreme busts. -
Pushed an acolyte near the zombie pit over next to the lift.
Engine exploit and a Supreme bust. -
Used a flash bomb and knocked out a nobleman close to
large courtyard. Ghost bust. -
Was spotted to hunt mode by a noble guard in the
courtyard. Also knocked out the balcony nobleman in the process. Ghost busts. -
Took 3 points of damage dropping from the above balcony
down to the streets (taking only 2 damage is possible), and also got a first
alert from a mage to the right. Supreme busts. -
Got a first alert from the hammerite
guard outside the tower when jumping across the courtyard rooftops. Supreme
bust. -
Had to drink 3 breath potions in the flooded caves to
avoid taking damage. Supreme busts. -
Had to douse 2 torches to get past the monkeyman to get the end key. He also gave a first alert
to this. Supreme busts. -
Got spotted to full alarm by an underwater frog in the
flooded caves. Ghost bust. If lucky, you can get away with only hunt mode
here. -
Got two sets of first alerts from the frogs in the last
room of the flooded caves. One when emerging and one when opening the door. -
Got caught by one of the zombies in the pit when
returning from flooded caves. Ghost bust. -
Got two more first alerts when jumping across the pit to
the final area. Supreme busts. -
Had to alert the 3 final haunts in order to have the
guards kill them. Ghost bust. -
Didn’t return the kitchen, sword, chapel, training place,
haunt’s, seal, demon, JIS, or end of the key, as these would each require
additional Supreme busts. Not returning them, however, were also considered
busts. -
Not sure what the discovered body is from, as nobody saw
any of my knockouts. It could be from the zombie-spider fight in the trash
pit. It was not from the final haunt fight, as the stats showed it before
that point. |