|
THE BLACK FROG - Mission 2 The Portrait This
is where the mission pack really gets started. We finally see Gaëtane’s true talent at work. Yes, it’s your standard
break-and-enter map with something precious to steal in a difficult location,
but this time it’s done with style. A highly non-linear mansion with plenty
of secrets rewarding the thorough player. I also like when readables (actually reading
them) constantly provide worthwhile hints. Kudos to the testers and
translators for helping Gaëtane out in that
department. I can’t wait for the upcoming missions! Per
request of Belmont, I was to steal ‘The Lady of the Shadows’ from collector
Lord Vincenzo Garivaldi. I knew the portrait was
protected by elaborate security systems and I would have to circumvent them
to obtain my prize. Unfortunately, it sounded like Supreme was in for a tough
time. On my own personal agenda was the task of finding out why Belmont was
interested in the portrait, despite its low value. In addition, I needed to
find out more about the situation as a whole, perhaps the vaguest objective
of the bunch. The ‘Breath of Karras’ plus 2,000 in
loot were also on my list of to-dos. Lastly, I had to find an alternate way
to escape the proper. That sounded like enough trouble for one night, so I
got started. Security Systems My
arsenal contained nothing of use except the compass and lockpicks.
I found a rope arrow in the shed near the beginning outhouse. This was a
highly necessary pickup and no bust for Supreme. That mode enforces (at least
in spirit) the idea of picking up as little as possible, except for loot and
direct objectives. I am very much a stickler for rules and always try to keep
pickups to a minimum. I had already done an exhaustive blackjack run, so I
knew what items I absolutely had to
get. Supreme
has a few rules that made this mission considerably more difficult than
regular Ghost. “No turning off of watchers, or other security systems” was
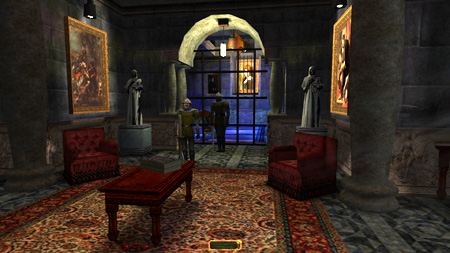
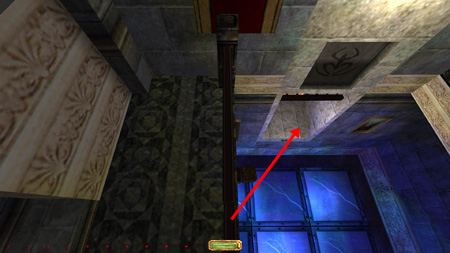
the most significant one. It meant I couldn’t turn off the electric floor or
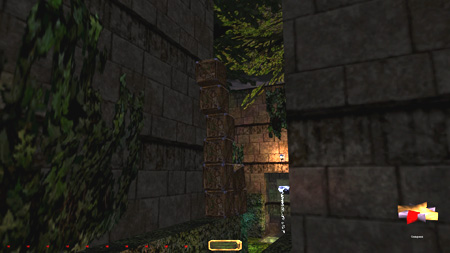
the camera in the portrait vault (left image below). If I could somehow
circumvent having to shut those off, then I would not only avoid the busts,
but I wouldn’t have to deal with the stationary swordsman in the garden
either. He protected the key for the camera switch and would almost certainly
require a first alert. Using that key also required cutting open a corpse
with a hatchet, and not to mention short circuiting a second camera in the
basement using a water arrow. Both situations were at least arguable Supreme
busts and highly desirable skips. So I decided to enter the vault and scope
the territory. Hopefully it would give me some clues to a possible solution. The
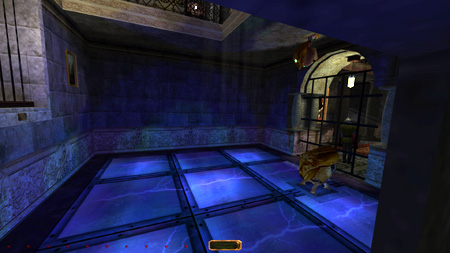
side shaft proved an excellent spot for recognizance (right image below).
Luckily, the grate didn’t make any noise. The watcher had a pivot angle of
180 degrees. There was a guard outside the main gate, facing away. Another
guard patrolled the outside rooms, coming to a halt in front of the entrance
with regular intervals. The floor was glass, but made metal sounds. The small
outcropping from the shaft was metal as well. The floor only caused damage straight
out from the portrait cage. Either side was safe. I couldn’t mantle the
portrait ledge without taking at least one point of damage. I must have done
that jump a hundred times, seeing if there was a chance the damage wouldn’t
kick in fast enough, but it always did. All hope wasn’t lost though, as I
found a neat little “safe spot” just to the left of the shaft ledge. Inching
down I could hide from the watcher before it swung back. There wasn’t much in
it, as I occasionally had to lean towards the wall not to get a chirp. As
soon as the watcher went yellow, the guard would start looking. It didn’t
matter, as I had to avoid both. I practiced getting back into the vent from
here also. It required a walk-jump
onto the ledge and further taps of the walk-key to lurk inside. Garrett
sometimes has a hard time entering crawlspaces, and leaning forward into the
chute was the key. I
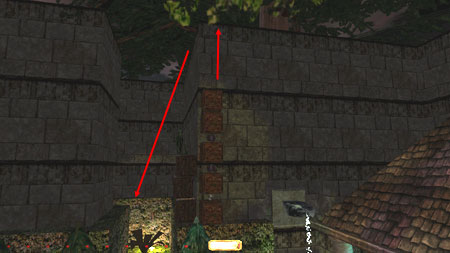
realized I had to attempt some acrobatics from the upper floor railing to
reach the portrait. With an angled strafe-run, I could be able to land inside
the cage without taking damage from the fall or the electrical floor. There were
quite a few factors to consider though. I needed to find the proper position,
angle, velocity and landing spot. I had to consider the roaming robot, the
pivoting watcher below and the patrolling swordsman outside the vault gates.
I also couldn’t make noise on the railing or during the drop. I used the
western railing, but assume it could equally well be performed from the
opposite side. There was a split in the railing’s top frame about one third
of the way from the north wall. This was my starting position. I first mossed
the vault’s northwest corner, to make the escape quiet, if the jump proved to be successful. I waited for all patrollers
to be gone and for the watcher to be on its way east. The latter was more
trial and error, quicksaving and checking its
position, then quicksaving again half a second
later until it no longer chirped when I dropped. Coming from the west side I
had to land in the right (east) corner; that allowed for more headroom and
prevented me from bouncing off the ceiling and onto the floor. I don’t know
how many quickloads until I got the hang of it. A
few times I would land on the edge, only to slowly slide down from lack of
forward momentum. Once I got in there with taking damage, alerting the front
guard to my grunt. That’s when I knew it was possible. Dozens of jumps later
I finally got it! I hit escape as fast as humanly possible and did a hardsave. Now I had to worry about grabbing the portrait
and getting back to the corner by the shaft before the watcher caught me. It
didn’t take hardly as many tries. The main problem was bumping into the cage
corner, which slowed me down to the point of not making it in time. It was
just a matter of the right keystrokes in quick succession. Eventually I was
safe. Now
that I knew it was possible, my thoughts went to removing the Supreme bust,
mossing the vault floor. Any use of moss arrows is disallowed in that mode
and there was another option. If I could make a crate-bridge to travel across
from the portrait cage to the wall, I might get away with a clean Supreme
steal. That might even make the entire mission Supremable,
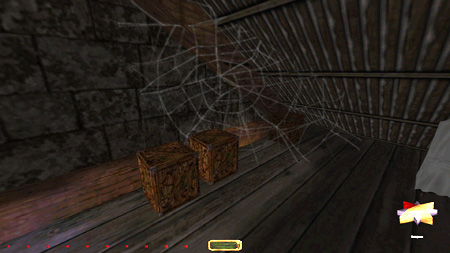
which would be awesome! It was definitely worth a try. Three crates should do
it, and there was a trio of such in the attic accessible from the southern
hall on the upper floor (left image below). The entry door was partly hidden
behind drapes. I brought them down to the vault one by one, via a rope arrow
into the collections room (right image below). The use of crates is perfectly
allowed for Supreme, as long as they are returned and not stacked on an
enemy’s patrol route. Crouch-dropping the crates proved to be silent enough
to avoid comments from the vault guard. I made a straight line of crates
starting a few feet out from the safe corner. They were pretty much flush with
each other, the furthermost placed just before the floor’s damage area
started. If placing a crate onto this portion, it broke into a million pieces
and alerted the whole neighborhood. It seemed wood suddenly was electrically
conductive. Once happy with my placements I made my way up to the second
floor to redo my leap. At
first I had a hard time finding the spot from before. I was actually too
close to the northern wall without realizing it. Once I found the proper
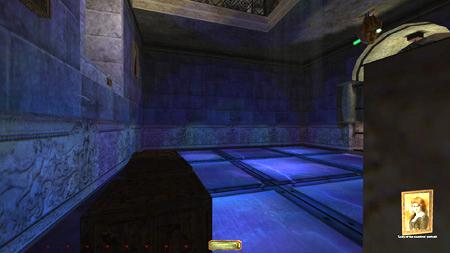
range it didn’t take too long to nail the jump again (left image below).
Leaving the cage took between 10 and 15 tries. A few times one of the crates
would shatter. That is property damage and not allowed for any Ghost mode. It
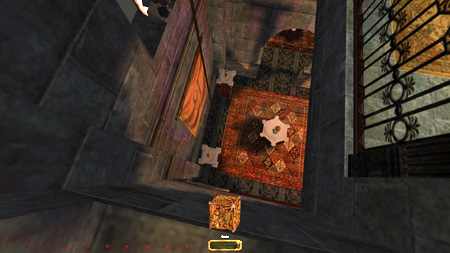
leaves you unable to return the crate too, for obvious reasons. The image to
the right below shows the portrait in hand, my successful crate-bridge and
the watcher not alerting to Garrett in the corner. Now all I had to do was
return the crates and continue my mission. I remembered to touch one of the
buttons in the code panel to close up the vault cage. There was no way to
close the gate to the code chamber itself. Supreme intact! As
I returned to loot the rest of the collection rooms, I found to my
disappointment that the guard who was supposed to be asleep in the northwest
was wide awake and stuck in his chair. I reloaded previous savegames to see where I alerted him and deduced that it
had to be during the crate-placing ordeal. I might have stepped on the tile
when ascending the rope but not heard the comment. At any rate, I had to
restart and do the entire set of moves over to save Supreme. This time it went
much smoother. I think I stole the portrait in less than 40 minutes. That
verified this method to be highly repeatable, it was just the experimentation
that took an awfully long time. It
was wonderful to loot all the collection rooms and peek into the vault from
the outside. Everything was left intact except for the missing portrait. I’d
love to hear them explain that one in the morning. General Looting From
here, much of the remaining mission was a breeze. There were a few tense
spots in areas with heavy patrols, such as the main hallways on either floor.
Other than that it was fine. I did Lady Garivaldi’s
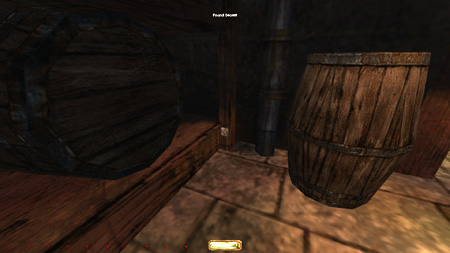
first. Found her secret under the desk and tested to see if the chapel key
could be returned. Her feet were resting on the carpet, so that would be sufficient.
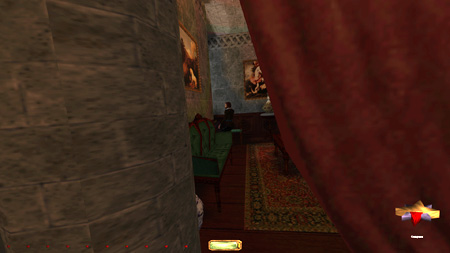
Grabbed the vase outside Sir Garivaldi’s and
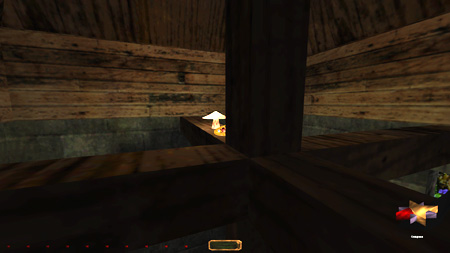
entered the west tower through the passage behind the drape. Climbed a rope
and grabbed the tiara up top (left image below). Dropped to the bottom and
started looting the main floor. Spied on Gilles and saw him run away. This
would trigger his body in the bath. Grabbed the items in the kitchen when the
servant left. He had a fairly big loop so there was plenty of time. Crossed
the main hall and took the statue there on the way. Back around through the dining
room towards the patio. Entered the library and cleaned Sir Garivaldi’s through the secret entrance. This way I
didn’t have to pick the doors and could leave his main key alone. Grabbed the
garden key and went back downstairs. I locked the garden door but blocked it
open. That way I could return the key right away. I would get back here later
but was a little unsure of the method as of yet. Moving
north I stole Gilles key from the pool. The splash didn’t alert anyone
upstairs if I waited for them to clear out. The roaming bot was around but it
never indicated any sounds for first alerts. I don’t know if it even had any.
Took the ring from the secret passageway and returned to the hall outside the
library. The guy studying to the south was now standing (right image above).
This meant I had alerted him somewhere during my recent endeavors. I reloaded
and found him to alert to me roaming around the pool. This was tricky to spot
due to the closed door. He saw me through the glass if I moved too fast. I
stayed on the pool’s north side this time to avoid his gaze. Dodged
the front yard guard and entered the chapel. Locked the doors from the inside
as I wouldn’t get out that way. Got the code scroll from the east tower. That
was an objective and couldn’t be returned. Lock-blocked the tower door and returned
the key to the middle floor desk. Crossed the hall and descended to the
basement. Took the Sir’s journal from the workshop and left. That was another
objective and also couldn’t be dropped back. The secret switch in the wine
cellar was a tough one to find (left image below). Thanks to Gäetane for letting me in on her secrets! Went up to the
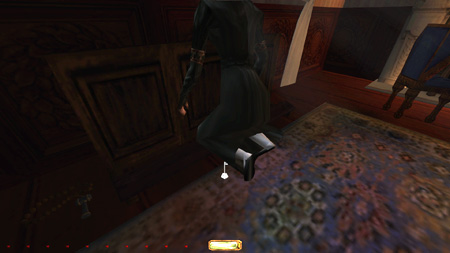
second floor and returned the chapel key to Lady Garivaldi’s
carpet (right image below). I had to go into the actual pool to return the
workshop key without alerts. The splash from the high drop seemed to carry
for miles, but from surface level it was quieter. The key eventually found
its way to the bottom. The Garden Coins The
only items remaining were the coins in the garden fountain and Karras’ Breath. The latter I was a little unsure of how
to handle, so I decided to go for the loot first. It couldn’t be taken in
conventional fashion by any stretch of the imagination. I’ll explain. The
‘Garden of the Muses’ was divided in half. The west part contained a
patrolling swordsman and the “secret” exit. No problems there. Another
swordsman, stationary this time, guarded the entrance to the eastern half. He
faced west, but could easily spot anyone coming via the entrance path. The
area was lit up by mushrooms and a lamp on the far wall. For plain Ghost I
could climb the grassy side and rush past the east corner, coming to a halt
in the shadows. This spawned a comment though, which is not allowed for
Supreme. It wasn’t possible to eliminate that alert by sneaking or
running. There simply wasn’t enough shade and the guard was too
inconveniently placed. It was only a matter of a few feet rounding the corner
though, and Perfect Supreme sounded too tempting to give up just yet. What to
do...? Could I enter that part of the garden in a different way perhaps?
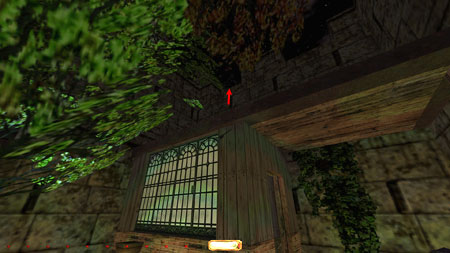
After a lot of searching, I finally found a way using the shed in the front
yard. It could be ascended with a rope arrow, and this gave me access to the
eastern wall (left image below). I couldn’t reach the muses garden directly,
but the chapel took me to the manor’s main roof. Circling north I could reach
the library. From there, the garden was in view. I could drop onto the spiked
fence, luckily without taking damage. Despite being in plain view of the
mentioned guard, I received no alerts if creep-crouching along the rim. Maybe
his field of vision didn’t extend that high. Regardless, I ended up on the
eastern wall behind his back. With accuracy, I could fling a rope arrow into
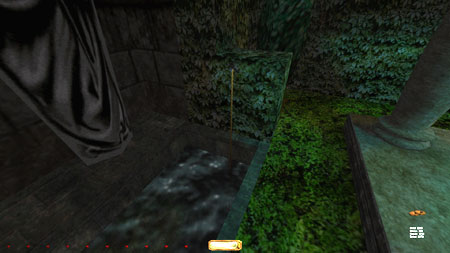
the grassy wall below and catch it jumping down. Voila! The
coins were in the backmost pool. Sliding into the
water still alerted the guard, so I had to utilize the rope arrow again to
descend quietly (right image below). The corpse on the altar had the key for
the basement switch. Due to my circumventing the security systems, I didn’t
have to deal with any of that. Instead, the problem ahead was leaving this
part of the garden. There was no orthodox way of getting back onto the upper
walls. No attachment sites for rope arrows were feasible, so the only obvious
way to exit was past the corner to the north. I could get closer coming from
this side, but rounding the corner always triggered an alert. Again, plain Ghosters don’t have to go through any of this. First
alert comments are allowed for that mode. Eliminating first alerts for
Supreme, however, is a whole different ballgame. I
soon realized drastic measures had to be taken. My thoughts drifted toward
crate-stacking as my only possible means of success. Luckily I had a savegame from the end of my blackjack run to test things
out. Eight crates total were needed to reach the proper height. Six crates to
make the main stack, and the other two to elevate the last ones to make them
reachable. I had to ascend the wall as close to the exit corner as possible,
in order to reach the crates from the north side to replace them afterwards.
Everything had to be returned to their original location for Supreme,
otherwise there was no point in doing any of this. That meant I had to reload
and set up the crates close to the corner first, then climb the walls and
roof like before, grab the loot, and finally stack the crates that would be
reachable from the east side. Supreme rule #7 states in part: “You cannot
stack boxes to gain access to an area when your stack is on the patrol path
of an AI. If it can be done in a
shadowed area off a patrol path or even in direct light where no one is
patrolling, that is fine.” The ledges surrounding the gardens were of the
latter kind, so no busts to Supreme in stacking crates here. The east tower
conveniently had eight boxes spread across the three floors. It was pretty
much a straight shot from there to the garden. The only slow area was getting
through the patio. It took time, but eventually all the crates were set up as
in the image to the left below. I couldn’t stack any more crates onto the southernomost one, as this alerted the guard. The tall
stack was beneficial because it would help me reach more crates when building
my stack from the other side. It seemed the wall corner marked the border for
the guard’s field of hearing, as I could stack crates north of this
completely unalerted. The corner in the far
northeast was a good spot to wait for the patrolling swordsman in between
placing each crate. Once all this was done I took the trip over the roof like
before, stole the loot and was ready to commence my project. My
hope was short-lived however, as I realized stacking boxes on top of each
other alerted the swordsman to hunt mode. What was alert-free on the north
side of the corner, busted even plain Ghost on the gazebo side. My plan
needed further adjustments. What I needed were soft objects that could be
placed in between each box pair. If I needed six boxes to climb the wall,
five soft objects were required to cushion all the box drops. Experimenting
using my blackjack-run savegame, I actually found
only five boxes to be necessary, since the extra objects added to the stack’s
height. That meant a maximum of four soft objects had to be brought along.
The best ones to use were 1) the chapel invisibility potion, 2) the fruit
from the basement workshop, 3) another piece of fruit from the southeast
bedroom upstairs, and finally 4) the crumbled piece of paper in the trashcan
east of the patio. All of these could be taken and replaced later without
busts. The deer leg in the north servant’s quarters might also have been
useful, but picking the door alerted the fireplace guard. This meant, of
course, that the hatchet used to obtain the key for the basement camera
switch also couldn’t be taken without busting Supreme. My circumventing the
security systems earlier was therefore confirmed necessary for that mode.
Grabbing the objects entailed retaking the workshop key. Making my way across
the roof for the third time, hopefully the last. The
order of objects in my stack was as follows: Crate, potion, crate, fruit,
crate, fruit, crate, crate (right image above). Notice I didn’t end up using
the scroll at all. I was high enough at this point not to alert the guard
from the last two crates touching. Also, stacking the scroll elevated me too
much to reach the fourth crate in the stack around the corner. From the top,
the guard’s head was hidden underneath the gazebo eave, so mantling the top
wall wasn’t too difficult. Phew! What work for a measly few coins! But that
was it; full loot all within Supreme rules. I
returned all 8 crates, the tower key, the invisibility potion, the 2 fruits,
the scroll, the chapel key and the workshop key. The Breath of Karras The
final problem was Karras’ Breath. When taken, it
closed the gate and triggered the alarm due to the weight sensitive pedestal.
I argue this situation to be similar, though not identical, to the alarm
situation in TDP’s ‘Undercover’. Since it has been deemed acceptable by the
ghosting community to trigger that alarm, why not this one? The only
difference is the existing option to avoid triggering the alarm, by placing
the little bag from the secret chamber upstairs on the pedestal first. Does
the mere existence of this alternate method cause triggering the alarm to be
a bust? To me, no, but I know other players will have a different opinion. I see
the alarm as an inevitable occurrence, no matter what method is chosen. When
Lady Garivaldi awakens in the morning, she’s bound
to raise whatever alarm she can get her hands on. By letting Garrett trigger
the alarm, you’re simply forcing the inevitable fate. I know that seems like
an argument made purely to justify the Supreme success, and it might well be.
Instead of having the debate with myself, I’ll leave the stats as a
‘possible’ success. That way, readers can feel free to chip in with comments.
Notwithstanding, this mission was at
least Perfect Thieved without a single first alert, without deactivating
any security systems, without using any water or moss arrows, with no
unnecessary pickups and with everything returned to its original state or
location. Some
of the guards were on high alert after raising the alarm, but nothing I
couldn’t sneak past. I utilized the rope arrow up to the stone window
directly above the collections room like before. It was an efficient means of
escape. Managed to drop the secret exit key on the swordsman’s patrol path
before it locked shut. Done deal! Statistics: Time:
3:18:25 Loot:
2370 out of 2370 Pickpockets:
3 out of 3 Secrets:
6 out of 6 Locks
Picked: 6 Damage
Dealt: 0 Damage Taken: 0 Consumables:
None Ghost:
Success! Perfect
Thief: Success! Supreme
Ghost: Possibly (see notes) Perfect
Supreme Ghost: Possibly (see notes) Notes: -
Taking the Breath of Karras
closed the gate and triggered the alarm. I am unsure whether this is a bust.
It is highly comparable to the classic ‘Undercover’ situation where the alarm
is set off as a direct result of stealing an objective. The only difference
is that you can prevent it, by placing the little bag on the pedestal. Of
course, the bag can’t be returned and that is a definite Supreme bust, so I
chose the alarm alternative, in case
it is accepted. I finished the mission the “intended” way also, to get the
definite plain Ghost/Perfect Thief success. |
|
|