|
PREVIOUS MISSION THIEF
2 NEXT MISSION Mission 2: Shipping ... And Receiving [This
report has recently been verified with TFix/NewDark 1.27. Although the
original text for OldDark has been preserved, any situations affected by
these patches are discussed in green. Keep in mind that there is a difference between playing the game in
NewDark with or without TFix. TFix updates the core mission files, as well as
applies .dml files that tweak the environment in numerous ways. These changes
aren’t supposed to have a significant impact on gameplay, but when ghosting,
slight changes could occur. If wanting as close to the “vanilla” experience
as possible, install just NewDark, without any further patches. I have
ghosted the game 1) in OldDark, 2) in plain NewDark, and 3) in NewDark with
TFix. This walkthrough will discuss differences between all varieties.] One of the best missions
in the game. A warehouse map hasn’t been done before and it stands out as a
unique, memorable creation. Interesting dialogues and readables introduce the
game’s new faction, the mechanists. This also jump starts the main storyline
regarding their influence in the city. The map is highly non-linear and
contain a variety of ways to move around, both high and low. Overall score: 7.9/10 Down to the docks I was
headed, to interrupt smugglers and loot warehouses. I needed 850 worth of
gold, including 5 spice bags. The only special objective was to redirect
Gilver’s shipment with a new label. I would have to snoop around to find the
label first. Even though the briefing said few guards were likely, that
wasn’t the case at all. The alleys surrounding the warehouse buildings were
filled with swordsmen and archers. Even some civilians were roaming about. I
would have to utilize all my skills to Ghost this one. As always, Supreme was
the ultimate goal, and I figured I was in for a challenge. Much equipment was scattered about, posing extra
challenges for purists. Eighteen pickpockets, only one of which was loot,
added more fun to the mix. I was really looking forward to this one! I fetched the rope arrow
on the west side of building A first. The only practical way to reach it was
by way of a difficult mantle up the adjacent shed. The southwest corner of
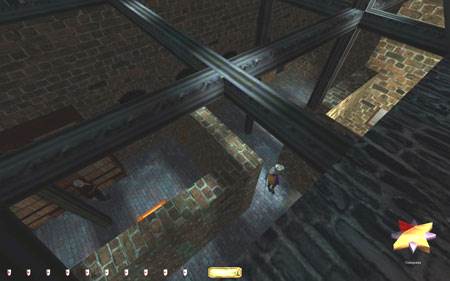
the crate was dark, so I hung out there waiting to drop back into the alley.
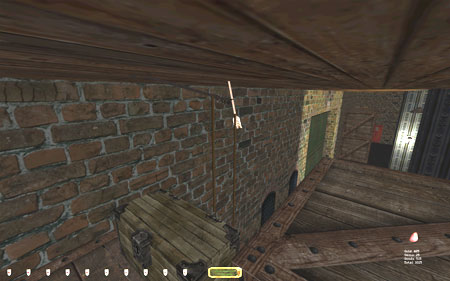
I entered building A via the ceiling window above the main offices (left
image below). I stole the few pieces of loot here and the key from the
control room. Despite the abundance of guards, the building wasn’t hard to
traverse, due to ample amounts of shade. I left through the side door in the
east. Used the control panel in the nearby shed to unlock the warehouses in
this vicinity. Got a bunch of pickpockets from
the top floor of building A and the patrollers in the surrounding alleys. Two
conversations on the south end of the building produced more patrollers. It’s
smart to wait with triggering these, or avoid them altogether. I started by the north
entrance and worked my way clockwise. At first I thought Kilgor’s Weapon
Smithing would be tough, as I knew there was loot inside. But the
merchant/hammerite behaved in a peculiar manner. After their lengthy
conversation, they entered the warehouse. Upon entry however, they were
nowhere to be found. I replayed the scanario and discovered to my
astonishment that they disappear after coming to a halt just inside the door
(right image above). Playing the sequence several times produced the same
result. This was most puzzling. Researching on the forums, I found they are
supposed to act like this. Initially, there was an error where they remained
outside indefinitely. This was later fixed in a patch by Winter Cat. I
recently installed DJ Riff’s Tafferpatcher pack; it might have been included
there. Well, if this is their intended bahavior, then I was in the clear for
Ghost. Most of the warehouse entrances had windows, causing tricky situations
for Supreme Ghosters. On more than one occasion, I realized I had been seen
by outside patrollers through the door. Even when crouching they had the
ability to spot me. That happened a time or two at Kilgor’s. The next warehouse was not
any easier: Mynell Steaks. A large green spider was held captive inside a
cage with loot, but the real problem was his three little brothers spread
around the storage room. All of them were stationary, pivoting with their
famous butt-vision. X-ray butt-vision at that! I figured the boxes would help
me out, but these critters could see straight through them. A tiny statue
worth 15 gold was situated smack in the middle of two of the spiders. The
third was way over in the corner. I could traverse the southeast corner and
along the southern wall without trouble. One spider was staring straight into
the wall and the other was too far away. But the last was looking directly
south, right in between those two wooden containers. Two lifts as well, in
opposite corners. I focused on the loot in the cage first. I could dodge the
looks of the patrolling spider by hiding behind the nearest pillar. I could
even reach the lever and raise the gate. There was a patch of shade just
inside doorframe on the south side (left image below). Alas, I couldn’t reach
it without a chirp from the small spider further north. It didn’t matter how
slow I went. I was creep-crouch-inching my way against the pillar, but still
spawned a sound. There was no other way into the cage, so I kissed the nugget
goodbye for Supreme. I could Ghost in and pick it up easy enough. No offense
to plain ghosters, but there is more than a subtle difference. To access the loot
upstairs, I first needed the safe key from top of the storage locker. The
locker itself had another angry little spider. The key drops from a ceiling
hatch by pushing a button just inside the door, but that alerts the spider to
hunt mode. It was much easier to climb the outside of the chamber and grab
the key from on top of the hatch. The spider still alerted to clunky
footsteps, so I had to traverse carefully. I flung a rope arrow into the
ceiling and used it to ascend silently. If the rope hung close enough to the
edge, I could swing around from the top, climb back down and grab the rope
while standing on the chamber sort of. That method is absolutely silent. To
slide down the slope after taking the key I just tapped the walk-key while
crouching. Another jumpy archer patrolled the outside hallway. The only way
to reach the safe across the hall was by unlocking the door from the outside.
Yes that’s right, you can unlock many of the doors in this mission from the
outside, despite the locking mechanism being situated on the wall inside the
room you’re trying to reach. In this case I could even unlock the safe and
grab the valuable recipe from outside the door (right image above). This
method is considered an engine exploitation, as it goes against all laws of
physics. But exploits are allowed in plain Ghost as a last resort. The north
elevator was too protected by the critters, so this was definitely a last
resort. Supreme thus had another two pieces of loot skipped. The last statue
could be reached riding the north elevator down to the backside of the small
spiders. Cleaned T.M. Blackheart,
Cid Capezza, Lady Angelica’s Experimental Apothecary, and E.B. Bramrich’s
accountant office without trouble. One piece of loot at Lord Porter’s had to
be skipped for Supreme. Rule #5 states: “Use nothing that would leave a trace
or remnant of evidence. [...] Rope Arrows and Scouting Orbs can be used but
they must be retrieved.” I reason it to refer to any non-retrievable
equipment, regardless of any visible
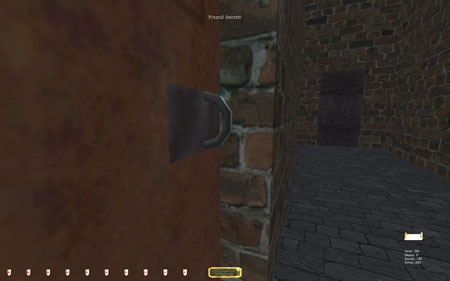
remains. An arrow had to be struck into a specific spot of a painting in
order to reveal a hidden alcove behind it (left image below). What happens to
the arrow upon impact? Does it get stuck? Does it shatter into a hundred
pieces? Whatever the answer, it would bust Supreme, so I moved along without
it. [UPDATE 10/12/11: Old Man pointed
me to a trick I wasn’t aware of. Apparently, hidden buttons can be triggered
by the use of scouting orbs. These of course can be retrieved and are
perfectly legal for Supreme. They’re also silent as can be. I went back and
tried it and sure enough, the painting swung open. This means the total
available loot for that mode is 1405. A small, yet important boost.] I
could ascend the elevator despite the button being broken. The ceiling was
wood so I used a rope arrow (another broadhead was intended but unnecessary). Building B was hassle free
except for one piece of loot. It’s in a closed off section on the first
floor, southeast corner. A spice bag is found inside a sideways container,
but it’s inaccessible without some serious intervention. The first obvious
entry point is the outside door, but the locking mechanism is found on the
inside and the wall is too thick to allow outside frobbing. The second way in
is through the ceiling window, but breaking it is deemed property damage and
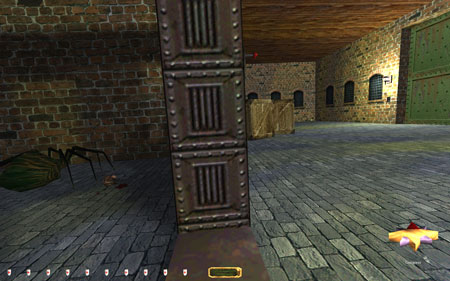
not allowed in any Ghost mode. The third is past a footlocker up high on the
south wall. It’s not intended for passing, but Sneak, Old Man and Peter Smith
way back in the day came up with a clever way to do it (right image above). I
won’t attempt to claim any honor for the method, but it actually isn’t too
difficult. You need two rope arrows for the job, so make sure to pick up the
first one west of building A. The other one is in the pickable footlocker
right here. Climb up by fastening one arrow into the ceiling and pick open
the footlocker from the edge. Fling the second arrow into the ceiling so the
rope hangs down just off the back end of the chest. You shouldn’t see any of
the rope transmigrating into the wood of the footlocker, then it’s too close.
But just so you can spot a tiny opening between the rope and the back end. I
couldn’t reach this line in any other way than to jump onto it from the
initial rope. That is, I managed once directly from the edge but wasn’t able
to recreate it. The safe way to attach to it is to jump from a foot or so
down on the first rope, since the jump angles upward. Chances are the hop
will reach the second rope at the very top. Then climb as high as possible
and swing around by moving the mouse so you see directly west. The engine
will attempt to force Garrett’s body through part of the chest by pivoting
around the line. You might have to wiggle arround a little to get fully over
on the east side of the rope. The trick now is to look down and open the
chest. I think this forces you through the footlocker just a little more and
solidifies your positioning. To get off, press the back button and jump. Then
all you have to do it strafe back and to the right and slip between the chest
and the crate to the north. Voila! I have repeated this set of moves many
times and it really isn’t that hard. The trick is to have motivation enough
to try persistently, like the aforementioned taffers so zealously did.
Astonishingly, this situation completely pales in comparison to the events unfolding further below. The
abovementioned footlocker has in T2Fix been shifted a considerable distance
to the north (left image below), enough to easily pass between the footlocker
and the wall by use of a single rope arrow. This of course renders the above
description a moot point, though it does remove the gameplay element of
coming through the skylight, which was the obvious intention from the
authors. This is where fan-made patches should tread carefully. To me it is
ok to use such patches to fix errors, technically, aesthetically, or
otherwise, but once you alter elements in gameplay due to meer preference,
you cross a line that is very difficult to either define or defend. I can
confirm that the technique described above does work in NewDark. The sad
thing is that very few players will ever get to try it, as probably 95% of
new players will implement T2Fix by default. ‘Nuff said.
The Cargo Ship Davidson’s ship contained eight pieces of loot, all but one of which
had some degree of challenge to them. I entered the boat via the ladder in
the aft, that is the backend. Five enemies to consider, three thieves and two
spiders. Two of the thieves had long routes involving the nearby building B,
so they could pretty much be disregarded. The last thief was stationed on the
deck, shifting between three directions. Strangely, he covered all angles
besides the one facing the deck entrance. The spice bag on his belt was the
first target, although it wasn’t too difficult to obtain. I slid down the
northern slope coming from the stern (again, the backend) while the thief was
facing away. The next piece of loot was the spice bag on deck. The two spiders in
the shed were already alerted to full alarm (third level). I could hear them
clearly from the outside. I also realized the door to their shed somehow was transparent
to the critters. They saw me the instant I passed in front of it. I restarted
the mission to see if they were alerted from the beginning, and surely, I was
never able to encounter them in a restful state. They have a high pitched,
elongated chirp when in this state, easily recognizable. I figured they had
spotted the stationary thief as he was lit up quite well from the surrounding
flames. Had they been in hunt mode they would’ve searched around the inside
of the shed making footstep sounds. Since they were unable to open the door
to attack, they instead stood frozen in alarm mode, similar to a guard waving
his sword if Garrett mantles onto an unreachable plateau. Opening the shed
door out of view solidified this hypothesis, as they went straight for the
thief and caused a fight. This door was special in other ways too. In fact,
I’ve never seen any other door behave this way. First, it gave an unlocking
sound when opened, even though I frobbed it without the use of a key. Second,
it couldn’t be closed, although it lit up as if frobbable. Third, I could
penetrate it from the front just by regular leaning. That’s when my previous
theory got confirmed. I could see the critters had their pedipalps raised,
doing small leaps as if viewing an enemy from afar. So if I could
transmigrate the door, couldn’t I just grab the loot from outside, you ask?
Well, this is considered an engine exploitation, and only allowed as a last
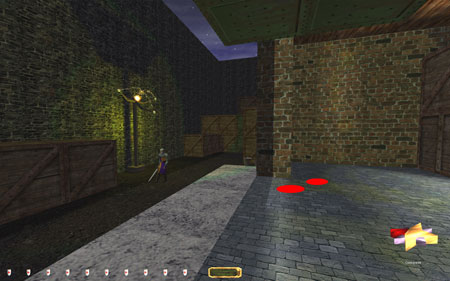
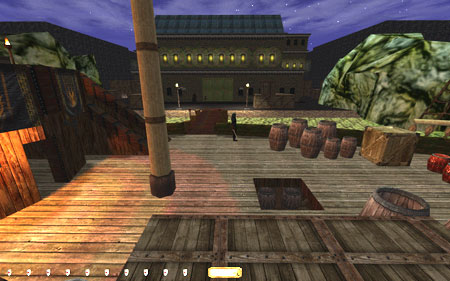
resort. And there was another non-exploitive way to obtain the loot. Dousing
the three torches closest to the thief lowered the spiders’ alert level to
rest mode (left image below). This was proven by opening the shed door and
seeing no spiders leave to attack. The sounds they made were different as
well, more like the regular soft hissing noises. Leaning through the door at
this point revealed them facing south. Of course, they still have their
butt-vision so in effect their orientation was unchanged. This meant Supreme
had to skip whatever was in the shed. Neither dousing torches nor transmigrating
doors are allowed for that mode. Dousing the first torch spawned a comment
from the stationary thief anyway. It was one of those comments that takes a
few minutes to produce a settling remark, similar to enemies alerting to the
opening of doors or picking of locks. Ok, so the door could be opened, but
reaching the spice bag inside still wasn’t that easy. I couldn’t cross the
view of the door, so instead I had to climb the top. With the stationary
thief turned I mantled up, quickly traversed to the east side of the door and
slid off the edge quietly. With the three aforementioned torches out, the
thief only commented when pivoting south. I opened the door and spotted the
spice bag (right image below). The spiders couldn’t see me from around the doorframe
corner, so I grabbed the bag and mantled back over the shed. Two of the
three fruits in the shed could also be obtained within plain Ghost rules. The
rightmost apple and the cucumber could be taken while grabbing the spice bag.
The cucumber wasn’t in view, but could be taken around the doorframe corner.
I always keep an inventory object active and when it shrinks in size I know
something is highlighting. I grabbed the cucumber without alerting the
spiders using this method. The apple in the nearest corner was out of reach,
though it can still be reached by leaning through the door while it is
closed. As mentioned, most of the objects can be obtained this way but due to
it being an engine exploit it is only allowed as a last resort. Norwegian
Thief aims to obtain every possible pickup within Perfect Supreme
rules. I see that mode as the ultimate challenge in Thief; stripping a
mission utterly clean without a single enemy comment, without using any
consumables, returning everything to its original state and leaving no traces
of my presence. As an example, only two missions in Thief Gold were
successfully Norwegian Thieved. T2Fix has
made the shed door work as it should, which makes the situation regarding the
spiders quite different. They are no longer alerted while inside the shed,
only if the door is opened, where they first alert to the opening and third
alert to the thief, given the torches haven’t been put out. The door is no
longer see-through, and it can be closed like any other door. Getting the
spice bag can no longer be done by leaning through it. Instead, you can push
up against the door while opening it. This makes you able to take any item
inside the shed, while still being hidden from the view of the spiders (right
image above). This isn’t an engine exploit, as the door technically is open.
It can even be done without dousing any torches, though it is very difficult if you want all the
items (spice bag + apples + cucumber). You basically have to rely on the
thief facing north long enough to get everything. And it is a bit of a
guessing game on where the fruits are located in there, since you can’t see
them. The only way to tell they are highlighting is by seeing the door not highlighting any longer. The spiders now started behaving peculiarly. Upon the first reload to
a save state after having opened
the shed door, the spiders did a patrol route out of the shed, about halfway
across the deck just past the first mast, turned around and headed back for
the inside of the shed (left image below). They gave several settling remarks
as they came to a halt and returned to a complete resting state. This small
patrol did not repeat and I was never able to spawn it any other way than by
reloading after the shed door was open. I had to time the reload to a state
when a) the stationary thief had his back turned and b) none of the
patrollers were anywhere in sight. Either of those conditions would spawn a
brawl. From this point on, all three thieves gave comments when facing the
shed, then settled with another remark like “I’m getting too jumpy” when
turning away. The spiders never alerted again. They were however much more
sensitive to movement on deck from me. I had to slowly sneak in and out the
cabin doorway, but dousing the last torch was not necessary. Of course, none
of this applies to Supreme, as the shed loot for that mode was skipped
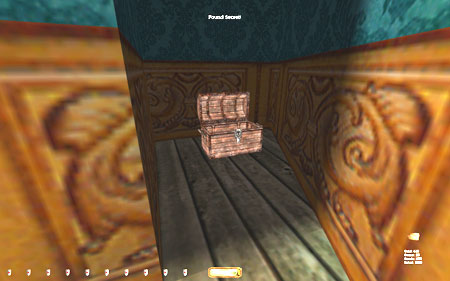
entirely. The focus ahead now lay on Davidson’s cabin. It held five pieces of
loot, only two of which needs reporting, located in chests behind banners.
Again I redirect all honor and glory to Sneak, Old Man and Peter Smith and
their endless work towards perfecting this mission. Both banners can be
transmigrated, thanks to them. The northern one is by far the toughest, so I
suggest going for the other first. The methods below are very close to the
original instructions, developed by the aforementioned taffers. They have
recently been revamped and confirmed by Sneak and myself. You can view Travis
Whitsitt’s video of them here. Here’s how to reach the loot behind the southern (starboard) banner
without property damage: 1.
Crouch
hugging the middle of the banner and shoot a rope arrow straight into the
ceiling as close to the banner as possible. 2.
Release
the crouch to grab onto the rope. 3.
Climb
to the top, turn around 180 degrees and jump. [You should now be attached to
the banner and unable to walk away] 4.
Retrieve
the arrow. 5.
Crouch,
hold back and jump. [You should now penetrate the first layer of the banner
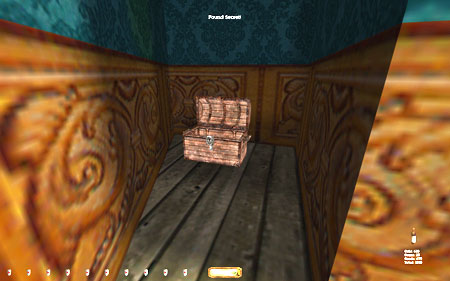
and if crouching, the chest should highlight] 6.
Unlock
the chest and grab the contents (right image above). Quicksave. 7.
Slide
to the right with your back to the banner and position yourself so that the
vertical line of shade on the wall is in the middle of the screen. Then
crouch, lean forward and jump. [You should be propelled to the front side and
be completely free of the banner. If not, reload and try again.] Here’s how to reach the loot behind the northern (port) banner
without property damage: 1.
Crouch
hugging the middle of the banner and shoot a rope arrow straight into the
ceiling as close to the banner as possible. 2.
Release
the crouch to grab onto the rope. 8.
Climb
to the top, turn around 180 degrees and jump. [You should now be attached to
the banner and unable to walk away] 3.
Retrieve
the arrow 4.
Crouch,
hold back and jump. [You should now penetrate the first layer of the banner,
but the chest won’t highlight yet] 5.
Face
the chest, crouch, lean forward and jump. [The banner’s second layer has been
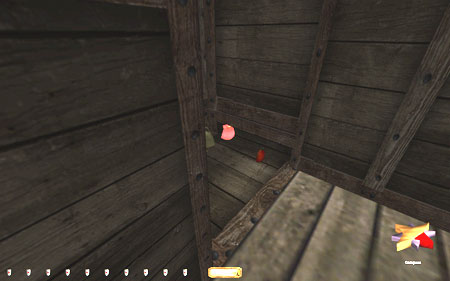
penetrated and the chest should highlight] 6.
Unlock
the chest and grab the contents (left image below). 7.
Crouch,
push back and jump. [The chest should not highlight anymore] 9.
Slide
to the left with your back to the banner and position yourself so that the
vertical line of shade on the wall is in the middle of the screen. Then
crouch, lean forward and jump. [Although no visible change is apparent, the
force from the wall has pushed you through to one of the front layers] 10.
Move
a little bit to the right, crouch facing the chest, push back and jump. [You
should bounce back to the front side of the banner, seemingly a foot or so
away, although still attached] 11.
Walk
all the way to the door end, crouch, move so the right side of the bed is in
the middle of the screen, lean left and jump. [You should now be completely
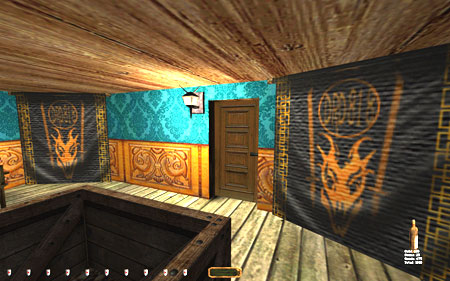
free of the banner] Throughout the entire process I turned up the volume to listen for
alerts from the deck guards. They regularly commented on spotting the
spiders, but that never resulted in hunt modes. My maneuvers inside the cabin
occasionally had them start searching, which indicated a bust. Mossing the
bottom of each banner takes care of the problem ahead of time, but I wanted
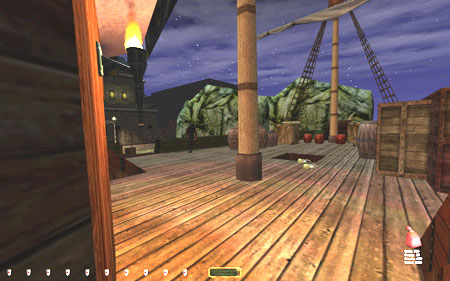
to avoid consumables. The right image below shows Garrett after having
retrieved both pieces of loot, with both banners still intact and no alerts. Neither
banner can be transmigrated in NewDark. At least I haven’t been able to. Both
pieces of loot thus need to be skipped for all modes. Snuck off the ship by creep-crawling out the cabin doorway and
climbing the aft ladder. Ventured along the east wall of building B, back to
Noah Jerm’s warehouse, replacing the various keys for Supreme along the way.
They were all taken from patrollers, so no alerts were risked in the drops.
Used the control panel in the middle shed to open the bay door. Grabbed the
loot and headed for Gilver’s. Switched the packaging label there and stole
the final pieces of loot. A diamond in the office could be taken through the
banner. T2Fix changes this diamond to not be frobbable
through the banner. According to Jax64 on TTLG, the diamond now gets
transported there only when you slash the banner, which apparently was the
intended implementation. Alas, Perfect Thief busted in NewDark then. Exited through the second floor door. Put the yellow key back in the main office control room for Supreme
and reset the code to ‘0000’. Returned to the starting corner via the metal
catwalk, dropping silently onto the barrels below. Statistics: Time: 2:19:25 Loot: 1665 out of 1665 [NewDark: 1440] (Supreme: 1405 [NewDark: 1305]) Pickpockets: 17 out of 18 Locks Picked: 3 Secrets: 12 out of 13 Damage Dealt: 0 Damage
Taken: 0 Consumables: 3 water
arrows on ship deck (plain Ghost only) [NewDark:
None] Ghost: Success! Perfect Thief: Success! [NewDark: Failed!] Supreme Thief: Success! Perfect Supreme Thief:
Failed! (Norwegian
Thief: Failed!) Notes: -
Skipped a silver nugget (50) in
the spider cage at Mynell Steaks for Supreme. The small spider nearby gave a
chirp when crossing the gateway. -
Couldn’t reach the valuable
recipe (50) in the safe at Mynell Steaks for Supreme. The only way was by
exploiting a hole in the doors highlight perimeter. Engine exploits are not
allowed in Supreme Ghost mode. The small statue (15) in the north end of the
first floor was thus also skipped for that mode. -
Skipped the spice bag (20) in the
small shed on Davidson’s ship for Supreme. Had to douse three torches on the
deck to avoid a fight between the spiders and the stationary guard. Putting
out light sources is not allowed for Supreme mode, plus the water arrow
spawned a comment from the nearby thief. With T2Fix
you don’t have to put out any torches, but the spiders first alert to the
door opening, so the loot still has to be skipped for Supreme. -
The three pieces of
fruit in the shed were also skipped for Norwegian Thief mode for the same
reason as above. -
Skipped two pieces of loot (125)
behind the banners in Davidson’s cabin for Supreme. Obtaining them requires
banner transmigration, an engine exploit not allowed for that mode. In NewDark, these also have to be skipped for regular Ghost. -
Had to skip the diamond (100)
behind the banner at Gilver’s for all Ghost modes. T2Fix renders this diamond
unobtainable, and correctly so. The only way to take it is to slash the
banner, which is property damage. |
|
|