|
The Burning Bedlam [Thief: The
Dark Project 20th Anniversary Contest] Again
choosing at random, the choice fell on The Burning Bedlam by Phantom. This
sounded like a very different mission from the first one. I was very much
looking forward to it. -
Seems like a cragscleft style mission. Can’t get much better than
that. -
Very nice
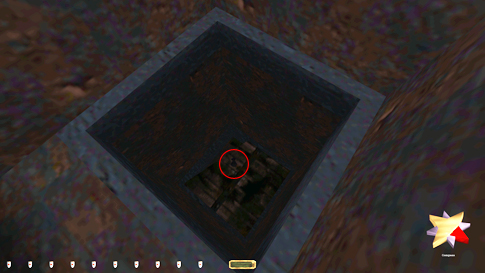
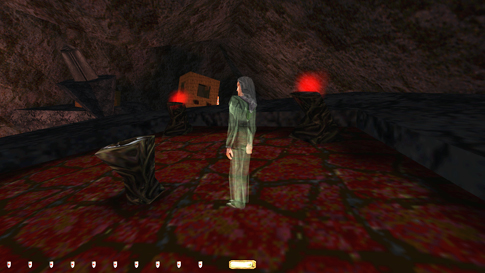
atmosphere in the opening cave. Great first impression. -
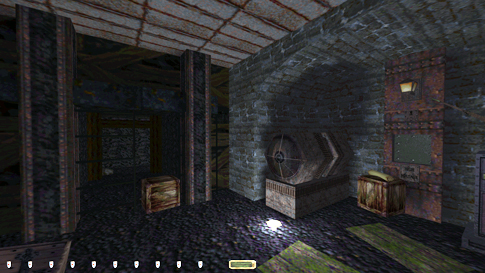
The first cave
has so many details to love. I assume it’s what’s called ‘Mine Entrance’ to
the right on the map. -
Wow this
mission is clever. Once I read the note about the locked gate and headed back
to the smithy, things had changed in the starting cave. Creepy and lovely. -
The smithy
itself was so simple, yet incredibly tense. Just up my alley. -
The mines give
a classic cragscleft vibe. Wonderful. -
Think I found
the exit drain. Seems like the armory key is in there too, according to the
note here. Gotta reach the asylum first, it seems. -
Surprisingly
much packed in a small space in this map. I really loved the sewer section,
and how it wraps you all the way back to the starting cave if you open the
correct gates. -
Good use of
sound throughout; good sound design. -
The only bad thing
so far is the mission is quite linear. Once you open up all the passageways,
then it’s better. -
The asylum had
the right vibe; scary, but not packed with enemies. Subtleties do the job. -
The in-game
maps remind me of TDP’s original ones. -
I really like all
the readables. They tell the story of this desolate
place quite effectively, much like the original TDP missions used to. -
Had to use a
hint from the forum to figure out how to proceed once I reached the asylum. I
was sure there was a way to proceed past the lava pit, but I was mistaken.
The gate back in the mines now suddenly open by help of the lady in green. A
bit random. Not enough clues to figure that one out. -
Got to the
asylum via the majestic bridge area now. Very, very cool. Some cleverly
hidden loot around also. -
Had to break a
board to descend to the foundry basement. Would bust ghost that, if required. -
This mission
impresses me more and more. So many clever passageways that rewards an eager
searcher. The water tank with the drowned hammerites
is my personal favorite. I reached it by stacking some items and mantling up
the vent shaft, but I imagine you’re supposed to drop from above. At least
there’s a chute up there. -
Not sure how
much I like this back and forth on the top floor with all these keys. Matron
key, observation key, treatment room key, etc. I guess it’s not too bad when
I think about it. -
This mission
would be an interesting ghosting experience. Supreme would be very tough. -
Overall
impression: A very solid mission. Classic Thief experience. Linear to begin
with, but opened up later on. Creepy, but not overly so. A nice balance
between puzzle elements, hints from books and diaries, mystery, platforming, keyhunts, and confrontations. Well done! 26/30 A
very nice and surprising first entry by Phantom. I don’t play straight up
undead missions too often, but if well-made, it effortlessly tenses the
atmosphere. Although the mission in principle is quite linear, Phantom does a
good job at camouflaging it by looping certain parts of the mission together
in clever ways. Linearity is helpful in guiding the player in a certain
direction, but could risk removing a player’s freedom of choice. Luckily,
this mission strikes just the right balance. I will be looking for upcoming
releases by Phantom with great anticipation. J To
settle a debt with my fence Adolpho, I had agreed
to find his brother Araphin’s perished body in an
old, hammerite asylum set in the Old Quarter. I
also had to find and break into a weapons armory, before locating the asylum
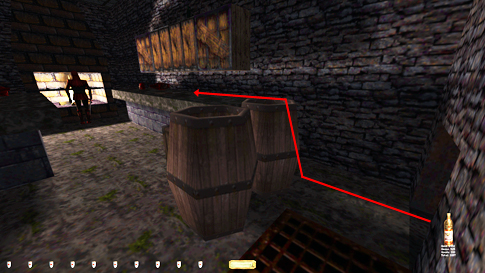
from a set of mines to the east. Lastly, I was to escape with Araphin’s corpse via a drain into the canal, meeting Adolpho on the other side. The Mines The
first problem came by the entrance to the mines. I had to use the power
station key to open the gates, which was necessary in order to proceed. The
key needed to be returned, but the gates also had to be reshut.
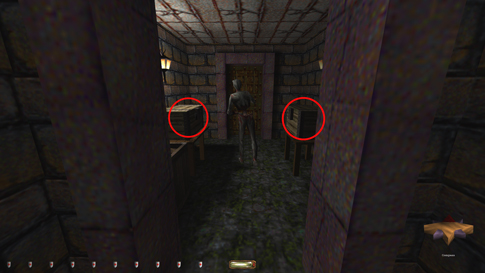
There were two possible solutions. The easiest way was to block one of the
gates with a crate. There was an old crate in one of the halls to the closest
mine. That did the job perfectly (left image below). I could (with a bit of
wiggling) squeeze through and bring the crate along as I left. This had to be
done after visiting the armory though, otherwise you were locked out. The
other option was to utilize the sewage canal gates from the control room. One
of the underwater gates led back to the starting cave, which made it possible
(with some back and forth) to leave the power station key at the smithy’s
without ever touching the crate in the mines. Whichever method rocks your
boat. I chose the crate option.
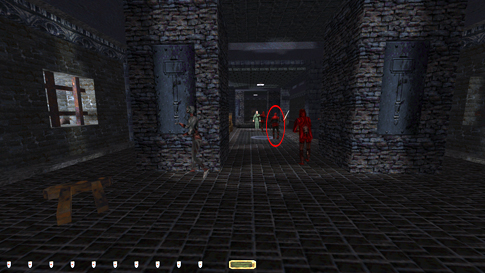
In
the control station itself another big problem arose. A zombie had a very
small patrol route in and out of a room with two locked, but pickable chests, both containing loot (right image
above). It pivoted at each end of the route, normally turning right. Once in
a while (I’d say about 25% of the time) it turned left instead. It also did a
very strange spin a second or so after starting to walk south. It wasn’t
really a turn, but instead an immediate flip in its facing angle. To me it
seemed like it got snagged on one of the tables, and the flip was the
engine’s solution to fixing it. The peculiar thing was it happened every
single time. Usually it just flipped west and then turned to head back south.
Other times it would do a complete 180 and face north, before resuming its
regular patrol southward. If I followed it north, snuck past it on its left
when it turned around, then I could hide in the northeast corner just behind
the table. Usually I was safe even from the aforementioned flip. From here I
tried picking the lock as the zombie was at its southernmost point in the
patrol. Alas, it gave a growl picking either chest this way. This of course
meant the two pieces of loot in here couldn’t be taken for Supreme and had to
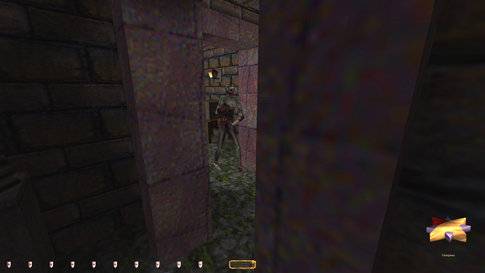
be skipped. For regular Ghost I could use a slightly different method. I
waited around the corner of the doorway to the control room, monitoring the
zombie as it patrolled (left image below). As soon as it turned, I rushed out
and picked part of the first lock. I needed to scoot out of sight again
before the zombie pivoted and started heading back south. I couldn’t use my lockpicks for long each patrol cycle, but it was quite
reliable once I got the method down, and didn’t require hardly any reloads. I
needed 8 rounds to get the nugget, and 6 rounds for the vase.
The
rest of the mines were pretty easy. Dodging the three zombies on gravel was
the biggest problem. Returned the armory key to the drain pipe after use.
Managed to close the hatch and mantle up before it locked up. Remembered to
go back to the sewer control room to reset the switches to their original
configuration. The gate leading to the bridge would now open. I assume it was
the matron ghost’s doing. The lights in that mine shaft also changed for the
brighter, before they finally shut off completely. It sounded like a
generator went out somewhere. Although the lights went off, that did not bust
Supreme. I was forced in this direction and it seemed like a natural part of
the storyline. I suspected the matron was behind it anyhow. I
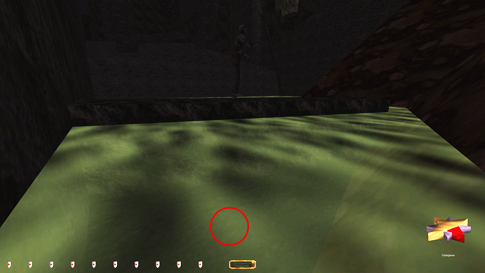
dropped directly into the water at the big bridge area. Water will break your
fall and avoid damage, no matter the height. Two pieces of loot down there.
The purse behind the zombie was super difficult to see (right image above).
It was the final piece I found on my first playthrough.
I had to lower myself into the water slowly from the sloping rocks, in order
to avoid the alert from the nearby zombie. The Asylum I
loved the foundry. A good balance of enemies, metal floors and shade. The
southern chute took me to a dead end past a large vat. That is, I could break
a boarded up shaft holding a purse (left image below), but that is property
damage and against Ghost rules. Instead I found a safe route up to the
foundry assembly line and north into the control rooms (right image below).
The stationary zombie by the vats below heard the slightest misstep, so I had
to go slower than usual. If I had been able to mantle up the walkway with the
haunt and the dead thief, then I could’ve skipped picking the lock to the
elevator shaft from the control room. I thought I had a shot once I managed
to mantle the tower-like electrical device west of the assembly line. But
even though I was high enough, the walkway fence wasn’t possible to mantle.
It had a railing that was separate from the walkway’s floor, and that might
have had something to do with it. I do try to avoid picking locks if
possible, but I couldn’t avoid the elevator lock.
The
basement was uneventful. The wandering zombie had an unpredictable route, and
I think it alerted to the hammerite priest over by
the lava pool. It went to hunt mode once when I was far away in complete
darkness at least. It gave several growls too at random times, so they were
probably set as enemies in Dromed. One end of the
metal pipe took me to a chute that I’m not sure whether you’re supposed to be
able to mantle up. I found a rather small sweet spot where I didn’t even need
to jump, I could just mantle straight up. At the top was a water reservoir
with three dead bodies and a ring. Creepy place that. Back
down I had a terrible time getting onto the elevator without alerting the
zombie. I couldn’t avoid the big clang for some reason. I ended up having to
click the button and then quickly strafe onto the lift platform as it rose.
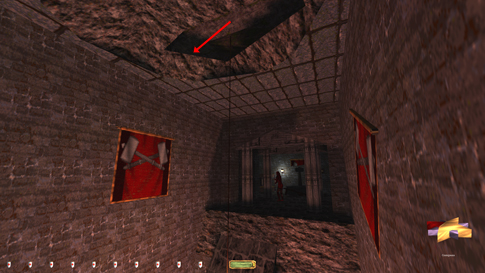
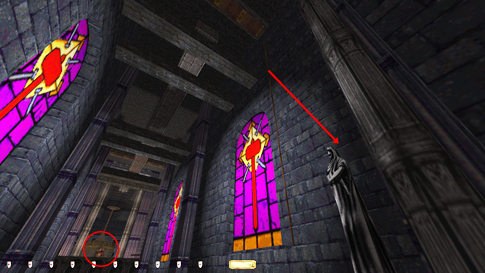
Weird. On
my way up I entered a hidden passageway between levels 2 and 3. It took me to
two different areas, one of which was the walkway with the patrolling haunt
back at the foundry. I needed to get to the other side to steal a purse from
a dead thief there. The haunt patrolled continuously and could pivot at
random points, but it was difficult to detect a specific pattern. Both the
walkway and railings were metal, so I couldn’t move fast, wherever I went. I
tried the railing first and it worked well until I got about 40% across. The
middle part was lit up from the lamps below. The south side was darker than
the north, but it still wasn’t dark enough to prevent a gasp from the haunt
as he passed. Next I tried following him across the ground walkway, hoping he
wouldn’t turn before reaching the end. This worked, but I couldn’t move fast
enough to get out of the brighter middle area in time. That’s when I realized
the south side of the main walkway was dark all the way across (left image
below). It was only a thin section very close to the railing, but it was
possible to move concealed like this all the way to the east end. The
lighting on the floor was a bit misleading, as it seemed like the middle
section was bright all across. Used the same method going west, but I could
also have dropped over the edge and taken the long route back, if so desired.
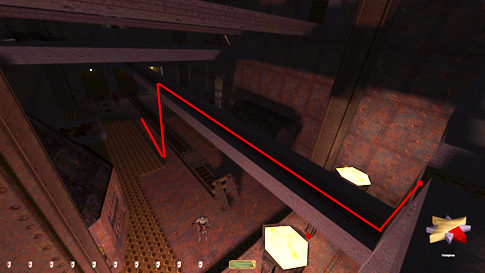
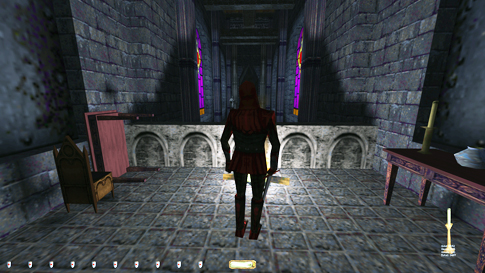
Level
4 was the kitchen and barracks. A very
cleverly hidden goblet was on a ledge in the ceiling above a collapsed bridge
(right image above). It was where I had seen the matron from the opposite
side earlier. I managed to grab the rope as I leapt back onto the west side. The
dining area had only one thing worth noting. As I entered the kitchen, the
gates to the cafeteria slammed shut behind me. The intended way to leave was
to drop down a deep chute to the north, plunging into the water reservoir I
had visited earlier. I could lean through the gate and flip the lever from
the inside however, but I’m not sure if this is considered an engine exploit.
In case it was, I looked for a way to avoid the gates closing altogether. The
trigger was an invisible line in the kitchen doorway, but there was another
way in. Entering via a small access panel to the northwest did not trigger the gates. The only way to
keep them open was to climb the counter on the west side of the room (left
image below). I could get all the items in the kitchen this way. Left the
same way I came.
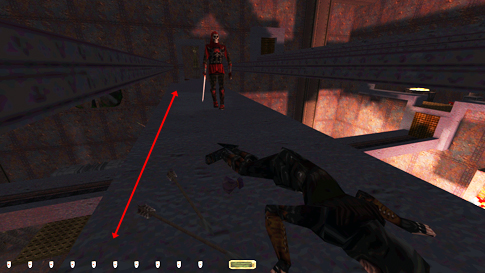
The
top floor looked more intimidating than it was. If I went slow, most places
kept me concealed. The two balconies upstairs were a bit tricky to get to,
but nothing too bad. I needed to get to the high priest chamber first, to
obtain the observation room key. In order to get there I had to pass a
stationary haunt overlooking an obliterated staircase below. The two
candlesticks on the railing in front of the haunt could just be taken without
any alerts, but there wasn’t much in it (right image above). I traversed the
ceiling beam to get to the (dead) high priest. His readable gave me a bit
more insight on what was going on. I could drop to the pit with the matron’s
body on my way back. Her office provided incriminating information about her
diabolical involvement in these unfortunate events. The
observation floor was tense, but unproblematic in terms of ghosting. The
inmates did alert, so I had to use the shadow lines in the prison to open the
respective cells. After getting the treatment room key, I could mantle back
up to cell 5 or ascend the alternate ladder to the south. When climbing the
ladder, I could turn the handle to close the gate behind me. Brother Thomas
from cell 12 had moved to the hallway closer to the entrance when leaving,
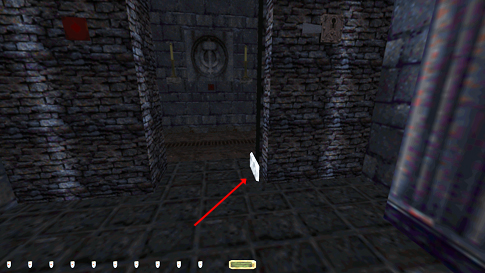
but he was no issue to sneak around. Treatment Room Went
all the way back to the high priest room, picking up the last pieces of loot
from the asylum. The problem now was that the treatment room gate needed to
be relocked for Supreme, along with the returning of the key. Both were
mandated by rule #7. The biggest issue was that gates can’t be frobbed after the locking mechanism is operated, so you
can’t lock-block them like you can regular doors. The only way to do it was
to find something to physically prevent the gate from closing. That way, once
that item was removed, the gate would close behind me. However, that item
would also need to be returned then, following the same Supreme rule. Once
descending the elevator, there was no way to return, and there were no
objects down there to block the gate with anyway. The closest items were in
the high priest’s office. Had I carried an applicable inventory item from the
start of the mission, the case would be solved, but I didn’t. Adolpho’s notes were the only likely item, but those
weren’t droppable. The solution instead fell on the fruit tray from the high
priest’s desk (left image below). It could be placed at the foot of the gate
while I went back to return both the matron’s key and the treatment room key.
And so I did.
Traversing
across the beam above the broken stairs for the last time, I realized
retrieving the rope arrow was problematic. Not only did I have to avoid
taking damage during the fall, but I also had to avoid a first alert from the
haunt to the south. It was a big drop, even though you can grab the arrow a
fair bit down the rope. I definitely had to do it in the northwest corner, as
the statue here would break the fall. The statue in the other corner had
crumbled. The rope had to be shot so it stuck down vertically from the top
beam, in order to be reachable from the lowest possible point. The best way
to do this was to descend and shoot a second rope up from below, though it
can be done from the edge of the beam up top as well. I ended up taking a
second rope arrow for Supreme for this move, although it is strictly speaking
not necessary. I didn’t count it as a bust, since I did end up using both.
From the rope I looked straight up, jumped and immediately grabbed the rope
in the air, landing in the corner on top of the statue. If I took damage, I
reloaded and inched down ever so little on the rope, and tried again. It was
hit or miss whether the haunt first alerted. Eventually I found the sweet
spot and got it Supreme clean. Nice! Back
by the treatment room elevator, I had to return the tray used earlier (left
image above). As soon as I took it, the gate closed, and even if I was in the
way it wouldn’t stop. I threw the tray into the right side of the statue’s
head close to the desk. With some precision, it would bounce off the statue
and land around the corner. Testing it a few times, I never got it to land on
the actual desk, only a foot or two away on the floor. Once, it landed by the
foot of the chair, in line with the edge of the desk. Since I had to get onto
the elevator quickly, I couldn’t check how close the actual throw ended up
being. I counted it as a Supreme bust, albeit a small one.
The
next problem came in the lava cave with the matron. I had to take the rosary
in order to get out of there. Getting onto the big island wasn’t that tough,
and I could sneak around to the left unseen. She gave off apparition-like
sounds, and in all my years of playing Thief, I have yet to determine clear
first alerts from this sound set; I doubt they even have them. I tried from
every direction to lean forward and grab the rosary without her attacking me,
but that was not possible. I ended up pushing her forward to about 3-4 feet
away from the pedestal (left image above). That is allowed as a last resort
for Ghost, and this definitely was a last resort. It is not allowed for
Supreme though, so that mode unfortunately busted. The
treatment room setup was strange. There were four chambers with haunts, one
of who was dead. The other three could be opened with an outside lever, which
triggered the haunts to start patrolling. If I operated the lever again, they
would stop instantly. I could manipulate their patrol route position like
this. The only haunt of interest was the one in the northwest chamber. It had
the sewer key on its belt, which I needed to escape. However, I also needed
to return it on my way out. The sewer panel (like the gate from earlier)
couldn’t be lock blocked, and since it used a horizontal sliding mechanism to
open and close, there was no way to stop it from closing at all. Following
Supreme rule #7, keys have to dropped “back
on the original patrol route”. But what if an enemy is involved in a
fight that causes it to deviate from its patrol path? I assume it means you
then can drop the key anywhere the enemy was located during the fight. The
point of the rule is that it should be possible for the enemy to have dropped
the key on accident. In fact, it should be more likely to get dropped during a fight compared to just
walking around. I knew a fight would ensue once unlocking the chest with Araphin’s remains. All the haunts would be let loose,
with the matron and her minions spawning instantly. If I manipulated the
haunt’s patrol to stop in the hallway close to the chest, it would spot its
enemies and run to fight directly over the sewer hatch. This meant once the
fight was done, I could drop the key by the hatch and not bust Supreme in the
process. That was the plan. And that is what happened. The haunt in question
was lured over to the matron, passing over the hatch (right image above). I
wasn’t out of the woods yet, though. First, the two craymen
had to die. The haunts downed them quite easily. Secondly, although the
matron always won (she was seemingly invincible), I couldn’t let her knock
out either of the zombies too close to the sewer hatch. They wouldn’t
actually die, but rather enter a sleeping zombie state. If I tried to climb
down the sewer hatch then, they would give a first alert growl. The matron’s
attack was shooting air elementals. They wouldn’t hurt the sleeping zombies
at all, so she kept attacking indefinitely, being the only one still
standing. Luckily, she seemed completely oblivious to my presence, enough for
me to sneak out unnoticed. Locking the hatch and dropping the key while
plunging into the canal was tougher than it sounds, but I got it in the end. Emerging
from the sewers the mission ended within a few seconds. What I assume to be Adolpho and a mysterious ghostly figure were waiting for
me. Really
enjoyed this one! Statistics: Time: 2:08:57 Loot: 4137 out of 4137 (Supreme: 3457) Pickpockets: 1 out of 3 Locks Picked: 13 Damage Dealt: 0 Damage Taken: 0 Bodies discovered by enemies: 1 Consumables: None Ghost: Success! Perfect Thief: Success! Supreme Thief: Failed! Perfect Supreme Thief: Failed! Notes: -
Skipped a vase worth 500 and a gold nugget worth 180 in
two pickable footlockers in the sewer control room
for Supreme. The patrolling zombie first alerted to the lockpicks. -
Didn’t return the tray used to block the treatment room
gate to its original position. I tossed it back towards the high priest’s
desk, but it probably landed a few feet away. Small Supreme bust. -
Had to nudge the matron forward some in order to avoid
the bust when taking the rosary. Supreme bust, but allowed as a last resort
for Ghost. -
The body discovered was during the last fight between
the matron and the hammer haunts. No bust. |
|
|