|
PREVIOUS MISSION THIEF GOLD NEXT MISSION Mission 13: Escape! [This
walkthrough has recently been updated for TFix, running NewDark 1.26.
Although the original text for OldDark has been preserved, situations
affected by these patches have been inserted in green. All screenshots have
been updated, and many new ones have been added. Keep in mind that there is a
difference between playing the game in NewDark with or without TFix. TFix
updates the core mission files, as well as applies .dml files that tweak the
environment in numerous ways. These changes aren’t supposed to have a
significant impact on gameplay, but when ghosting, slight changes could
occur. If wanting as close to the “vanilla” experience as possible, install
just NewDark, without any further patches. I have ghosted the game 1) in
OldDark, 2) in plain NewDark, and 3) in NewDark with TFix. This walkthrough
will discuss differences between all varieties.] One of the hardest missions
to ghost, along with ‘Thieves’ Guild’. I know many players hate it, mostly
because of the many patrolling enemies and confusing cave systems. Well, I
don’t think it’s that bad. Although I don’t care much for the new monsters
(especially the frogs), the level design is quite innovative and unique.
Again the mission authors dare to go new ways, and I admire them for that.
The best part is to revisit Overall score: 8.6/10 So, Viktoria and
Constantine turned on me. He happened to be the Trickster himself, and she
didn’t look too good either. After taking my eye and leaving me for dead, all
hope was lost. Fortunately, the Keepers helped me out one last time, but I
still need to get out of here. I seem to be stuck somewhere below For the second time in
this campaign, there’s no point in going for Supreme. To have any chance of a
successful Ghost, both moss arrows and water arrows have to be used. As
always though, I will try to limit consumables to a minimum. Initially, I
wasn’t going to draw maps, but figured out they were an absolute necessity.
On the maps I have even marked the locations of useful ghosting equipment.
Remember, gas arrows can also be used to douse torches! Whether following
this walkthrough closely or not, I strongly recommend planning ahead. Make an
image in your head of the route you wish to take and stick to it. In many
areas, just getting through a normal tunnel takes lots of time because of
heavy patrols and undousable mushrooms, so you do not want to backtrack for
missed objects. The objective about getting my stuff back is gone, although
it was visible before loading, so that is not a requirement. No purchase
screen (obviously), even though I do have my sword at start. My trustworthy
compass is also intact. Just imagine the cruelty of depriving me of essential
navigational instruments! An additional recommendation is to save often, and I’m
not talking about quicksaves, but hard-saving in a new slot every time. Some
patrols tend to get stuck (or even turn stationary), rendering normal bypass
impossible. Not having to reload 10 minutes of playtime (which could end up
being 2 hours real time!) is highly preferable. I will point out these areas
as I go along. That should be enough
preparations, so let’s go. I recognize the starting
room as one of
I emerge on the upper
level of a larger cave, with slopes leading down on either side. Three
patrollers cover the ground below, introducing two new enemy types: monkeymen
and insect-beasts. I position myself in the shadows on top of the northern
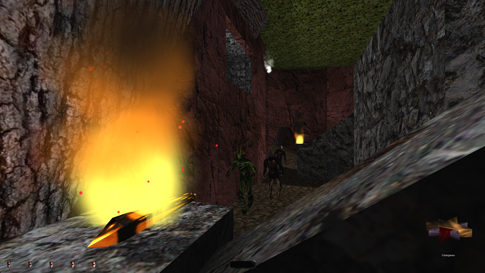
slope, studying the patrols. Then I slide down to where the burning fence
post casts a pitch black shadow. I snatch the moss arrow from the ground here. A fire arrow is also hidden in the
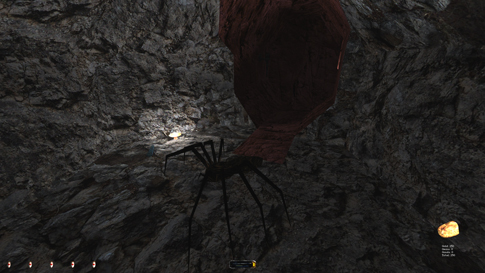
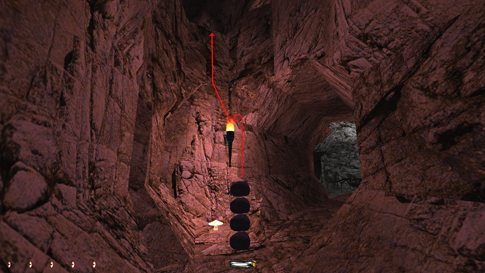
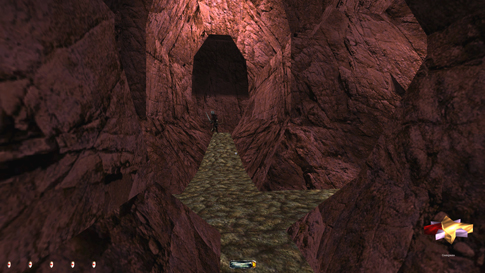
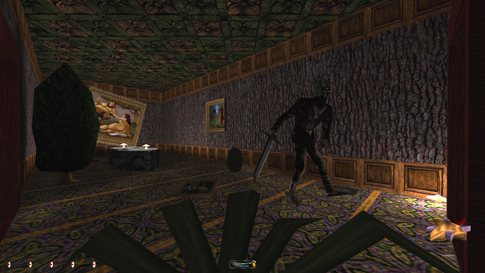
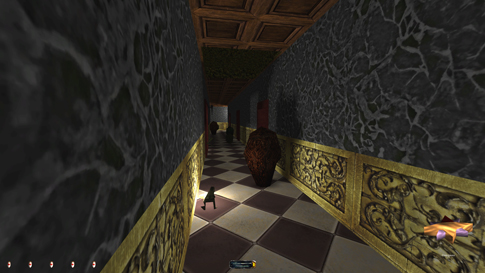
flames. Standing up peering southwest I can make out a grey, unnatural
cave high on the wall (left image above). A rope arrow seems like the perfect
plan to reach it, and the ceiling portion above the window is wood. I fling
one up there! The large tree trunk directly east has a dark area south of it,
convenient for me to hide in. From this dark portion
I can lean into the cave to the east and grab a fruit. Fruits give a small health boost, but are also excellent
for stacking. I suggest bringing along the first four if wanting to obtain an
extra moss arrow. When no enemies are around, I climb the rope and
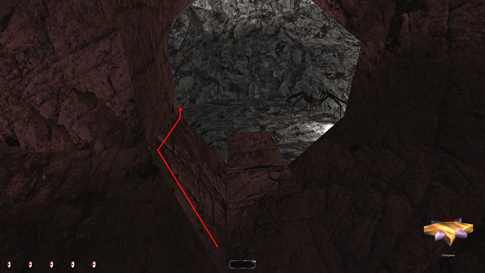
leap into the cave (right image above). The inside is bright, but the outer
ledge covers me quite well. An unlucky adventurer found his demise here long
ago. Among his remains lies a gold
nugget (100). I grab the floating gas
arrow by leaning right. Moreover, the cave
contains 2 noisemaker arrows, 6 broadhead arrows, 2 flash bombs, 2 gas mines, and one regular mine.
Dropping to ground level is a bigger problem. I wish to travel south,
so most or all of the beasts should be heading to the right. I choose to
retrieve my rope arrow first, as it is not needed to avoid falling damage.
Not only do I have to creep slowly over the edge, but I have to hide before
anyone comes around. This is one of many times in this mission where one
simply has to wait for the perfect opportunity, and even then the risk is
high of getting caught. With a little luck, I manage to reach the cave to the
south. This place is not safe for
long, so I grab the water arrow and the fruit,
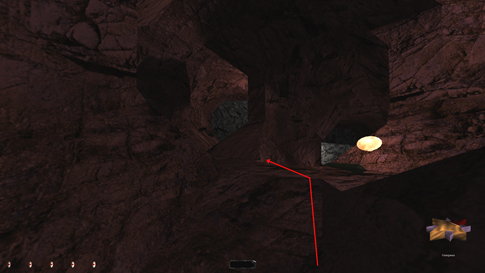
and head through the small opening to the south. I continue south, but stop
before the next drop. Two more monkeymen patrol these tunnels, and some green
spiders are off to the southwest. Again, timing is the trick. I want to reach
the cave on the left corner, the one high on the wall (left image below). The
noisy gravel and the flickering lights add to the suspense. As both monkeymen
turn around, I hop down, grab the moss
arrow off the floor and quickly mantle into the cave. I follow this
tunnel until well out of vision of any patrollers.
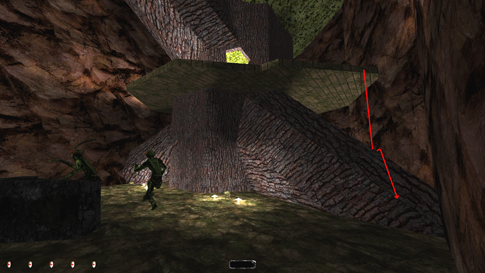
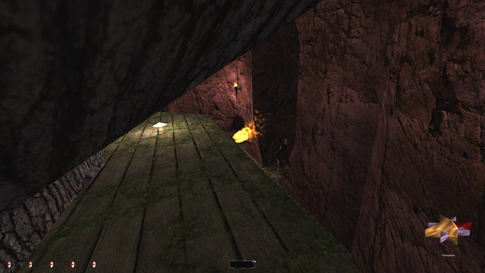
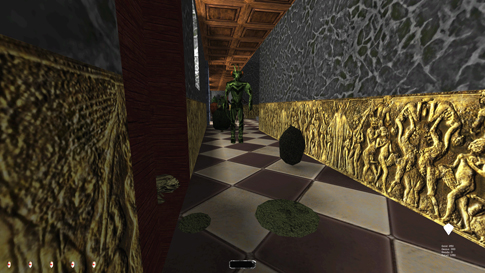
The tunnel emerges on the
wooden walkway of a tree-trunk cabin. The grassy cave below is among the most
heavily patrolled areas in the mission. The cabin
itself contains a noisemaker arrow,
2 gas mines, a flash bomb, a rope arrow and 10
broadhead arrows. Waiting for the area to clear, I drop to ground
level and grab the silver nugget
(150) and the fruit
off the ground. There is a handy dark nook in the northeast corner; a
nice place to lower my pulse. I realize these methods of stop-and-go can be
gruesomely frustrating at times. I chose to finish this treehouse cave early,
as patrollers have a tendency of getting stuck in the tunnel further south.
And believe me, that is even more frustrating. But if you wanna skip this
cave altogether, clearing the north spider caves first is probably a smarter
option. Anyhow, I need to get my bum further north. I suggest examining my
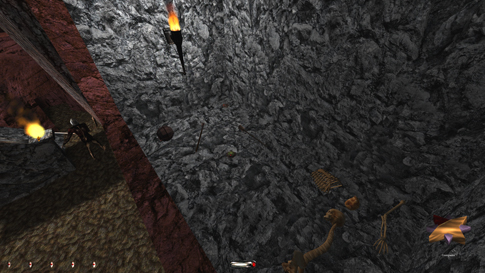
maps to plan the moves. The cave up the graveled slope has a single monkeyman,
fortunately with a predictable patrol path. On the red tunnel floor just to
the left lies another moss arrow
that I bring along. I run up the right side of the path not to make noise on
the pebbles. The best spot to hide before the monkeyman returns is behind the
tree trunk to the northeast (right image above). This
cave also contains a fruit and a fire arrow. As he rounds
westward I slip into the cave on the east wall and head past the next corner.
The skeletal remains on the ground hide a moss arrow, and the weird-looking puddle on the wall has 4 floating water arrows. The area to the
south of here is more a challenge than anything else. The spider in the first
cave has to be nudged to enter the tunnel. In the next cave I first have to
douse the flame on the tunnel wall, then the four fires making out the star,
then lastly the torch in the distance to the west (it adds too much intensity
to the already emitting light from the mushrooms). Only then can I retrieve
the fire arrow on the south tip of
the star, the 2 water arrows on
the northern rock, and the gas arrow
underneath the ceiling, without alerting the stationary fire elemental. So in
sum, you are spending 4 water arrows to obtain a gas arrow and a fire arrow.
Pointless if you ask me, so I skip it, but worth the challenge nonetheless. The upcoming caves are
very hard, but oh so fun! Spiders are by far the most amusing challenge for
Ghosting, and it gives such a rewarding feel when you wiggle out of a tough
spot successfully. Timing the monkeyman to the west, I enter the small, red
tunnel in a crouching position. I have to hug the left wall to avoid getting
caught by a spider further up the slope. The north wall in the next,
perpendicular tunnel is safe. Ok, there’s one patrolling spider, but she is
covering the area to the northwest of here. For now I keep her in the back of
my mind. To the right is a grey cave with a stationary spider and loot.
Rounding the corner sets her off immediately, so I extinguish the torch on the
east wall. Initially, the splash produces a squeal from the spider, but
reloading and pulling the bowstring very gently lightens the impact enough to
not bother the critter. I have not been able to
avoid a first alert from the spider when dousing this torch in NewDark,
whether it be from water or gas arrows.
I suggest practicing
various maneuvers on the tunnel slopes before venturing into areas like
these. Combining the crouch, creep and walk/run forward keys can generate the
perfect speed at which enemies won’t catch you. Playing with the strafe
buttons and learning proper mouse turning will expand your movement
repertoire even more. Among the most effective moves is walking on top of the
slopes that exist on either side of any tunnel like these. Getting a foot or
two further away from a glowing mushroom can make all the difference in the
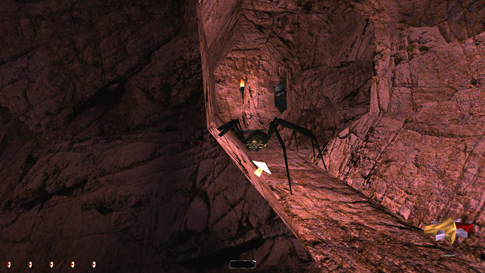
world. Thus, passing the corner, I crawl to the top of the left slope and
move toward the cave entrance (right image above). This spawns a chirp from miss
spider, but I am still in the clear. This exact spot is special though. If I
enter in a crouching position from the top of the slope, the spider catches
me. If I stand up and enter in the same manner, she stays utterly silent.
Check out the left image above if you don’t take my word for it. Perhaps I
hit a blind spot in her view, or rising gets me a tad further away from the
mushroom. Regardless, I stroll in behind her and grab the gold nugget (250) and the water arrow. The same method can not be used to get back out. She
raises full alarm whichever way I go. This is a good time to learn about
spider-nudging. Every time she does her beauty-turn, I push against her side
and she jerks away. Sometimes just an inch, sometimes all the way to the
wall. The best situation is to make her end up where the angle in the wall
shifts, just north of the mushroom (right image above). I could move her all
the way to the doused torch, but since nudging is a last resort option, I
wish to keep it to a minimum. Leaving the cave spawns two more chirps, one by
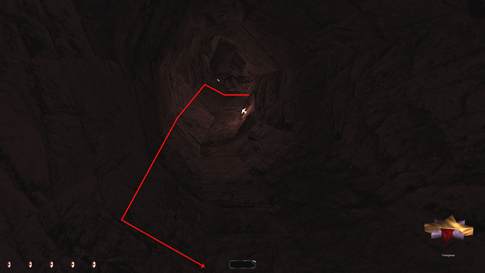
the cave entrance, and one rounding the corner. The next area is the
toughest in all the spider caves. I studied the map and memorized the various
locations and dark/bright spots before planning my approach. I suggest you do
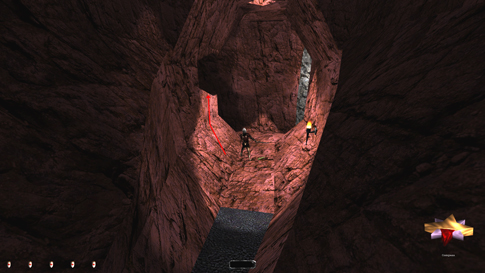
the same. On top of this hill is what I refer to as the ‘five-way junction’.
The road I come from is already covered. The way up to the east is
uninteresting. That leaves three paths to go. The one straight ahead going
down to the north is now under the gun. Study the image below to the left.
There is a tiny spot where I am totally hidden and where the patrolling
spider can pass undetected. It helped me a lot to find this spot. Her patrol
is unpredictable, meaning she has no set route but can turn around randomly
at various points. It is a huge advantage to analyze her pattern and memorize
these key points. That makes it able to predict her destinations early enough
to pass the tunnels successfully. Sometimes you have to guess and hope where
she is headed, and that she won’t come around before you reach your desired
spot. If it fails, all you have to do is reload and try again. Patience and
determination. But I must admit, before you know whether a move is possible, it is hard to get motivated to
try again for the 13th time. You have to love Ghosting to attempt it
willingly.
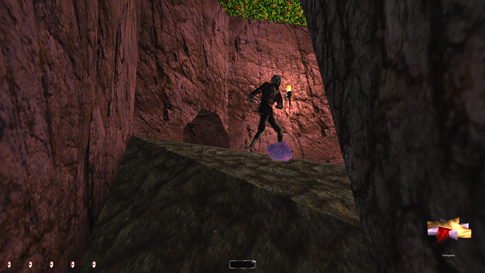
So, notice where the
spider is coming from in the image above? That tunnel is where she stays for
the longest amount of time. She can turn around at the first bend (where it
turns grey), but with a little luck she will extend the patrol out west for a
few more precious seconds. When she starts on the red part of that tunnel, I
crouch-walk up the slope and grab the moss
arrow. On the flatter part I have to creep to prevent chirps from both
stationary spiders (you should know where they are by now). When the hill
slopes down again, I have to turn around to avoid generating speed. The
mushroom at the top puts my gem to strong yellow, but inching downhill I
still avoid any alerts. The image above to the right shows how I utilized the
tunnel’s sloping side to circumvent the next mushroom’s glow. No alerts thus
far. The grey cave at the end of the red tunnel is very bright, too bright in
fact. The spider is nicely positioned for a pass, but not without
extinguishing the torch. This also generates a first alert, from which the
spider takes several minutes to settle. Don’t know why that is. In NewDark I can sneak by this spider without needing
to douse the torch. I still trigger a first alert though, but dousing the
torch would also have done that. Passing the opposite direction later can be
done without dousing the torch with TFix, only spawning a first alert, but
without TFix (vanilla NewDark), you have to douse the torch. Passing the spider, I
reach a corner with a burning torch and a ledge
above. There is an arrow up there, only reachable if I get on top of that
torch. Remember my nifty move from the Bonehoard? If you do, you’ll know that
burning torches don’t hurt. 4 fruits are enough to reach it. Skulls, rubble
and the likes can also be used. From the torch, I can mantle to the top (left
image below). I then grab the moss
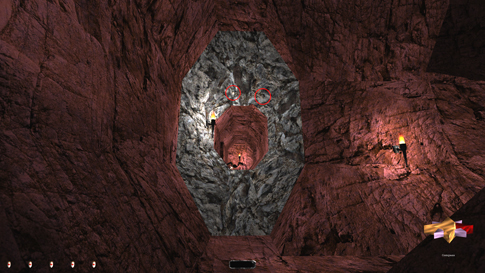
arrow and slide back down. To the north is the end
cave containing my objective, but it is heavily fortified. I can sneak a peek
around the corner and observe the activities. Two more of those
insect-beasts, and two frogs. Frogs have a high pitched whistle as a 1st
alert, be sure to recognize it. The insect-beasts patrol while the others are
stationed in the grass. Plenty of mushrooms and two torches do a good job of
lighting the cave. I cannot even exit the tunnel before the nearest frog goes
berserk. I douse the torch on my right. In
NewDark, I have only been able to douse this torch with no first alerts using
a gas arrow, and even then it requires luck and good timing of the insect
beasts. Wow that helped a lot! I foresee it might be enough to reach
the cabin, but I’ll need a rope too. My suggestion is to fasten one as far to
the south as possible (right image below), right by the tree root. I can hop
onto the root in the south corner and attempt a rope grab from there. As the hindmost
beast turns its back, I climb the line gently and mantle to the top. No
remarks from the frogs either. I retrieve the rope and crawl into the hut.
The book beside the chair tells about the Trickster’s plans for the eye(s).
Objective check! I bring along 3
silver nuggets (400), a gas arrow,
a flash bomb,
a mine and a rope arrow. To leave the cave I need
to slide down onto the tree base at exactly the same spot where my rope arrow
was stuck. The enemy most alert to this is the northern frog, as it’s angled
more to the south than the other. With a little wiggling and inching, I’m
out. I inch past the spider again and up the slope to the five-way junction.
Two paths remain to be
examined. The one straight west is up next. When the patrolling spider moves
into the cave to the northwest, I inch up the slope and across to the small
alcove. My gem is still soft yellow, but normally she won’t catch me going by
(about 1 out of 5 times she will). She returns from the grey tunnel, goes
wherever, then heads back northwest. I then creep-crouch down the red tunnel
to the west, toward the stationary spider, sticking to the right side. If the
patrolling spider comes by while I am in here, I can crawl up the northern
side of the tunnel and stay hidden until she turns around. Considering
butt-vision, this one faces south. I can easily reach the water arrow to her north. Staying in
the dark spot of this red tunnel, this time I wait for the spider to leave the tunnel to the northwest, so
I can enter. She sometimes heads up a slope to the east; this is a good time
to go. The fastest way of moving without alerting the stationary spider
behind me is creep-crouch-strafing. Along the mentioned tunnel I grab a water arrow and a gold nugget (500), in that order. I
then halt in the shadows at the end. I’m back by the two
monkeymen and the insect-beast from the beginning, this time on the north
side. I can monitor them through an opening to the south. To the north is
another red tunnel with 2 water arrows
in another one of those weird vertical puddles. Back south and through the
opening when clear. I turn west, through the hole ahead and quickly duck into
a small cave to the right. Actually, it is more like a chute, with another
cave higher up. There is a small wooden branch in the ceiling where I can
fasten a rope arrow and ascend. Being careful not to alert the outsides from
the top, I head down this new cave and pick up a water arrow along the way. In the corner at the very end is a diamond (600). I backtrack this cave
and drop to ground level.
I call this next section
random because the situations arising are highly dependent on the location of
enemies. I will quickly go through it, highlighting in blue areas only
objects interesting for purists. Using the concrete balcony to traverse
southward, I enter the next cave through the opening at the bottom of the
slope. I take the small entrance at the tree base like before, and pass the
next red cave. I wait for the monkeymen to leave and drop down beside the
gravel. There are two hard to spot
silver nuggets (700) in the
ceiling of the grey opening to the right (left image below). I grab them,
watching out for patrolling spiders beyond. I ignore this tunnel for now, and
follow the monkeymen east into another grassy cave. Immediately to the left
is the third and last wall-puddle with two
more water arrows. This is a
cute one, because you can hide from the patrolling monkeys at the “bottom” of
the puddle, or in the far corner rather (right image below). As both enemies
stroll west, I run south, grab a purse
(800) from the ground and enter the rocky caves ahead. In here is a moss arrow and another silver nugget (850). Timing the
monkeys yet again, I leave these caves and head southeast. Immediately to the
right I duck into a small alcove (left image below). The next section has a
pulsating light emitting from the ceiling. The previous monkeys’ routes do
extend to just outside this alcove, but I am safe crouching here as long as
they don’t reach the end of their patrol right as the light is at its
strongest. As the brightness weakens, I make my way east and claim a diamond (950) in the grass. A little
further up this tunnel is another water
arrow. The area beyond
this tunnel has no less than seven patrollers; five monkeymen, a fire
elemental, and a bugbeast. I wait for the right moment and slip south toward
the treehouse. This tunnel is shadowed, but there is nowhere to fully avoid
first alerts. However, to my immediate right in the emerging cave is another
one of those dark nooks ideal for hiding. The outside patrollers walk awfully
close, but in the western corner, I am safe. I reach out and grab a fruit. Two of the monkeymen are
particularly attracted to the caves southwest of here. I listen for them as I
empty the rest of the cave for goodies, namely a moss arrow and another fruit.
I return to my previous hiding spot. Next, when the coast is clear, I make my
way east and in behind the big root. This area is dark and out of the way of
patrollers. I can rope up safely and monitor the traffic from a convenient
patch of shade behind a large branch (right image below). The cabin entrance
is super bright and in direct view of all the adjacent caves and tunnels.
Although it’s only a few feet away, it is very difficult to reach and at the
same time avoid everyone’s gaze. Finally, I enter the hut undetected and grab
a mine, a gas arrow, a flash bomb and
a rope arrow. Constantine’s diary
is one of my favorite reads in the entire game. After a lengthy wait for the
patrollers to clear, I drop back to ground level, exit to the north, and
quickly reenter the grassy tunnel to the west. Somewhat southwest of here is a graveled
path that I wish to take. There are enemies surrounding me from at least
three directions, so it takes a few tries to avoid any nasty looks. I
overlook the entrance to the left and walk straight, grabbing the moss arrow from the ground, into a
circular rock-strewn cave with a fire arrow.
This is the south spider
caves, not nearly as tough as the north ones. Up the graveled path to the
north I can observe two patrolling spiders make their rounds. They walk the
same path, as indicated on my drawn map. Their route extends to the northwest,
at which is the best time to move. I grab the water arrow in this sloping tunnel and slow down the pace once at
the top. There is a trigger-happy spider facing south in a cave to the east.
This is a four-way junction with the exit to the north. The two caves to the
east both contain goodies. They are both covered in fair amounts of darkness,
and not too hard to loot. It mostly depends on dodging the patrollers. The
southern one has another water arrow.
The northern has a gold nugget
(1050) in the corner behind the spider. I suggest doing them in that order.
Leaving requires following both patrollers down the tunnel to the northwest.
They should preferably be fairly close together. At the start of that tunnel
is another moss arrow. I need to
inch down the top part to avoid alerts from the stationary spider. At the
next t-junction they should both turn left. Either may turn around instead,
requiring a reload. I stop in a tiny pitch black spot right before meeting
the perpendicular tunnel (left image below). As they come back, they will
pass undetected. I enter the tunnel they came from, watching east for
monkeymen. I ignore the path to the north and crawl past the gravel around
the bends. Up a small slope is a circular cave with a hole and another cave
beneath. The latter has a stationary spider. I creep along either side and
continue west. Right before the next corner I stop and wait. There is one spider left
before reaching the mansion basement. Leaning around the corner I see it
appearing from the west. It turns and I follow. It eventually enters a
metallic room with patrolling monkeymen. I can follow and crouch in the left
nook around the corner. If the monkeymen keep catching you, I suggest waiting
in the red tunnel outside for the spider to head back, then enter when it has
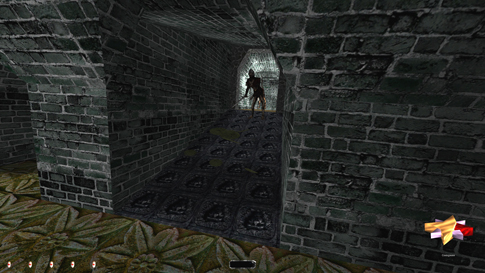
cleared up. On the metal floor are a water
arrow and 10
broadhead arrows. --- Basement --- I move into the south hall
to check the territory. It splits in two, going west and south. The south path takes me back towards the south spider
caves. Along the way I can gather a moss
arrow and a fruit, but
reaching them might require waiting out the three patrollers for extended
lengths of time. The biggest problem is the sloped metal ramp, and worst is
heading back up, as you can’t see or hear exactly where the monkeymen are
located. Plus, crouching and tapping the run key is impossible to do uphill
without making noise. The west ramp is what interests me. The three
patrollers have a small extension of their route going southwest, out of
sight. If two of them move that way, I should be able to follow the last
westward and evade him there. A moss arrow on the ramp is inevitable though,
so I shoot one on there in between patrols (right image above). I return to
my spot to the north and wait for the spider to come around again. Since the
monkeymen’s patrol is random, I’ll just have to move and hope for the best.
Have heard many players with grueling stories about this area, but I find it
to be rather hassle-free. The last patroller turns to his left when reaching
the exit door. Keeping this in mind, I dodge him to the right. Behind some barrels close to here is another fruit. I quickly open the door
and enter the mansion ground floor. [Update February 4th, 2019: I have recently been able to
avoid using a moss arrow and therefore prevent the Supreme bust when
traversing the sloping metal ramp shown above. It simply requires waiting for
the perfect scenario where all three patrollers are heading in beneficial
directions. I found camping in the alcove just south of the ramp to be the
best spot. The perfect time to go would be if all three heads east down to
the lower level at approximately the same time. Problem is, this will
basically never happen. I was successful when one monkeyman headed east, one
north towards the spider, and the last headed up the ramp going west. I crept
up the ramp following the latter as fast as possible. The biggest challenge
was not to make noise on the metal and trigger first alerts. I found if
hugging the southern wall of the metal ramp while doing crouching strafe-run
taps, I could generate enough speed to get a fair bit up before having to
stop. At this time the patroller that was heading north earlier was
returning. If he turned west to head up the ramp, I was screwed. So I
reloaded until he either pivoted 180, or continued further south past the
ramp. Either way, the south wall of the ramp was dark enough to avoid a
comment. There was a small outcropping further upslope that blocked the torch
beyond it. Next, the monkeyman I had followed was reappearing around the
corner up the hallway. He absolutely needed to do a 180 and head back where
he came from, out of sight. If so, I could inch a bit further up and do a
crouch-leap onto the carpeted part of the hall. Then I sprinted into the
alcove to the north where I could hide as he came by from the west. With a
bit of luck, none of the other two patrollers were on their way up the ramp
at this time, and I could dart around the corner and leave the basement. It
is definitely not a method I will try again anytime soon, but it was
undoubtedly worth avoiding the Supreme bust.] --- Back in the Mansion --- For some reason, the
designers decided to put two barrels right in the path of five patrolling
monkeymen. This can cause great frustration when emerging from the basement.
Normally, one patroller is bumping into the northern side of the larger
barrel. If so, save your game, and attempt to push the barrels to the eastern
side of the room. If more monkeymen appear, reload and try again. I push the
smaller barrel first to approach the big one from the front.
Let’s roam the area a
little. I recognize
The next sections are
easier. I quickly loot the counter and shelves. A vase (1350) on the floor behind the counter, 2 bottles of fine wine (1450) and a goblet (1465) in the racks. One more goblet (1480) on the floor in the corner. Another fruit sits on the
counter itself. Westward is the main foyer. An insect-beast covers its
ground. I can slowly sneak around the corner and in behind its back, being on
the lookout for monkeymen. The beast gave a howl, but quickly settled. I
suddenly spot a purse by its feet. From behind I can barely reach it. Aha!
This must be my loot from the previous mission! The purse (3606) contains however much I got from the cathedral. I
then sprint up the stairs and grab the gas
arrow and the fruit from the top floor. Downstairs again, I realize I
must take another first alert in order to get further west. I have to hop
onto the plant even, to not trigger hunt mode from the green beast. I then
move on to the dining area. Except for the monkeymen coming through here
occasionally, there is an additional stationary one in the kitchen to the
north. He turns heavily, and with his back to me I pass the dining table.
Underneath it I find another diamond
(3706, right image above). I exit through the door on the west side (not the doorway). Upon exit, I notice
another one of those annoying frogs further south. In order to be able to
move out here at all I have to extinguish the last torch of the mission. The
entire northern part of this hall is now more or less dark. I go north and
carefully pass the doorway to my right. On the left hand side is an overgrown
section with some bushes. At the end of it I find a diamond (3806) in the grass.
The monkeyman from the kitchen can see me through the trees, so I tread
slowly. Further north around the corner is another
entrance to the kitchen. From right inside the doorway I can pluck a fruit to the left when the monkey has
his back turned. I return to the main hall afterwards. I pass the kitchen doorway
once again and approach the frog to the south. On the right is an opening to
the west wing. I can barely reach the first corner without spawning any
alerts from the frog ahead. There is a torch in the staircase going down to a
locked door. When the light of this torch hits me, the frog goes bananas.
There is a slight delay in the light gem however, so standing up and running
inside sometimes prevent the frog from alerting. On the floor inside is a moss arrow. Up the stairs I find
another diamond (3906) and a fruit among
the plants. The mentioned stairs going down is a dead end. I can do a
quick-step into the hallway shadows again and fool the frog once more.
In order to leave the
mansion, I must pass the frog to the south. A bush is blocking the hall and a
mushroom sits beside it. A good thing about mushrooms is they seem brighter than
they really are. Right beside a mushroom the light gem will go red, but a few
feet away the power quickly diminishes. The floor level of the hall is thus
bright, but higher up the conditions might be different. I fling a rope arrow
into the ceiling to check the state. Yep, quite much darker there. I could
have a plan going. I still have to avoid the torches from the wing to the
west. Luckily that doorway doesn’t go all the way to the ceiling. I will need
multiple arrows though, three at minimum. See the portion covered with
foliage? It’s where there was a hole to the upper level back in mission 6. I
fling one arrow into the wood just north of that area. The second I shoot
into the middle of it, where it slightly bulges out. The third I put into the
southern edge. It ends up hanging right onto the shrubbery (left image
above). You might think rope jumping from the doorway further south is
easier, but mushrooms on the table in there make that impossible. Therefore,
I hop onto the first, causing a grumble from the frog. I’m almost completely
dark up here, so no chance of getting caught. From the first to the second I
get no remark. I swing around and retrieve my first arrow. On to the third I
get another remark, but I am also very bright. I am right above the bush now
and can climb down unseen. The last two ropes are obtainable from here. From
top of the bush I can inch down to the tiled floor (right image above).
Luckily no monkeymen seem to have an interest for this side of the mansion
any longer. I can creep past the frog and reach safety through the doorway on
the right. In sum, one can pass the western hall with the use of three ropes
and a single water arrow. That’s right, not a single moss arrow used! J [Update February 8th, 2019: You can get through this
hallway only using 2 rope arrows; the first (northernmost) one isn’t really
needed. Instead, jump directly onto the middle one from the western doorway,
out of view of the frog. This spawns an alert, but you can get to the top
without triggering hunt mode. You take the second alert hopping to the final
rope, unless you jump to it before the frog settles from the initial alert,
in which case you’re technically only spotted once.] This room is viewable from
the main hall to the south, so I watch my back as I traverse southwest. One of the lockers in here contains 5 broadhead arrows. The lower floor of the southwest tower
has a stationary insect-beast. I can easily reach the ladder past the barrel,
but as I climb up and swing off to the north, the insect-beast makes a howl.
I reload and try again, but he still makes an uneasy remark. The clue is to walk off it inch by inch as far north
as possible. When done, I scope out the room to the north. A single
patrolling monkeyman and the final pieces of loot. Aha, I almost missed the golden nugget (4006) in the tower
itself, opposite the ladder. The monkeyman has a predictable route. When he
turns north and heads for the balcony, I slip in and grab the 2 silver nuggets (4106) in the far
end of the room. I exit through the balcony when he comes back. Immediately
over the fence to the left is a small ledge where I safely drop to the
outside garden. All done, with Perfect Thief intact! Time: 1:00:53 Loot: 4106 out of 4106
(Supreme: 3856 out of 4056) Pickpockets: None Locks Picked: None Damage Dealt: 0 Damage
Taken: 0 Consumables: 6 Water
Arrows & 1 Moss Arrow Ghost: Success! Perfect Thief: Success! Supreme Thief: Failed! Perfect Supreme Thief:
Failed! Norwegian
Thief: Failed! Notes: -
Skipped the equipment by the stationary fire elemental in
the grassy cave area. Obtaining it is possible but requires using six water
arrows. Not worth the trouble. -
Had to douse the torch by the cave with stationary spider east in the
north spider caves. She still gave 3 squeaks going in and out. Skipped the
gold nugget worth 100 in there for Supreme. -
Had to douse another torch on my way to the information cabin. The
spider there also gave a chirp from the splash. I
did not need to use this water arrow in NewDark, but I took one first alert
each way. I saw this as a more stealthy approach. -
Had to douse a third torch on the south wall of the large cave by the
cabin with -
Moved the “magnetic” barrels in the east wing of the ground floor to
avoid lock-ups with the patrolling monkeymen. Not a Supreme bust. -
Doused the torch in the east hallway of the ground floor. Needed to
move past the frog to the south. He gave a total of 4 squeaks. For Supreme,
since I didn’t need to head south, I took a first alert from the frog when
crossing the hall instead of dousing the torch. -
Mossed the hall outside the guard tower in the southeast to fool the
guards in the area. Also extinguished the torch inside to sneak past the frog
and the bugbeast. In sum they gave 2 alerts each. Skipped the entire guard
tower and the diamond inside (100) for Supreme. -
Took two first alerts passing the insect beast in the main foyer. Could
sneak by both corners without dousing any torches though. -
Had to douse the torch in the west hallway to pass the frog. It gave
2 alerts when rope jumping. |