|
PREVIOUS MISSION THIEF GOLD NEXT MISSION Mission 10: Song of the Caverns [This
walkthrough has recently been updated for TFix, running NewDark 1.26.
Although the original text for OldDark has been preserved, situations
affected by these patches have been inserted in green. All screenshots have
been updated, and many new ones have been added. Keep in mind that there is a
difference between playing the game in NewDark with or without TFix. TFix
updates the core mission files, as well as applies .dml files that tweak the
environment in numerous ways. These changes aren’t supposed to have a
significant impact on gameplay, but when ghosting, slight changes could
occur. If wanting as close to the “vanilla” experience as possible, install
just NewDark, without any further patches. I have ghosted the game 1) in
OldDark, 2) in plain NewDark, and 3) in NewDark with TFix. This walkthrough
will discuss differences between all varieties.] I very much like this mission! The fact that it’s about an opera house intrigues me. The sound design is remarkable and the interior layout fascinating. It’s also a long mission, a factor that usually adds to the enjoyment. The first third is rather linear, but then it opens up and provides freedom of path choice, with many hidden passageways as options. Perfect Thief is a blast, and Supreme Ghost is only beaten by the smallest margin. Among Thief Gold’s top 3 in my opinion! Overall score: 9.4/10 Continuing my run for the
sacred stones, the path has led me to the Talisman of Water. Apparently, the
Keepers have hidden it deep inside a set of caverns. I need to use my rather
vague map to retrieve it, and reading it correctly the place seems to be
trapped. My informant Giry might have useful information, so the opening task
will be to find him, then grab the talisman and get out of there. I should
manage to scrape together 200 loot while in there, and avoid casualties
should I find any humans. I’m up for some sneaking and looting, so let’s go! My starting equipment
includes three rope arrows and a healing potion. This is probably the only
mission where you can bust Supreme with the opening click of the mouse. An
archer scouting from a nearby tower will detect any fast movement in the
streets. Fortunately, his vision is blocked by the window frame. I tiptoe
forward to the roofed entrance ahead, safe here. Ghosters not interested in
some free arrows can skip the next part and head straight for the sewers. The thorough guy that I am, I cannot miss such an
opportunity; the archer even has a pickpocket! The door at the base is locked
and the archer is in the possession of the only key. There’s an accessible
window on the north wall of the tower. To enter the adjacent roof I need at
least two crates. There are a total of three crates scattered around the
streets. I take the two in the closest alley and bring them over to the ledge
on the east side of the tower, directly underneath the lookout. From the top
of them I mantle onto the large roof to the east, turn around and leap across
the gap to the next rooftop. In NewDark
(with newmantle), you can easily mantle up the street lamp, then the wall
statue, and furthermore onto the roof ledge. No crates are needed. For those interested, there’s a moss arrow lying on the roof up here. I now have two options. The
easy way is to pilfer the archer’s key
[1], return to the streets and enter the tower through the door. The
tougher option requires a bit more stealth, but is quicker. After grabbing
the key, I need to hop onto the windowsill in order to steal the remaining
objects from inside the tower. To get as far away from the archer’s
peripheral vision as possible, I position myself an inch or two out from the
west corner of the window. Then I do a crouch-walk-jump (do NOT press the run-key) landing on the edge of the
window. This is a tricky move, but shouldn’t alert the archer at all. I lean
right and grab the 6 broadhead arrows and
the cheese from the corner (left
image below). Well thieved! I drop to the street level, replace the crates
and enter the double-doors leading to the sewers.
I follow the unlocked
hatch down the metal hallway. The well leads me to an old water reservoir,
seemingly out of use. I continue into the rocky caves beyond. Approaching the
sharp corner deeper into the caves, I hear the familiar sound of spiders. To
my left lies a cocooned corpse and a journal explaining it’s my friend Giry
(right image above). Wow these spiders mean business! There’s a healing potion next
to him. As unlucky as this Giry-situation is, it’s nothing compared to
the spiders at the end of the next cave. Let’s stop and observe for a minute.
First, we have a cylinder shaped sloping cave, fairly well-lit by an
undousable mushroom. There’s another mushroom beside Giry’s body, but that
one is unimportant for now. At the end, the cave opens up; it gets taller,
wider and the ground flattens. It ends in another bigger flooded cave with
exits to the southeast and southwest. Two more mushrooms are situated by the
edge of the water on the right side. This means I’ll be bright red the entire
last half of the cave. There are two spiders of concern. One is stationed in
the center, right above the water’s edge, staring southeast. The other is
patrolling right above the first, in a northwest-southeast pattern. His route
lasts for about 2.5 seconds. Paying close attention I notice he turns
sometimes left and sometimes right. The most desirable for me would be for
him to always turn to his left, but that seems to be pretty random (I would
say 3 out of 4 times he ends up turning left). Actually, what decides which
way he turns, is the other spider. Remember the lone spider on top of the
cave waterfall in the Ok, the cave is mapped,
and I’m ready for action. The stationary spider is now dead, and the
patrolling one turns exclusively to his left. The safest time to move is when
he patrols southeast. The most effective way of moving is strafing in a
crouched position. I inch along the left side, quicksaving for every new
step. When the spider gives a first alert chirp, I know I’m too close to the
mushroom so I reload. The left image below is the absolute lowest point I could
stay undetected. Notice I have a bright yellow gem. The series of moves
coming up were discovered and developed by Sneak, so I won’t take any credit
whatsoever. You can read his full report here. As the spider turns and starts walking northwest,
he reaches a point where his vision no longer covers the northern cave. This
is when I make a run for it. He reaches this point approximately halfway
through the walk. In theory, I should be able to stand up and run down the
cave without alerting the spider. I can almost bump into him without getting
caught. The only thing I can’t do
is cross his line of sight, i.e. pass in front of him. But since he turns
left and continues his patrol facing southeast, this shouldn’t happen. The
red arrows in the images below roughly show the proper path. He will give a
chirp though, indicating a first alert. I have not been able to make this run
without busting Supreme, but the way I see it, keeping normal ghost intact is
good enough here.
[NOTE]: I had many
problems receiving proper alerts from this spider. I realized that if I saved
anywhere near him, I could not reload and trigger a first alert. Said
differently, if I did a quicksave in the tunnel and got caught, reloading
meant that I wouldn’t hear his chirps after that, he would go straight to
hunt mode (second alert). First after settling from hunt mode he could
continue with normal first alerts, but then he was so much more sensitive
that I had to reload anyway. I have no idea why this occurs, but I suspect
it’s an engine problem. If anyone else has similar or different experiences
with this creature, please let me know. Therefore, I needed a way to know
whether he gave a first alert or not. What I did was I had a quicksave in the
cave after coming down the ladder, then I had to make the entire set of moves
without reloading at all. This was
extremely time-consuming as I had to wait for the other spider to die every
time. I quickly realized though, that running down the sloped cave
approaching the water was absolutely impossible without the spider giving a
little chirp. The only reason I didn’t hear it after reloading is because of
the engine failure. So I conclude that Supreme is busted, without actually
having heard the alert. The following moves are therefore on normal ghost
premises only. In NewDark, the spider’s first
alerts work normally. It’s easy to confirm that the spider will bust Supreme
every time when heading down the sloped cave. The instant I stand up and make
my move, he chirps. Then only after heading around the corner to the west
does he settle. Supreme is definitely busted. Starting my run
accurately, the spider should be about halfway due southeast when I reach the
end of the cave. This is when the hardest move comes. I need to jump across
the water and hit the wall on the other side (left image above). Doing it
correctly should allow me to slide quietly into the water. The problem is
pressing jump before getting my
feet wet but without bumping my
head into the rocks above. A good place to land is if I turn around and the
corner with the two mushrooms is in the center of the screen or even to the
right. Much further left than that and the last move could be tough. The
spider should now have turned once more, being on his way northwest. When he
turns south again, I’m caught, it’s as simple as that. By that time I either
need to be outside his field of vision, or somehow find darkness. The best
way of moving knee-deep in water is crouching while tapping the run-key; this
is both fast and quiet. I turn west (right), do a couple of taps along the
wall and leap into the opposite wall across the gap, again sliding into the
water silently (right image above). The dark patch here leaves me completely
safe. The next part can also be a little tricky. I need to slide into the
deep water without being spotted. Looking closely, the crack forms a V-shape
in the ground. From the bottom of the V along the southwest side is a dark
patch that could serve as my ticket out of here. Watching the spider
carefully, as he disappears behind the rock wall to the left I quickly inch
my way into the water. Too much speed will create a splash, but I have to do
the whole move by the time he comes back around the corner. It’s not a
lengthy process, but requires good timing and accuracy. Finally into the
water I follow the dark part southwest and then straight south until I’m out
of the spider’s sight. I still have to be a little careful swimming, as the
splashes can be heard around corners. [UPDATE Sep 9th, 2018: Should the spider be turning right
consistently, it’s actually a lot easier to get by with Ghost intact. You can
then run down the cave on the left side and sneak around the spider’s back as
he turns right to head back up the cave. At this time, you can crouch and
strafe-sneak around the corner by the two mushrooms and reach the shade
before the spider gets back to the bottom of his patrol. He will then turn
right and stare straight at that corner, but if you’re hidden, you’re safe. I
have never encountered the spider turning right when ghosting, but the method
is shown in Travis Whitsitt’s video here.]
Done with the spider, I
can finally continue my mission. I swim south and come to an underwater
grotto on the southeast wall. To the north around
the bend is a water arrow on the
underground sea floor. There are also three weird bricks in the ceiling that
will drop if I get too close (left image above). I guess they can be
considered traps but are no problem avoiding. I enter the grotto due
southeast. There’s another water arrow on the ground just inside. The grotto turns
westwards and emerges in a softer dirt cave. I hear craymen! Better stop and
navigate. Lurking out I immediately spot one guarding a water hole to the
southeast. No point in going that way. I disappear southwest instead. There’s
another waterhole up ahead but also a path going southeast. I try the latter
and walk to the end. Peeking around the corner I see the crayman from before
to my left, to the right a third waterhole and a patrolling crayman in the
distance. This looks too tough so I turn around. I hear yet another crayman
rounding the bend to the northwest. He patrols by the west waterhole,
disappearing down a path to the south. I sneak in after him as it’s the only
route I haven’t taken. Wow there’s a fourth stationary crayman down the end
of this path, and I can see rocky caves beyond him, that’s probably where I
wanna go. The waterholes are dead ends. Ok so the patrolling guy
has a circular counterclockwise pattern with a total time of about 40
seconds. I see a possibility in following him down the darkest cave and
sneaking in behind the stationary
crayman. There’s a mushroom right at his feet so it won’t be easy. He has two
facing angles, north and northeast. His turning seems to be random. However,
it might be infrequent enough for me to pass by undetected. Follow the image
above to the right for my coming moves. I can creep-crouch to the end of
arrow 1 without being spotted. Before starting move 2 however, the crayman
needs to turn northeast, and he needs to stay in that position until I’m done
with move 4. This is out of anyone’s control, and if he turns north, I simply
have to reload. Let’s assume that he faces northeast and I have to finish my
moves in say 25-30 seconds. I cannot continue to creep-crouch in the
direction of arrow 1, because the mushroom lights up the entire cave and the
crayman is angled too far north. He gives a first alert as soon as I pass the
bottom of the small V-shaped fissure. So I have to get up the steep dark hill
at arrow 2. There is a small ledge by the ground that makes me unable to
crouch up it. I actually have to run-strafe up the first part. This might
sound like a move destined to fail, but in fact it works. The hill is just
dark enough not to be too revealing, and steep enough so that I don’t get too
much speed. Between 2 and 3 I crouch-walk (not creep) until getting over the
tip, then I have to tap the walk-key to prevent sliding down the next hill.
This is the point when the crayman usually turns north and catches me. If he
doesn’t, all that’s left is to creep-crouch along arrow 4 in behind his back.
Path 5’s only challenge is to avoid getting caught by the patrolling crayman
probably on his way down the north cave by now. The rocky hallway has a dark
spot up the sloped wall to the east. My goodness Supreme Ghosting is fun!! Sorry if I get a bit
carried away. The areas where you really fear a bust, then after planning,
sneaking and lots of reloading you finally make it, are the ones most
rewarding. There’s nothing quite like it I’ll tell you. J These caves are much
easier if playing for normal Ghost, but the path described above is the only
Supreme way in, at least to my knowledge. This next cave is a cakewalk
in comparison. The only crayman has a short patrol in and out a dark cave to
the east. The final waterhole is my way out. There
lies a pile of 4 moss arrows on
the bank beside it. To make sure my dive won’t be heard, I wait until
the crayman is at the end of the cave before plunging in. Submerged, I take
the first left and surface in a hidden grotto, where a grim sight awaits me.
Here lies a long since perished member of an expedition (left image below).
His diary tells of the haunting fear closing in on him. His breath potion
is here for my taking. I take the other pool out of here and make a
left in the tunnel. I follow the water until I come to a horizontal split in
the mountain.
--- Underneath the Opera
House --- I take the upper way for
now to get some air. No wonder the expedition lost some members here, these caverns
are rough! I dive in again to check out the lowest cave first. After some
swimming, I end up in what seems to be a dugout pool. Even though I’m under
water I can still hear the clicking of a crayman nearby. I’m running out of
air quickly so I need a place to emerge unseen. I swim around to the west and
slowly surface in the northern corner (left image). Close call! The crayman
seems unconcerned. Hmm...there doesn’t seem to be any good place to mantle
up, but do I really need to? Turning north I notice a silver nugget (50) on the ledge, and it’s within reach from the
water (right image above). Nice! My situation looks grim in terms of getting
up, so I duck under and head back the way I came, trying the upper cave.
Another flooded grotto so I tread carefully not to alert the crayman nearby.
I peek out the doorway and see him to my right. He faces two directions,
northwest and northeast, with random turning (think I’ve seen his brothers
somewhere J). I need to use one of
the two staircases, but there’s a torch on the top of either one. If he stays
northeast for a while, I might be able to sneak up these stairs right here.
Naah, he catches me before I leave his sight, even if he is positioned
northeast. Then I guess it’s the other staircase. The area between the stairs
is fairly dark and easy to pass undetected. I’m behind his back now, staring
up the stairs. I sneak in beside him and wait for him to turn northwest. When
he does, I make a run for it. I sprint up the first 5-6 steps, but then have
to creep-crouch the rest. I would say around 9 out of 10 times he turns back
before I reach the top. That crucial 10th time, however, I’m ready. The torch
on the wall is blocked by a very convenient stalactite. This creates a blind
spot where I am totally hidden (left image below). Now all I have to do is
wait for him to turn northwest once again and creep-crouch into safety. After
about 4 or 5 takes I manage to lurk my way out of his sight. NewDark shifts this crayman’s position away from the
staircase, enough for Garrett not to fit between it and the wall. The only
way to get past him going east is by nudging, not allowed in Supreme and only
allowed as a last resort for regular Ghost. To avoid this problem, you have
to head up the western staircase. The first six steps are dark enough to
avoid any alerts. From the sixth step, make a gentle leap and mantle up the
southern ledge. This normally won’t spawn even a first alert. From here, you
have to make another leap towards the top of the stairs, in order not to
spring any of the arrow traps in this room. With a bit of luck, you’ll land
on one of the soft edges and not make any noise. This entire room is
trapped so I leave quickly, but not before grabbing the 2 broadhead arrows from Colliard’s body. Obviously, the
talisman is stolen, so I need to find another way to obtain it. I follow the
one-way route, through some more water tunnels.
Finally, I come to what
appears to be dry land. Hmm...singing, what is this? There’s a bum here that
clearly has been alone too long (right image above). He says, or sings
rather, that Lady Valerius of the Opera House found the talisman and has it
in her chamber. He also gives me a papyrus
(a map of the Opera House) and a key
that he claims will be useful. The papyrus I guess is an unnecessary pick-up,
and the mission can be completed without it, so I leave it be for Supreme. While he has his long talk I sneak inside the hut and grab
his cheese. I am evil I know! Ok
at least I have a plan... I head up the rope. On top
of Raoul’s “house” are 2 more moss arrows. New objectives:
The amount of loot has ten folded (now 2,000 including the cash box in the
ticket office), I need to fetch the opera director’s silver flute, and escape
to the streets. Yessiree! I continue and soon reach the sewers. At the
t-junction I remember what Raoul told me and head left. A scroll here
reveals Valerius’ cruel attitude towards her workers. I end up in the
Opera House basement. Let’s get started... I emerge in a room full of
stage props, most probably for the operas upstairs. Creepy ambient sounds, but
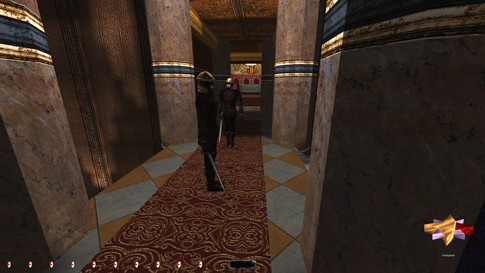
no guards around so far. I head into the main hallway to the south. A
swordsman is walking away in the distance to the east. I quickly run up behind him to check his patrol. He
eventually turns right into what seems to be a practice room for the opera performers.
There are four of them inside rehearsing right now. A stationary swordsman is
positioned in a smaller room further to the east; I can barely see him from
here. I stop against the wall opposite the doorway and let the guard continue
his patrol. I can spot several chests inside the practice room. Goodies! But
the area between the doorway and where I’m standing is well-lit. The
stationary guard has three angles: north, west and southwest. Only in the
former position will I be able to sneak over undetected. However, he switches
position often, so it’s gonna be tight. Then there is the singer just inside
the doorway, who turns south and east regularly. The doorframe might block at
least part of her view though. From where I’m sneaking, the swordsman is very
touchy. He triggers to some speeds but not to others. For instance, normal
crouch-walking (cw) sets him off with a grumble, but creep-crouching (cc)
does not. The latter is, however, so slow that by the time I reach the
doorway he has turned my way again. But there is a speed in between the two:
creep-crouch-strafing (ccs). I always thought this was the same as
crouch-walking but I was mistaken. When faced north, the swordsman has never
alerted to me ccs-ing, and it is just quick enough for me to land in the
doorway’s darkness before being spotted (left image below). I can now inspect
the two chests here and find a cozy cheese
in the western one. Aaah, that lump of dairy was well worth the wait (try to
say that three times fast!). This huge room has two more chests at the other
side and fortunately lots of shadows to hide in. One of these chests holds a healing potion. I dodge the
patrolling swordsman on my way back and sneak out the same way I came. The
other rooms to the northeast contain more props and ornaments, but nothing of
interest. I head west and try the main hallway in the opposite direction.
Passing the corner I spot another swordsman walking in this direction.
Luckily he turns left and disappears. I try the door to my right. It’s locked
but pickable. Also, the silver key from the archer in the tower unlocks it?!
That’s very strange... Is that a mistake from the mission designers or does
the archer have a part-time job at the Opera House? Anyway, this seems to be
the armory. I find a gas mine, 3 flash bombs and 2 fire arrows on the various shelves.
I hurry back out and lock the door.
This area is
full of patrols so I sprint back east until I find an opening to my right. I make a south into the
pool chambers. Hidden in the pool water are 2 water arrows. I continue
straight south and enter the next main hallway (on my way is one of several
empty chests in this mission). I hear footsteps but see no-one. I make a
right (west) and turn at the corner. A swordsman appears from the right,
turns west, then strolls on whistling his merry tune. As he turns right
again, another swordsman comes out beside him, does a 180, and disappears
back through the same doorway. The coast is clear! Quickly I enter the
green-framed doorway to the left. In the first hallway ramps lead up either
side; I’ll check those out in a bit. I go straight, into what seems to be the
wine cellar. There are a total of five entrances. I start at the leftmost
one. Well, it’s wine storage all right, but they seem to have drunk it all.
Wait, there’s one bottle of fine wine
(100) left for me, in the middle hole on the lower rack. The next three
doorways connect to the same wine “cave”. In the southeast corner is another bottle of fine wine (150). The
westernmost doorway leads to another racked wine cellar, with a third bottle of fine wine (200) in the
middle hole on the top rack. The last bottle is up the western ramp I saw
earlier. There is a servant patrolling counterclockwise that very route, so I
wait for him to pass, then sneak upstairs behind him. He enters a little
alcove on the left for a couple of seconds. The bottle of fine wine (250) is hidden behind a crate in that very
alcove. That’s all the loot from the basement so I leave the wine cellar
entirely. Back out in the main hallway I evade the swordsmen and make a
right, back to where I emerged from the communal pool. Straight across the
hall from the pool is the dining area with a single servant roaming about. He
has a very predictable patrol route and is easily dodged. I wait in the
shadows and follow him into the kitchen. On the
counter: a deer leg, carrots, a loaf and a cucumber.
No supper tonight ya’ll! I quickly crawl into the fireplace and head
up the hidden ladder. This is one of Raoul’s hidden
areas marked with a red X on the map. From this secret room I can enter
either side of the opera stage. As I drop down on the east side, two
performers start to complain about Cribs’ latest play (right image above). I
can watch them from a small peephole in the wall. There is also a secret
entrance further down the wall. One of the tables in here has tiara (375), and I can easily grab it
from the shadows. A healing potion sits on the same table. I can sneak out the
doorway undetected, but I can’t get back in, so I’ll wait with that area.
Back through the secret door and to the other side of the fireplace. This
empty parlor exits into a tiled hallway. I hear loud footsteps not far away.
Soon a swordsman comes by from the left. I pick his
red key [2] from the doorway. He
turns at the end of the hall and strolls back westward. I follow him around
the corner and wait in the nearest patch of shadow. Hmm...a servant prepares
a meal to the south. Suddenly another servant comes by from behind me. He
enters the kitchen and heads down the stairs to the basement. This guy has a
very long and intricate patrol route, spanning from the basement all the way
to the third floor. He cycles between fetching wine from the cellar and
refilling various cups around the Opera House. You probably won’t bump into
him the same places I do; his pattern is marked with a dashed blue line on
the map. Anyway, as he disappears downstairs I grab the two golden goblets (425) and the two golden plates (525), along with the loaf and the cheese by the cook. I watch out for the patrolling
swordsman and round the corner in the hallway going east. This time I
continue to the end and enter the opening to the left leading to the large
opera stage.
I should remind
everyone playing Supreme that many of the doors in this mission need a key to
open but are also pickable. This means that if you pick open one you also
need to get the key and relock it, due to rule #7. However, if this
necessitates an avoidable pick-up, it goes against rule #13 saying: “Keep a
clean inventory: don’t pick up what you don’t need...” Since pickpocketed
keys cannot be put back other than dropping it along someone’s route, I would
say this constitutes a bust if it is used just to take an easier path through
a mission. However, if the only way to i.e. get a piece of loot is to open a
door that requires a key to re-lock, it is ok; then it’s no longer
unnecessary per se. This
interpretation for me only concerns lifted keys, as other items can be put
back to their exact location and therefore wouldn’t leave a trace (although
these walkthroughs will touch the least amount of items possible, even if
they can be put back, the obvious
exception being Norwegian Thief marked in blue which on the contrary intends
to pick up everything J). With this in
mind, I hope you understand why I steer clear of the doors accessing the east
wing of floors 1 and 2. It is possible to finish the mission (and even get
the all the loot in these areas) without ever using them, hence avoiding
picking up any of the four red keys in the mission (that are all attached to
belts). I know I am strict, and I don’t blame anyone who chooses to see the
rules differently. This for me makes Supreme a pinch more challenging, in
addition to letting me keep a clean conscience for following the rules
accurately (I’m like that, don’t ask me why). The point is to enjoy the
missions and the mode you’re playing. This is the audience
section of the opera stage. I assume the large open area in front of the
stage will be packed with guests later on. There are a total of 9 boxes
overlooking the stage. In the north quarter, a lady is stationed in the
second floor booth closest to the stage, while there’s a gentleman in the
third floor booth a bit further away. A guest couple is talking in the larger
middle stand, while the last guest watches from the lower booth to the south,
seen in the image above to the right. Even though there’s a huge chandelier
in the ceiling, the room isn’t that well-lit. I can easily cc along the walls
and the stage without getting spotted, although any fast movements will cause
growling among the guests. The red arrows in the screen capture illustrate
the easiest way to move around. I can get onto the stage itself in between
any of the 5 spotlights directed at the carped. However, I can only get
backstage around the south corner. Looking closely, the carpet to the north
is hanging further out than on the south side. This is enough to prevent
sneaking past the spotlight here. The southernmost spotlight lights me up
some, but well within acceptable limits. I won’t go backstage just yet, but
I’m presenting the most convenient path now if such is intended. Instead I
sneak along the stage to the north and cc out the opening here. I stand in
the darkness and absorb more information from my surroundings. There’s
another hallway here similar to the one on the south side. And if I’m not
mistaken, a guard will stroll by soon enough. Yup, here he comes, and he has another red key [3] for me. I follow him west, past a locked closet,
around the bend north and then west again.
The door to the
north is the barracks, containing some nice goodies for those interested.
However, the hallway is bright, there are two guards staring straight at the
door from the inside, and two torches keep the barracks lit. Naturally, it’s
impossible to get inside without busting Supreme, but I might be able to keep
Ghost intact. I can open the door without alerting either the swordsman or
the archer inside. I can even spot the two torches alert-free. With a couple
of well-aimed shots I douse them to check the reactions. Both guards grumbled
intensely, but I’m surprised they didn’t give more than first alerts. The
entire room is totally black now, so all I need to figure out is how to get
inside. I might try dousing just one torch though. Most of the items inside
are to the left, so I’ll extinguish that one. The image to the left above
shows where I stood to make the exact shot. Notice I am just outside the
swordsman’s view. It also shows the placement of the inevitable moss arrow.
It has to be this close to the doorway to cover the entire tiled area beyond
the door. The image also shows the annoying disappearing-door bug. Thus, a
total of one water arrow and one moss arrow are necessary for this set of
moves. Next up I have to enter the room without getting seen, which turns out
to be more than a trifle. I have to hop from the carpet onto the mossed area,
open the door, run inside and crouch in the darkened doorway. All this while
avoiding the patrolling swordsman, dealing with the door bug (closing it
before it completely opens) and hoping for no more than first alerts from the
guards inside. It sounds impossible, but believe me, I have repeated it and then
some. There seems to be at least three factors deciding an AI’s response
level based on vision only: a) brightness (light gem), b) distance from AI,
and c) length of time visible. The latter factor can sometimes be used to
pass areas that might seem hopeless, as long as it’s done quickly. Well
inside, I close the door fully and start creep-crouching. That is the only
way of moving about in here without causing further remarks. I sneak left,
but have to leap onto the chair to traverse any further unnoticed (right
image above). From there onto the table, and drop gently to the floor just
west of the guard. On my way I grab the 2
gas arrows and the healing potion
from the table. I sneak past the next chair and snatch the 6 broadhead arrows and the speed potion from the north table
(left image below). Back I use the same method except getting onto the table
from the south is tricky. I find pressing jump and run simultaneously gives
me a small forward skip onto the table edge. From here on to the doorway it’s
easy. Back out I have to rely on the same skills as going in. A little luck,
swift key-strokes and determination leaves me be with another set of grumbles
from the guards. One would think they would stop blaming the rats by now and
finally get the picture.
The door to the south is
unlocked, so I slip inside. The room holds a jar (575) and 3 golden
plates (725). As the guard outside walks east, I enter the hallway and
travel further west. There are two doors at the end; I enter the one to the
front. It’s also unlocked. I quickly creep-crouch inside before the swordsman
comes around again. The map says this is the ticket office. There’s a clerk
selling tickets in the booth to the left; luckily he has his back turned.
There are a total of four booths, but the others are empty for now. The
middle two is exposed to a patrolling swordsman through a doorway to the
south. Gotta be careful. I can spot two safes in the back counter. The
closest holds a stack of gold coins (750)
in a cash-box. Is that all?! Yeah it seems so, as the other safe is empty.
What a downer! The door on the west wall leads straight to a stationary
archer protecting the basement staircase. I’ll leave him be. The floor here
is tiled, and I have to leave through one of the booths furthest to the west.
I can either do a walk-jump or a gentle run-jump to climb over the booth
ledge. Inching down the other side I enter the next tiled hallway. The
opposite doorway is black, but the following room is well-lit from the
powerful chandelier. The swordsman has a rather long walk going north-south.
There are three tiled rooms in succession going south. I pass the first one
easily. In the distance I spot a girl facing north; I might wanna watch out
for her too. The next room is more difficult, with few dark corners to hide.
The space behind the statue to my right serves as the only hiding spot for
now. I snag the tiara (875) from
the statue’s head while waiting (right image above). I notice a passage going
directly east from here as well. As the guard passes from right to left, I
move out from behind the statue. From this side I
grab the 2 water arrows from the fountain. Those playing for Supreme
can skip the entire next paragraph, and instead get ready to move upstairs. For Ghost I sneak south.
This room has fairly dark sides, at least enough to avoid the patroller. I
wait in the shadows by the opposite doorway for him to come back and turn
around. I then cc out but cannot prevent a comment from the girl across the
hall. My light gem only flickers dark yellow, but that is enough to set her
off. An option is to come in from the east, but that would also spawn a
comment. A third alternative involves using a secret passage from the third
floor, but that entails property damage or banner transmigration, a last
resort at best. No, I will have to deal with the situation from here, in
order to have a shot at Perfect Thief. She protects a single piece of loot in
the room behind. A guard in the basement refers to her as the cloak-check
girl. The problem is all the lamps combined with loud flooring. There is,
however, a very convenient dark area on the carpet right in front of her. It
stretches a few feet to the left. The green area in the image below tries to
illustrate where Garrett is pretty safe from comments, if creep-crouching.
The easiest way to get past the girl is to follow arrow 1, and simply jump
through the counter window. Remember to not release the run-key until hitting
the wall behind her. Most of the times she will respond with a “who’s there?”
but Ghosting allows that. Once there, I turn around to check the patrolling
swordsman. Making sure he walks away I cc through the door. I bring along a purse (975) from one of the right
shelves.
That’s all worth looking for,
so I prepare for the trip back past the lady. Opening the door I yet again
have to look out for the guard walking the rooms to the north. Unfortunately,
I cannot take the same way back to the carpet as I did in. The lamp on the
south wall is too bright on my back I suppose. No, I have to use the door and
come in from the west instead. Out in the hallway I can just sneak onto the
southwest corner of the carpet and still be outside the view of the girl.
However, jumping from there gives me too little speed to fool her. Initially,
I thought I could do the entire set of moves without using any equipment, but
I had to put up with mossing the tiles at the end of the hall to get more
speed jumping. The jump has to be quite accurate landing in the darkest spot on
the carpet (see image above). It’s very important to release the run-key when
entering the girl’s view, to more effectively come to a full stop in a
crouching position. The image should show all the moves and areas in full,
also proving I took the purse without alarming her. She gives another comment
when I sneak back through the north doorway. I time the swordsman to move
further north, and swing east towards the doorway I noticed earlier. Through this set of
doorways I reach staircases leading to the second floor. A swordsman covers
the ground between the floors very thoroughly, although his patrol takes up
to 80 seconds. My best bet as it happens is taking the south stairway. The
stairs themselves are marbled, but the edge along either wall is wood and
quite dark (with alternating floor illumination). The swordsman patrols
counterclockwise and will soon pass me from behind. He turns left and
disappears down a different set of stairs further east. This area is tricky
and needs planning. I wish to leave through the south doorway, but there are
two stationary guards on the third floor covering that area. There is also a
patrolling swordsman in the great halls to the west that could catch me. Then
we have the deal with the servant occasionally roaming about. If you study my
drawn maps, you can get an idea of the various patrols; they’re all signified
by colored dashed lines. I can quite easily sneak across the marble to the
south wall. From here I approach the doorway to the east by inching along the
wall (left image below). Soon I can spot the two guards upstairs. They alert
with a comment if I move too fast. I creep-crouch around the doorframe, into
the hall, and make a left. Phew! This entire area is safe from any patrols. I
take the first right and follow this hall around the bend. The only opening
on the right reveals a circular room with a central pillar. Studying the
pillar more closely, I find a hidden passage on the lower west side. I duck
under and climb the winding stairs. The hatch at the top is locked and
unpickable, but will unlock with Raoul’s key. I guess that crazy guy was
telling the truth after all! In the set of shelves is a blue key inside a small box. It unlocks
the magical chest in here containing the Talisman
of Earth. I re-lock the chest and drop the key back onto the shelf for
Supreme. On Valerius’ desk is another box with a valuable ring (1075), plus a scroll from Cribs explaining the
location of his silver flute. The yellow key
conveniently opens Cribs’ safe, so I bring it along. The scroll I replace.
That’s it for now. The double-doors lead straight to Lady V.’s personal
guards, so I head back down the secret passage and lock the hatch on my way
out. Furthermore, I backtrack to the doorway with the two guards stationed
upstairs. The patrolling swordsman needs to pass, then I can move. This time
I turn right and inch along the south and east wall, finally sliding
downstairs.
The reason I didn’t enter
the east wing before is that I needed the yellow key to steal the silver
flute. I didn’t want to go back and forth excessively. Now it’s the right
time however. I turn right at the end of the stairs and enter the stage area
once again. I follow the south wall and angle towards the stage when closing
in. The lady right above me to the south grumbles quite easily, and that can
only be prevented by creep-crouching. The image from before shows where I
mantle onto the stage itself, and how I sneak between the spotlight and the
carpet to get backstage. The east wing area is symmetrical, with two floors
on the south and on the north side. The middle room has a total of 4 AIs.
They’re not too hard to avoid, but worthy a notice nonetheless. The
patrolling archer upstairs is the one that catches me most often. His
clunking boots eventually become background noise, so I tend to forget about
him, to my own demise. Anyways, when the coast is clear, I approach the
southern doorway from the west. There is one item on
the first floor south side just for purists. It’s a scroll from Lord Bafford to Carmella. He wants to meet her on the
promenade later and promises her a precious gift. It’s located in the small,
dark room next to the stairs (the scroll, not the gift J). I assume avoidance of the
guards in the middle section from now on. To get to the second floor
I have to use the ladder leading up to the metal walkway. From the ladder I
can reach the ledge to the south directly. A jump and a mantle will do the
trick. The first two doors in this hallway are both pickable and lead to the
same storeroom. Inside are a rug (1225)
and two golden candlesticks (1325).
Everything else in here is junk so I leave quickly. Another
purist item is located through the door furthest down the hall. The swordsman
in here has a key on his belt; a nice addition to the pickpocket count. He
faces west and north, turning quite frequently. He is, however, unable to see
me facing west, if I creep along the eastern wall. To gain a small time
advantage, I creep to the dark portion of the doorway first. The next time he
turns west, I move. As with the situation in the basement,
creep-crouch-strafing is the most efficient. I get busted a few times before
sliding successfully in behind his back (left image below). From here, I
pilfer his red key [4]. I use the
same method back, stopping in the doorway (right image below). I
descend the ladder back by the metal walkway and traverse the room north.
Making sure the archer has
left I enter the first floor hall. I also grab his key [5] as he passes. The two
unlocked doors in here lead to another storeroom with more loot, two vases (1525) to be exact. I grab
them and leave. I return to the entry and ascend the next ladder in front of
me. Before reaching the top I turn around and hop across the gap to the ledge
here. This floor has blue metal door not responding to any key. I pick it and
enter Cribs’ study. Two singers immediately start quarreling in the
neighboring room (from the conversation it seems to be Cribs and the leading
lady for his new play). They leave me enough time to do what I need. First, I lean forward and grab the scroll from the desk. It’s a letter from Valerius revealing their
plans to uncover the power of the talisman. On the west wall is a
safe, and it unlocks with the yellow key from Lady V.’s study. Inside is the
precious flute (1675). I quickly
re-lock the safe and sneak out, before the woman starts patrolling. I
backtrack to the backstage area with the harp. For some reason, I can’t for
the life of me sneak by the same spotlight as I did coming in. Instead, I
have to make a special leap past the light on the far north side. Since the
carpet sticks further out over there, I can’t even enter the lighted area. I
have to hop onto the spotlight itself by the stage wall, without making noise
on the metal. Luckily, the area outside the spot’s light is pitch black; I
can even stand up straight and do a running jump. The landing has to be
perfect though. Too far east and I alert the whole audience with a loud
clunk. Too far west and I fall off the stage entirely. This “sweet spot” is
right on the top of the spotlight, and from there I can inch forward sliding
off on the northwest side. I can furthermore glide down the stage onto the
floor. From here, I sneak back to the door on the west wall and up the stairs
to the left. Before reaching the top of
the stairs, I turn around and look up. By the foot of the statue in the
alcove above I see a cleverly hidden piece of loot. Fortunately, rope arrows
can attach to the walls here, so I fling one in and climb up. I can just
reach and grab the golden nugget
(1775) from here. I climb back down and retrieve my arrow before the
swordsman returns (left image below). After that ordeal I continue upstairs
and approach the same doorway as before. At this point, the roaming servant
comes down from the top floor and enters this very doorway. He soon returns
and heads downstairs towards the stage area, the same time the swordsman
comes around for his next trip. I carefully cross the doorway light and draw
closer to the west doorway. Another swordsman regularly patrols here, and my
best option is to wait for him to come. He turns around in the doorway and
resumes his patrol in the opposite direction. That’s when I follow. I filch the speed
potion [6] from his belt when I get the chance. The three
consecutive rooms here all have a huge carpet in the middle for easy
traversing. That’s a particularly good thing here since I need to stay on the
guard’s butt until halfway through the second room. There are a couple of
guests stationed in the room to the far north, but they cannot see me as long
as I stay to the west. He continues north but I turn left and start sneaking,
fast! Frobbing the star formation thing on the wall here will open a hidden
door on the wall behind me (another one of Raoul’s secrets). I lean forward,
push it and hurry east. Halfway onto the carpet the woman in the next room
will spot me, so I switch to creep-crouching. I barely reach the door before
the guard returns. I hastily slip inside and close it. Aha, so this is
Raoul’s hidden chamber (right image below). He’s a sneak just like me. I grab
the two golden candlesticks (1875)
from the table and the rug (2025)
from the floor. Flipping through his journal I read that he is a man without
revenge. Not like me after all... I have to leave the same way and that
includes timing the guard outside. Fortunately, I don’t have to frob the
button in the star this time as the door locks itself. I cc to the south
doorway and sneak around the corner when I am outside the woman’s view. Soon,
the guard comes by, turns and heads north again.
I enter the foyer like
before and leave through the south doorway. In the hall I turn right and
enter the door on the left. This is a carpeted area with three connected
sitting rooms. The middle one has a table with two golden goblets (2075). I leave through the same door. I
continue east and make a right back to the rotunda. I enter the secret
passage and head upstairs to replace the yellow key for Supreme. The rotunda
moreover contains three goblets (2120)
and three golden plates (2270).
Leaving I take a left, round the bend and make a right approaching the
doorway ahead. I wait in the shadows for an archer to come by and follow him
down the carpet. The openings along this hallway are entrances to the boxes
overlooking the opera stage. The first one takes me to a lady holding a pair
of binoculars (2320) [7]. I can
easily sneak up beside her and grab them. The other stall is empty. I wait
for the archer to come around again and follow him to the next, larger box. A
couple then starts a conversation about Cribs and Valerius’ latest play (left
image below). From the shadows I lean forward and grab the man’s purse (2420) [8]. Piece of cake! I
reenter the hallway and continue north. The last side-hall takes me to two
more boxes. The lady in the northernmost one has another pair of binoculars (2470) [9] on her belt. I
return to the archer’s patrol ground and exit to the north. The last lady I
picked can spot me unless I creep-crouch out the last opening. The next hallway is long,
very long. A single swordsman covers the entire stretch, and at the moment he
is nowhere to be seen. As I sneak westwards, he appears from around the bend
at the end of the hall. There is an opening to the north with a dark patch
where I reside for the time being. The swordsman comes by, turns at the end,
and starts walking back. I follow him to the doorway on the left and enter
the foyer like before, now from the opposite side. On the right is a huge
vase. I inch between that and the wall, approaching the parlor with the two
stationary guests I saw earlier. The woman has a piece of loot that I very
much want, but it could be tricky. The chandelier seems very bright, almost
too bright if you ask me. As seen in the picture below and to the right, the
best approach is coming from the northeast. Sneaking from the southeast is
possible (perpendicular to their angle), but I cannot get close enough to
snatch the glasses. To the northeast there is shadow, but that stupid chair
blocks part of my way along the wall. Inching around it spawns a comment from
the gentleman. Argh!! Rope arrows in the ceiling could help, but the
chandelier is too intense. Nope, I must accept a first alert. Naturally, this
implies skipping this loot for Supreme. For Ghost I can get close enough to snag
the binoculars (2520) [10] from
the shadows directly to the north of the lady. I backtrack to the main
hallway in the north.
The last piece of loot on
this floor lies due west. I follow the patrolling swordsman until the turn
and let him slip by me heading back (the living rooms to the north are
empty). The next area is the promenade Lord Bafford spoke so preciously
about, and rest assured, he has brought his favorite singer Carmella along
for the ride. They are enjoying a nice moonlit night. Bafford is quite wary,
and Carmella seems nervous for the occasion. I better tread carefully. I need
to reach his belt, but rounding the northeast corner is a no-no. The
staircase hinders me of approaching from the southwest, but what about
something in between. I can hop onto the northern part of the east railing
without any comments from either. Now, I have to reach the north railing
silently. There is a nifty way of doing it. Most players think mantling
involves holding the jump-key from a standing position. However, one can
press jump while in mid-air and still mantle normally. That’s the solution to
my problem. Study the arrows in the image to the left below. I run from the
east ledge into mid-air, towards the north railing. If I hold the jump-key
after letting go of the edge, I will mantle onto the railing provided I reach
it high enough. From here, Bafford’s necklace
(2720) [11] is mine! Sorry Carmella. The same method works the other way as
well. Inching down from the ledge I return to the east hallway. The swordsman
soon comes around once more, and I tag along. I follow him past the right
doorway and enter the next hall to the left. Around the corner there’s a
single pickable door to the left. The library. I take the stairs to the third
floor. Cribs’ opera lies on a
table here in all its glory. What a piece of filth! I exit through the only
door. I strongly advise everyone to study the map of the third floor
thoroughly before barking on any trip around these halls. One swordsman
travels all over the floor. Another one traverses between the two spectator
wings in the east. However, there are two stationary guards in the middle,
protecting a set of stairs that pose the biggest threat. There are three
pieces of loot and one item (pickpocket) left in the mission. They are
possible, but require immense sneaking. From the library door I peek into the
hallway. For now, nobody is to be seen, so I go south and enter the carpeted
area to the left. The cozy sitting area to my immediate left has a jar (2770) on one of the tables. In
the spectator stall directly across is a male guest viewer. From the shadow
in the corner I snag his purse (2870)
[12]. I leave, reenter the main hallway and continue south. Up ahead there is
a large patch of shadow, but beyond lies trouble. Two consecutive swordsmen
patrol by. One of them disappears at the corner behind me (by the library),
while the other enters the north guest wing. He comes back after a little
while. In the opening to the west are the two stationary swordsmen I talked
about earlier. They turn frequently and could end up staring in my direction.
I need to creep-crouch following the guard further south; with some luck the
men to the west won’t spot me. They don’t this time, so I enter the shadowed
area further south. The guard checks the south wing, comes back and heads
north again. In the meantime, I spot an archer patrolling the south hallway.
I enter the guest wing myself and take the stairs to the left. The man I
robbed before can actually spot me from here, so I make sure to tread softly
leaning for the binoculars (2920)
resting on the stall railing. I wait in the shadows outside the box for the
guard to return, only to follow him back out.
The archer to
the south holds the last pickpocket of the mission; in fact it’s the last
item completely. The hallway here is very bright and the archer doesn’t give
me much of an opportunity. He mainly patrols the south hallway, but enters
the north-south going hall very briefly. As seen in the right image above, he
walks a few feet in, but turns before reaching the carpet. At this moment, I
have to leap across the tiled gap and land on the red carpet. Before he walks
too far off I have to lean and grab his healing
potion [13]. I must not land farther west than the middle of the carpet,
as one of swordsmen guarding Valerius’ chamber to the southeast can spot me.
I have repeated this move 4 or 5 times, so it is well within sneak boundaries. [UPDATE September 26th, 2018: If
wanting to reach the third floor without picking the two library doors (which
cannot be relocked), you have to ascend via the second floor central stairs.
The two stationary guards at the top pivot quite frequently; one east-west
and the other north-southwest. This leaves the northeastern pillar slightly
less protected, thus making the best approach the eastern wall of the north
set of stairs. From here, you can safely monitor the rotating guards (left
image below). The obvious goal is the hallway to the east, despite more
patrollers vacating the eastern half of the third floor. Quicksave at the
uppermost portion of the pillar’s shadow, and creep-crouch-strafe around the
corner. With a bit of luck, neither patroller will turn around by the time
you reach shade (right image below). Exactly the same method must be used to
descend back to the second floor. This means only one lock has to be
picked to ghost this mission, or two if you want to maximize loot.]
The only task left is
reaching the streets. Since I have to replace Raoul’s key for Supreme, I make
my way down to the basement exactly the way I came up (yes that includes
using the fireplace passage from the first floor). From the sewers I use the
manhole to finish the mission. La-dee-da! STATISTICS: Time: 1:51:58 Loot: 2920 out of 2920
(Supreme: 2770) Pickpockets: 13 out of 13 Locks Picked: 4 Damage Dealt: 0 Damage
Taken: 0 Consumables: 1 Water Arrow
& 2 Moss Arrows Ghost: Success! Perfect Thief: Success! Supreme Thief: Failed! Perfect Supreme Thief:
Failed! Norwegian
Thief: Failed! Notes: -
The stationary spider at the end of the sloped cave slides downwards
because of idle turning. His drowning is outside my control and hence not a
bust. -
Had to accept a first alert from the patrolling spider at the end of
the sloped cave coming down. He sees me starting the run because of the
glowing mushroom, impossible to avoid. Supreme bust. -
Got three sets of first alerts (six total) from the guards
in the barracks going in to steal their stuff. One set from dousing the
torch, another one going in, and the last one leaving. These cannot be
prevented if wanting the potions and arrows inside. Norwegian busts. -
I had to skip the purse behind the hat-check girl on the first floor
for Supreme. This reduces the total loot amount by 100 gold for that mode.
For Ghost I got four first alerts and used one moss arrow to retrieve the
purse. -
I also had to skip the glasses on the lady in the second floor parlor
for Supreme, worth another 50 gold. The light along the wall was too intense
to avoid a comment from the man. |